
Zendesk Knowledge Base
Step-by-step guides for installing, configuring, and using ADL Connect — the bidirectional Salesforce ↔ Zendesk integration.
Introduction to ADL Connect
Salesforce to Zendesk Connector - (AppExchange)
ADL Connect – Salesforce – Zendesk Integration Overview
ADL Connect is a powerful, bidirectional integration tool that connects Salesforce with Zendesk to create a unified workflow across Support, Sales, and Customer Success teams. Available on the Salesforce AppExchange, this connector enables seamless synchronization of Zendesk tickets, comments, attachments, and status updates directly within Salesforce.
By consolidating cross-system activities, ADL Connect eliminates the need for manual updates, improves response times, and significantly reduces context switching between applications.
Through its intuitive configuration interface and secure authentication model, ADL Connect allows organizations to centralize customer support operations while maintaining data accuracy and consistency across both platforms.
Purpose
The primary objective of ADL Connect is to provide a frictionless bridge between Salesforce users and Zendesk users, ensuring that customer support requests, service operations, and account-related activities move efficiently through their lifecycle.
This integration is particularly beneficial for:
Salesforce Administrators
- Require a configurable, scalable, and secure integration to support internal teams.
Support Managers and Agents
- Need complete visibility of Zendesk tickets within Salesforce records.
Customer Success Teams
- Benefit from streamlined communication and centralized customer context across systems.
Sales and Operations Teams
- Can create, link, and track Zendesk tickets directly from Salesforce without switching tools.
ADL Connect ensures that both customer-facing teams and support teams operate with a single source of truth, ultimately improving collaboration and accelerating ticket resolution.
What This Article Covers
This introductory article provides a high-level understanding of ADL Connect and what users can expect from the integration. The following topics are covered:
1. Core Features of ADL Connect
An overview of the essential capabilities, including:
- Creating and updating Zendesk tickets directly from Salesforce
- Bidirectional synchronization of:
- Fields
- Comments
- Attachments
- Direct search and linking of existing Zendesk tickets
- Secure authentication using Zendesk API tokens
- Configurable field and object mapping to align Salesforce records with Zendesk ticket fields
These features ensure smooth operational workflows and reliable data synchronization across both systems.
2. Installation and Initial Setup
A brief overview of the setup process, including:
- Installing ADL Connect from the Salesforce AppExchange
- Authenticating Salesforce and Zendesk using secure API tokens
- Performing initial ticket and object mapping configuration
This establishes the foundation required to successfully activate and use the integration.
3. How Zendesk and Salesforce Data Sync Works
An explanation of the bidirectional synchronization model, covering:
- How outbound synchronization pushes Salesforce updates into Zendesk
- How inbound synchronization retrieves Zendesk updates into Salesforce
- The role of:
- Field mapping
- Record ID mapping
- Sync rules and conditions
- Handling of comments and attachments across both platforms
This section helps users understand the expected behavior of the connector once configured.
4. Key Benefits for Operational Teams
A summary of the practical advantages organizations gain by using ADL Connect:
- Reduced manual data entry and administrative overhead
- Improved visibility into customer support progress for Salesforce users
- Faster ticket resolution through centralized communication
- Enhanced collaboration between Sales, Support, and Customer Success teams
- Increased data consistency, traceability, and auditability
These benefits lead to stronger cross-functional alignment and improved customer service outcomes.
Installation and Connection Setup
To begin using ADL Connect, the first step is to install the package from the Salesforce AppExchange and complete the initial connection configuration. This setup establishes a secure communication channel between Salesforce and Zendesk, enabling all subsequent synchronization activities.
1. Install the ADL Connect Package
Navigate to the Salesforce AppExchange and locate the ADL Connect listing. Link
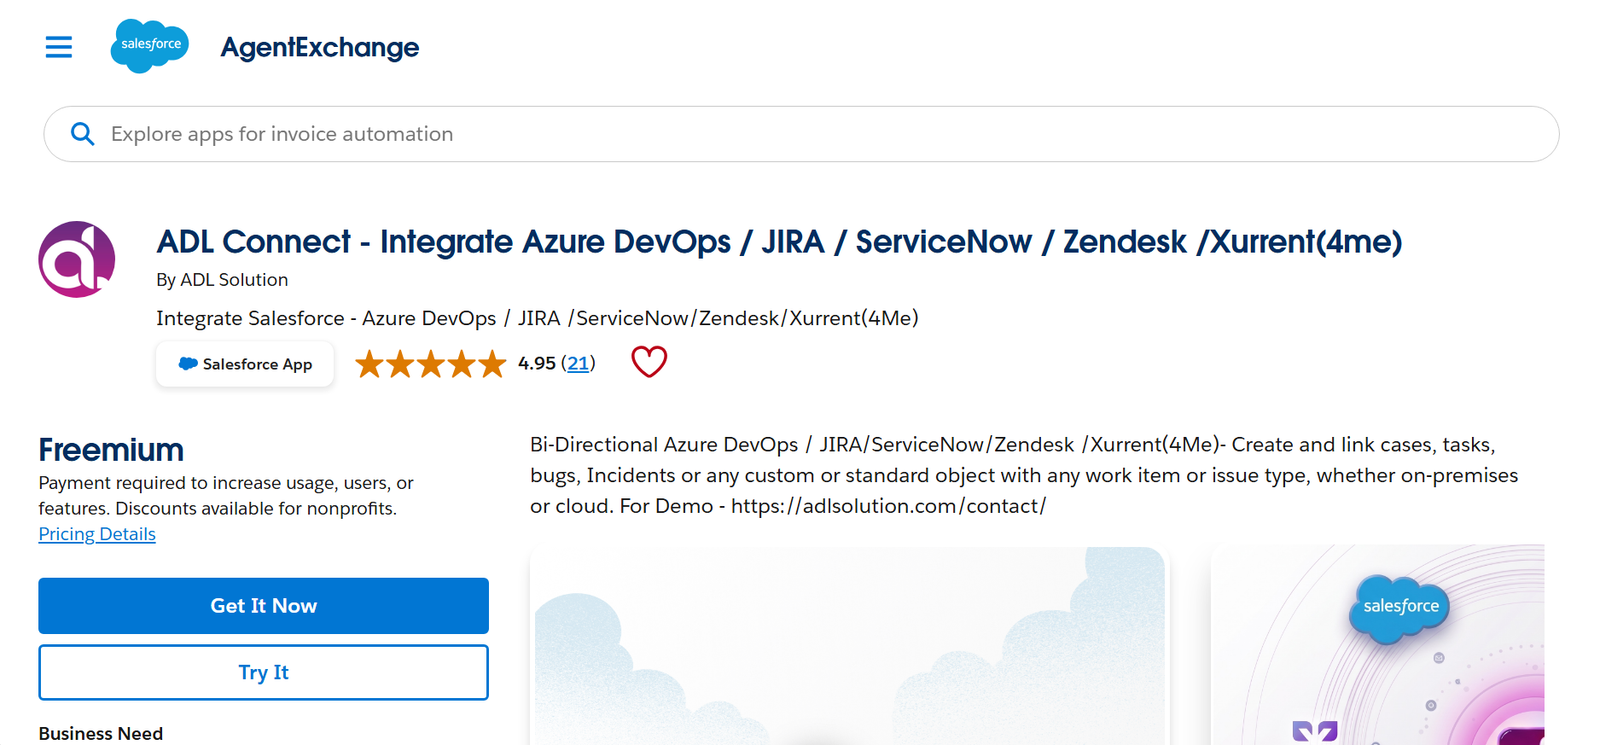
During installation, choose the target environment:
- Get It Now → Install in Production
- Try It → Install in Sandbox
Review and approve the required permissions requested by the package.
Select the installation scope:
- Install for Administrators only, or
- Install for All Users, based on organizational requirements.
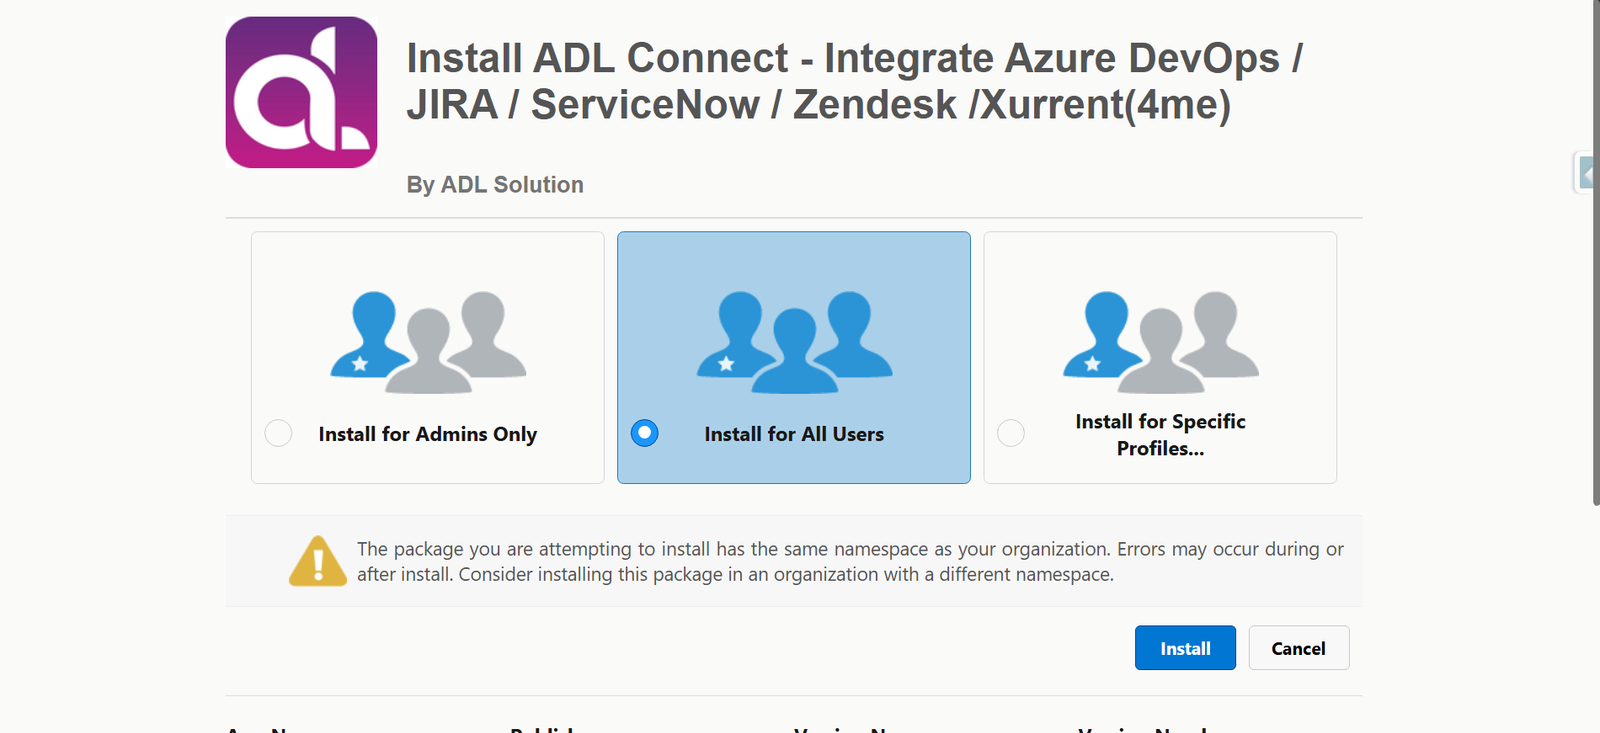
Note: If you require only specific users to create or modify Zendesk tickets, select “Install for Administrators only.” You can then grant outbound permission to specific users once after installation.
Once the installation is complete, ADL Connect will be available in the Salesforce App Launcher and ready for configuration. (Please wait until you receive the confirmation email. ET: 5–6 min)
2. Launch the Configuration Console
After installation, open the ADL Connect Setup Console from the Salesforce App Launcher.
The configuration console serves as the central workspace for managing the integration, including:
- Providing Salesforce and Zendesk authentication details
- Configuring Zendesk ticket and Salesforce object mappings
- Defining field mapping rules
- Managing inbound and outbound synchronization settings
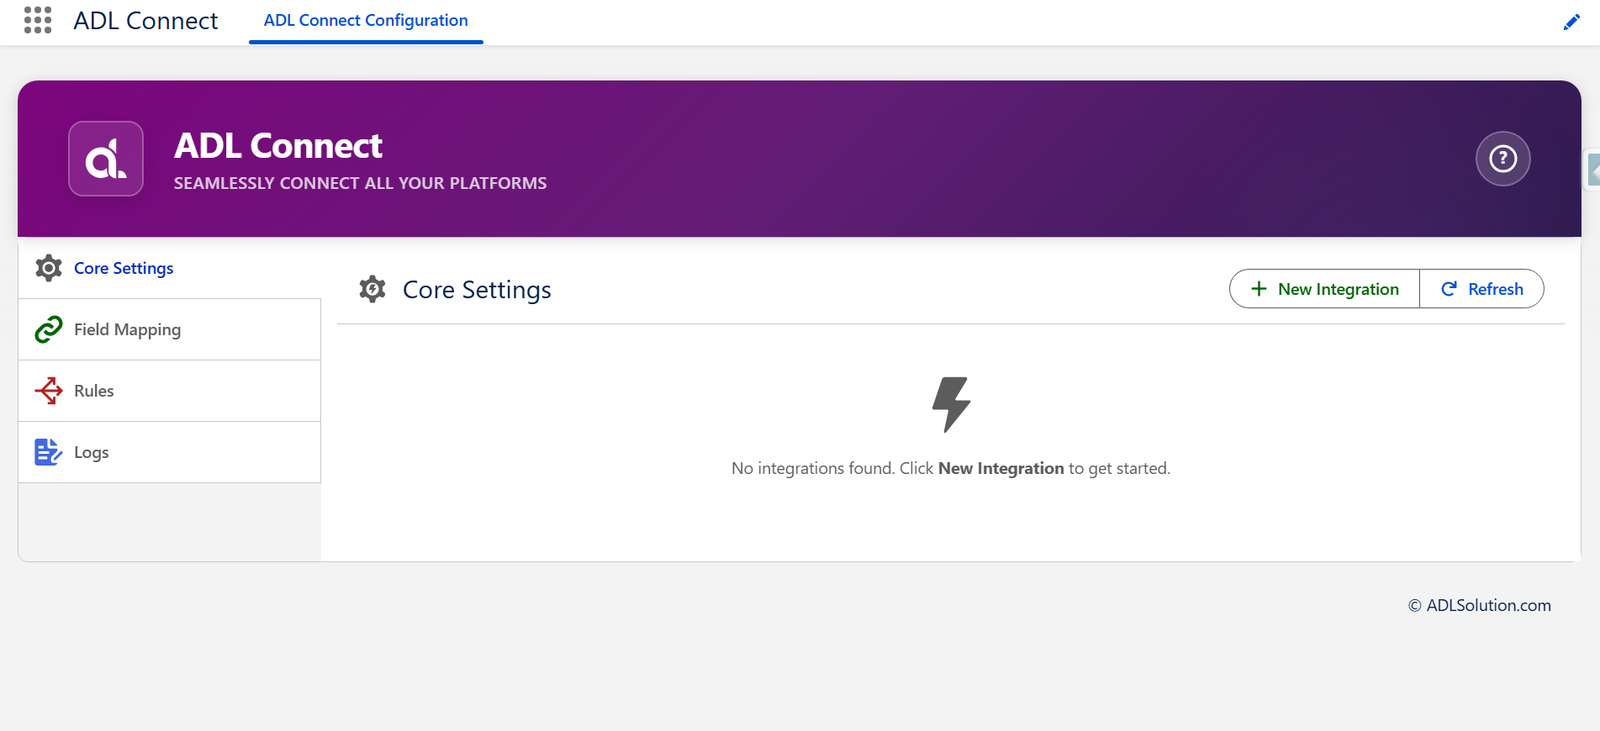
The console is designed to simplify both initial setup and ongoing maintenance, ensuring consistent and reliable synchronization between Salesforce and Zendesk.
Generate an API Token for Zendesk Account
How to Generate an API Token from Your Zendesk Account
To establish a secure connection between Salesforce and Zendesk, an API token must be generated from your Zendesk account. The API token is used together with your Zendesk email address to authenticate API requests from external applications such as ADL Connect.
Follow the steps below to generate and use a Zendesk API token.
Step 1: Log in to Your Zendesk Account
- Open a web browser and sign in to your Zendesk Admin Center.
- Log in using a Zendesk administrator account.
- Complete any required multi-factor authentication if enabled.
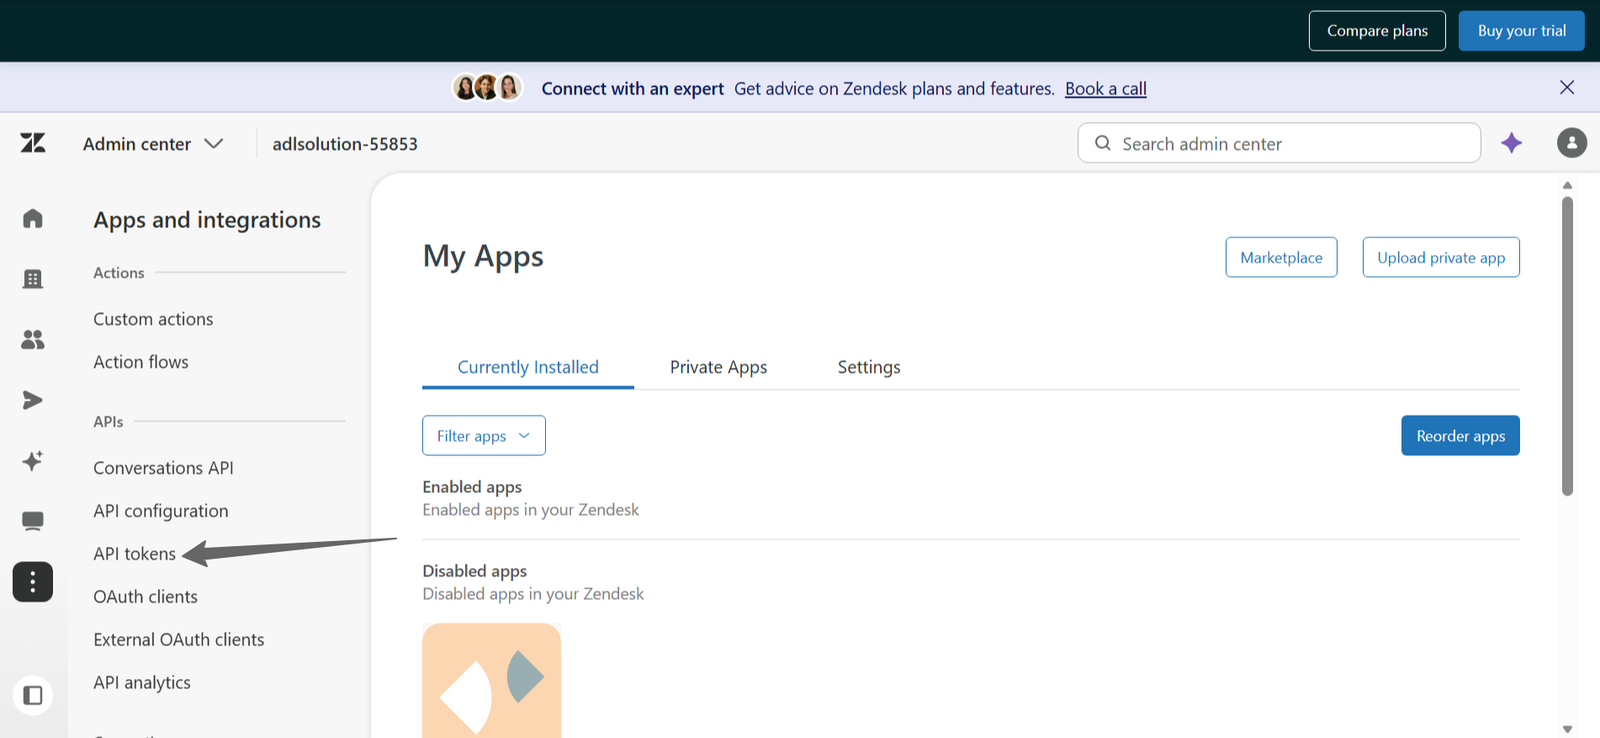
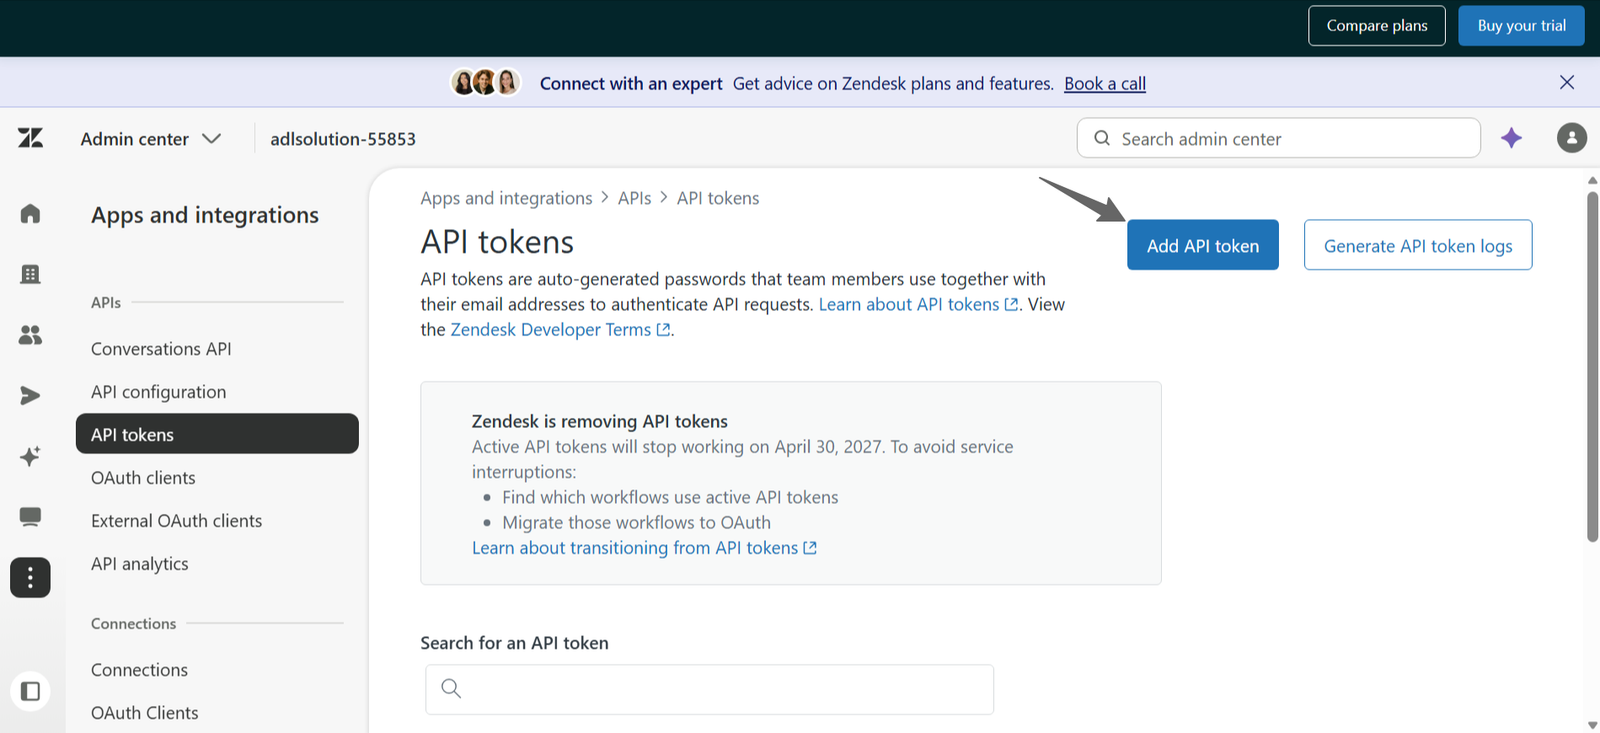
Step 2: Open the API Tokens Page
- In the left navigation menu, click Apps and integrations.
- Scroll to APIs.
- Select API tokens.
Step 3: Create a New API Token
- Click Add API token.
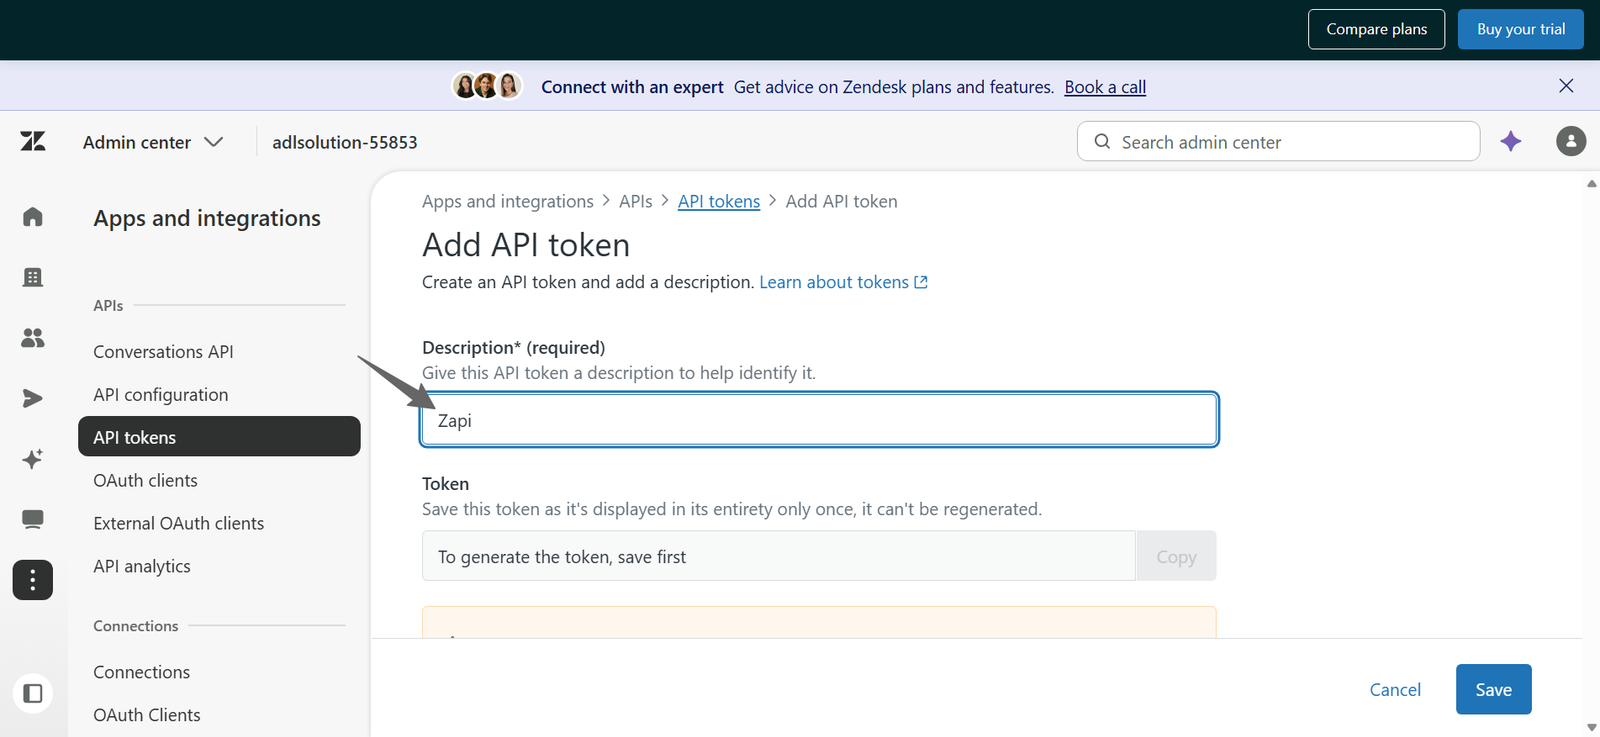
- In the Description field, enter a name such as Zapi.
- Click Save.
Step 4: Copy and Store the Token Securely
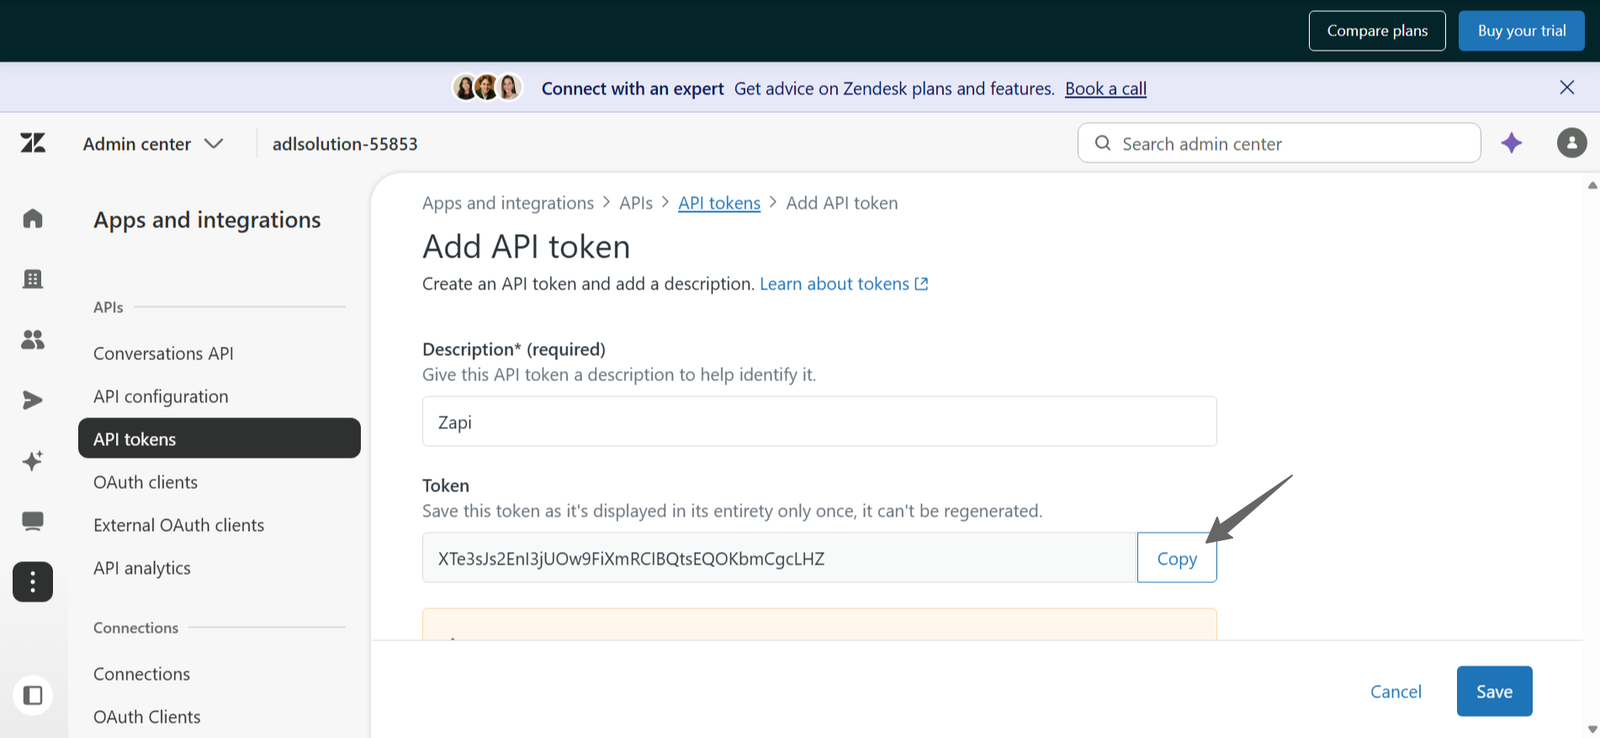
- After the token is created, click Copy.
- Store the token temporarily in a secure location.
- Zendesk will not display the token again after you leave the page.
Step 5: Connect Salesforce to Zendesk Using the API Token
To connect Salesforce to Zendesk:
- Enter your Zendesk email address.
- Paste the API token into the authentication field.
- Enter your Zendesk subdomain (for example: adlsolution-55853.zendesk.com).
- Save the configuration.
Once saved, ADL Connect can authenticate with Zendesk and begin synchronization.
Important Notes
- API tokens must be kept secure and treated like passwords.
- Do not share the token publicly or store it in unsecured locations.
- If a token is compromised, delete it immediately from the API Tokens page and create a new one.
- The API token must always be used together with your Zendesk email address when configuring ADL Connect.
Setup OAuth 2.0
This section is password protected
Enter the password to view “Setup OAuth 2.0”.
Incorrect password. Please try again.
Don’t know the password? Contact us and we’ll help you out.
Core Settings – Zendesk Integration Configuration
Configuring the Zendesk Connection in ADL Connect
Once the Zendesk API Token has been generated, the next step is to configure the connection inside Salesforce using the ADL Connect Core Settings. This section walks through creating a new Zendesk integration, adding the required Remote Site Settings, and verifying that the connection is active.
Step 1: Open the ADL Connect Core Settings
- From the Salesforce App Launcher, open ADL Connect.
- Navigate to the ADL Connect Configuration tab.
- Select Core Settings from the left navigation panel.
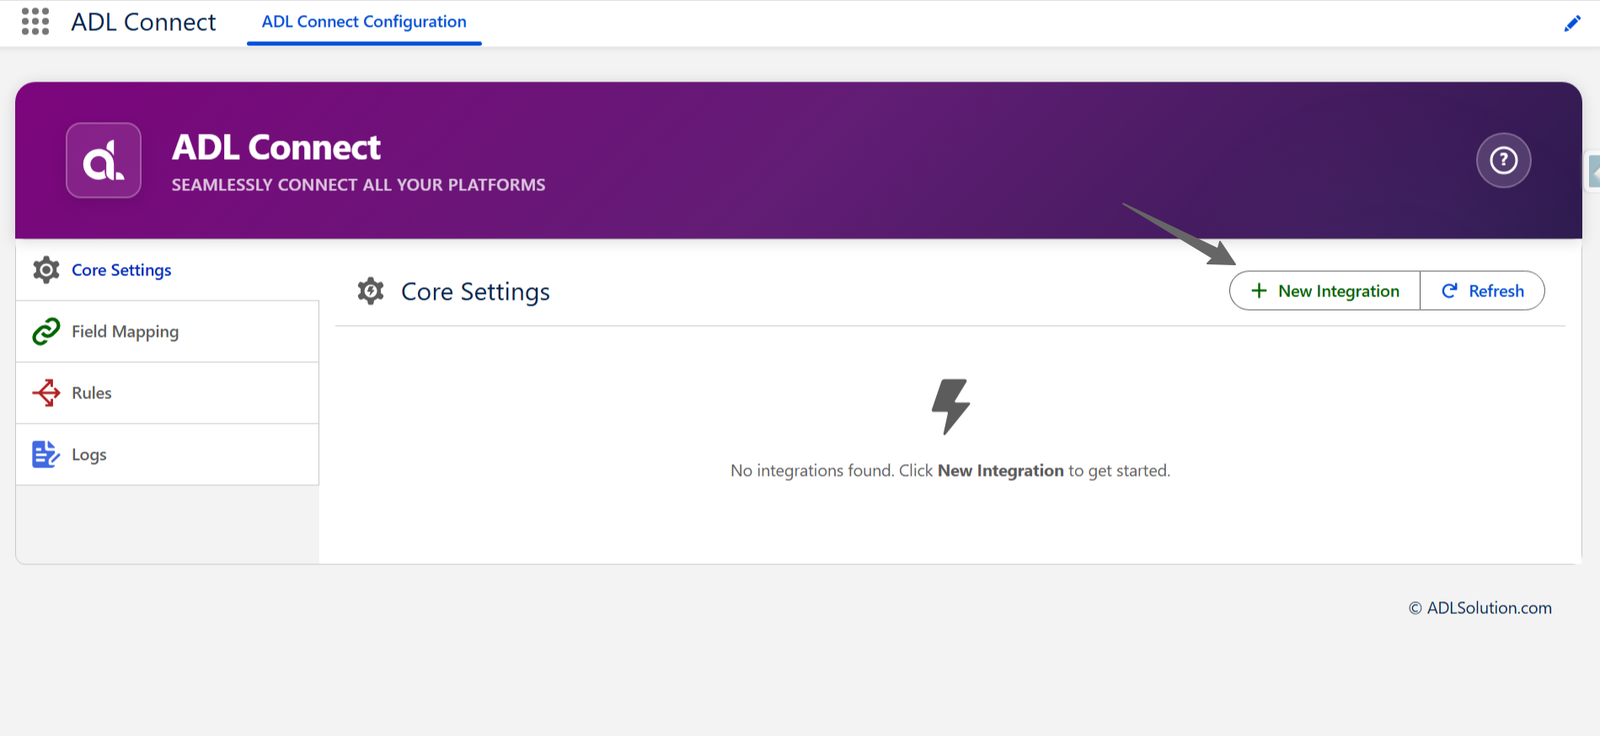
Click + New Integration in the top-right corner to begin adding a Zendesk connection.
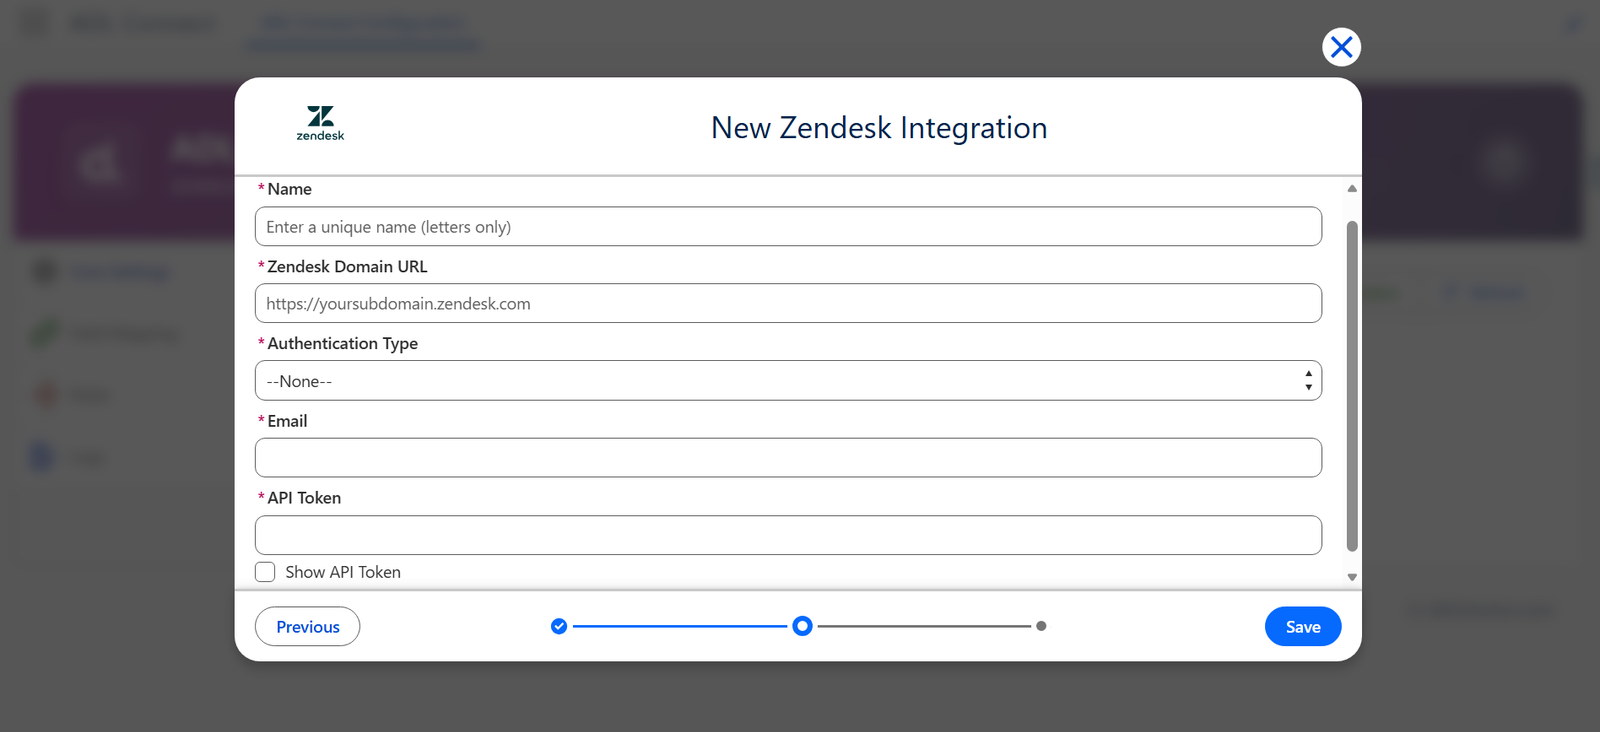
Step 2: Enter the Zendesk Integration Details
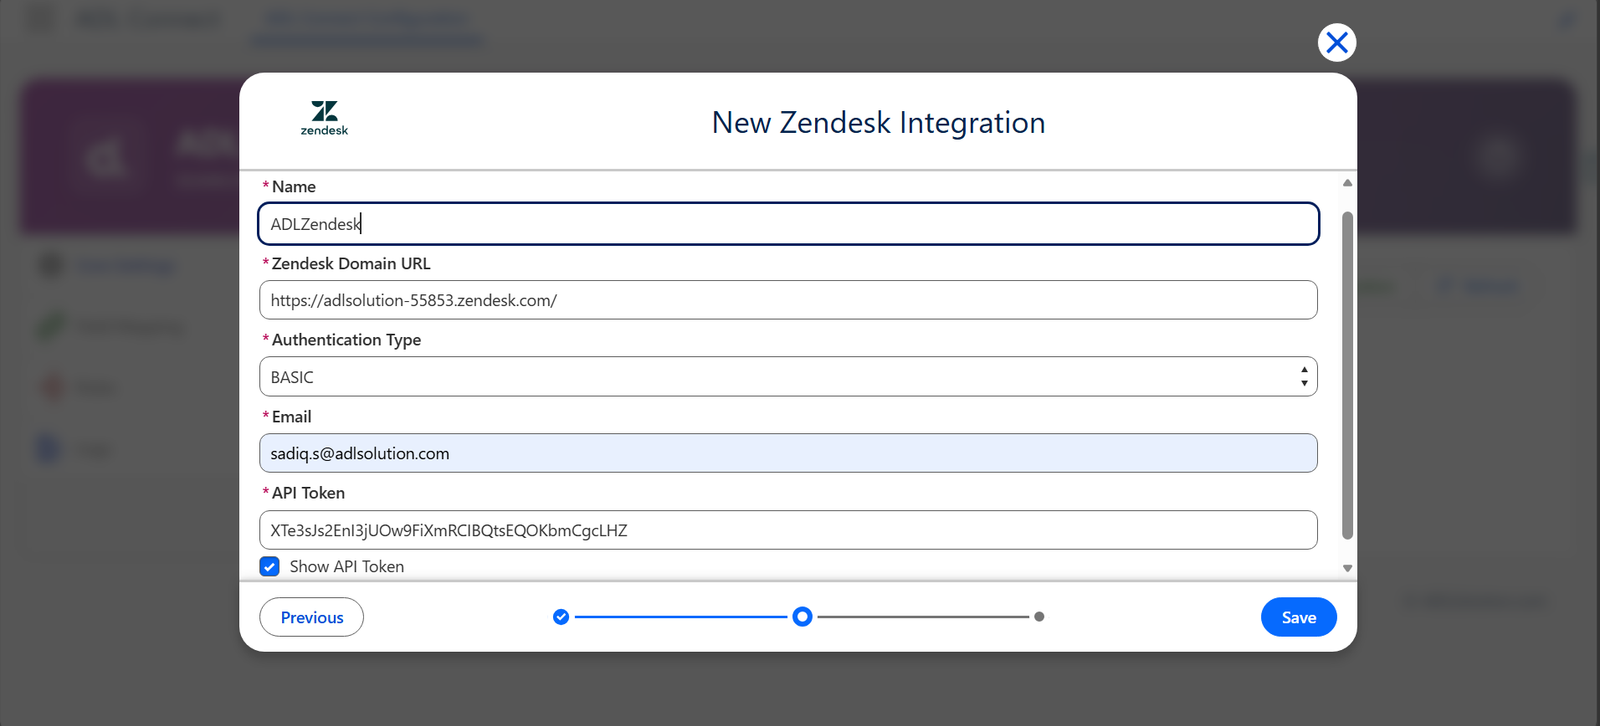
In the New Zendesk Integration dialog, provide the following details:
- Name – A descriptive name for the integration (for example, ADLZendesk).
- Zendesk Domain URL – Your Zendesk account URL (for example, https://adlsolution-55853.zendesk.com/).
- Authentication Type – Select Basic.
- Email – The email address associated with your Zendesk account.
- API Token – Paste the API token generated from your Zendesk account.
- (Optional) Enable Show API Token if you want to verify the token before saving.
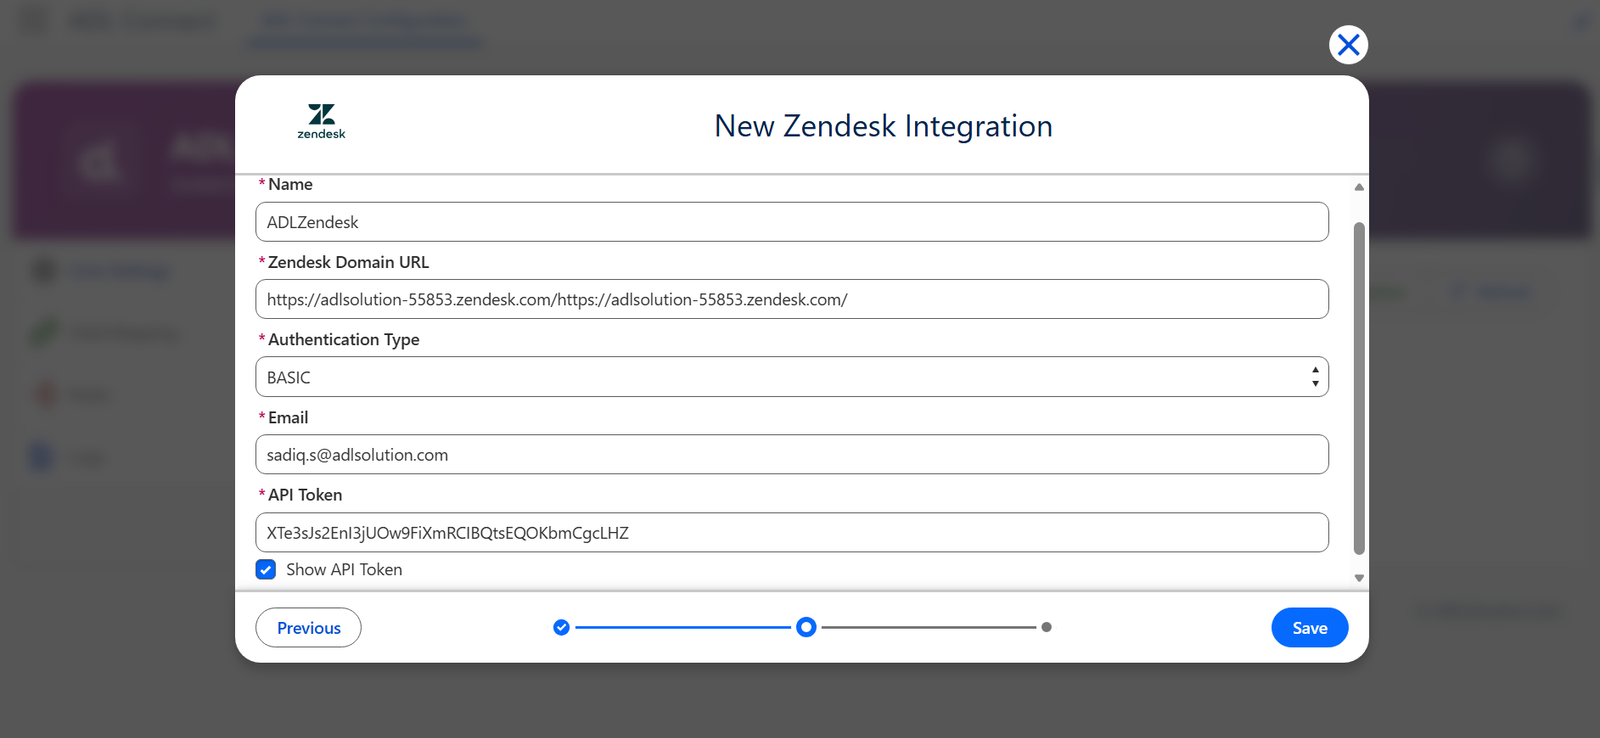
Click Save to submit the configuration.
Step 3: Add the Required Remote Site Settings
- On first save, ADL Connect validates the connection and checks whether Salesforce is permitted to communicate with the Zendesk endpoints. If the required Remote Site Settings have not yet been added, a prompt appears listing the Zendesk URLs that must be registered in Salesforce.
- The required Zendesk URLs shown in the prompt must be added as Remote Site Settings before the integration can be saved successfully.
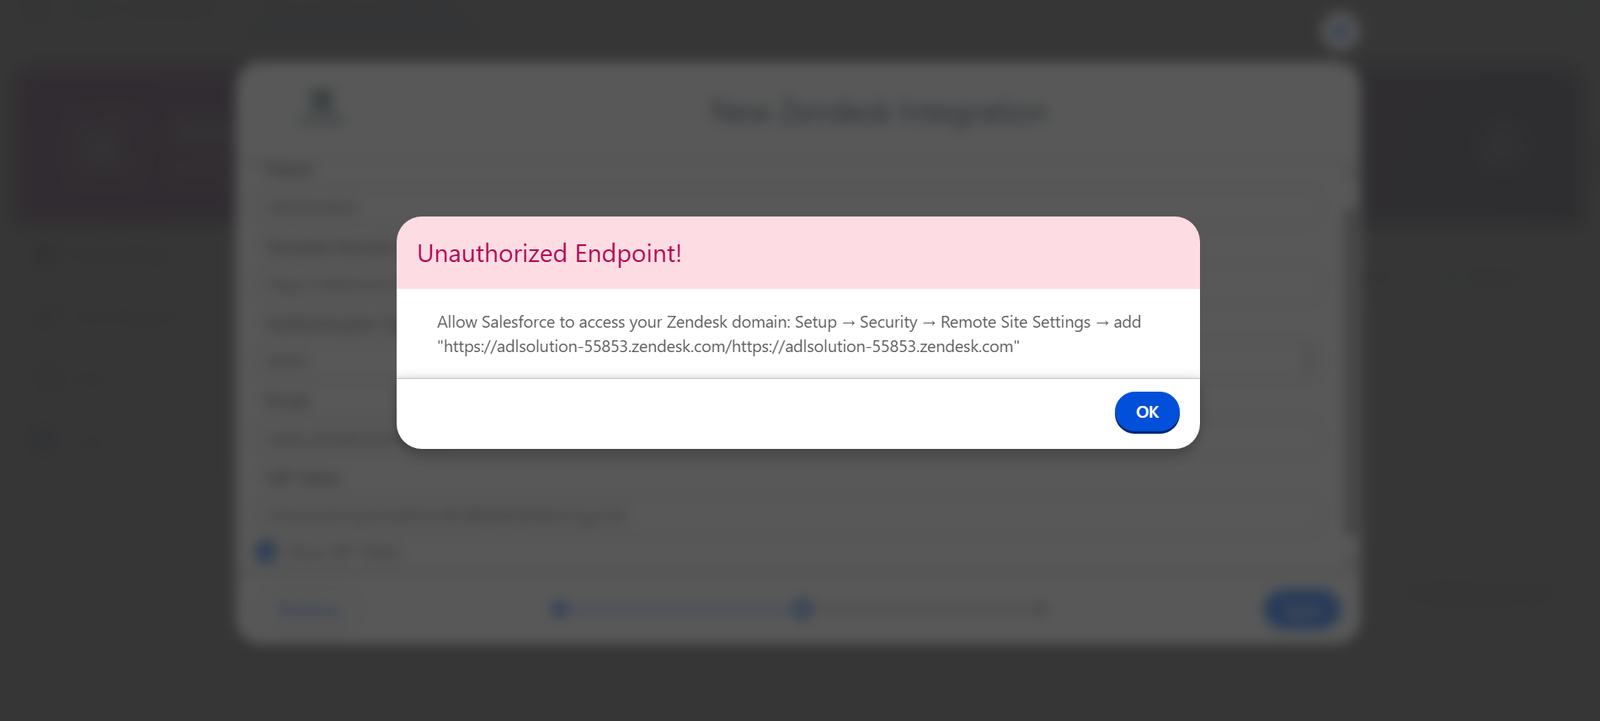
Adding Remote Site Settings in Salesforce
- Navigate to Setup → search for Remote Site Settings in the Quick Find box.
- Click New Remote Site.
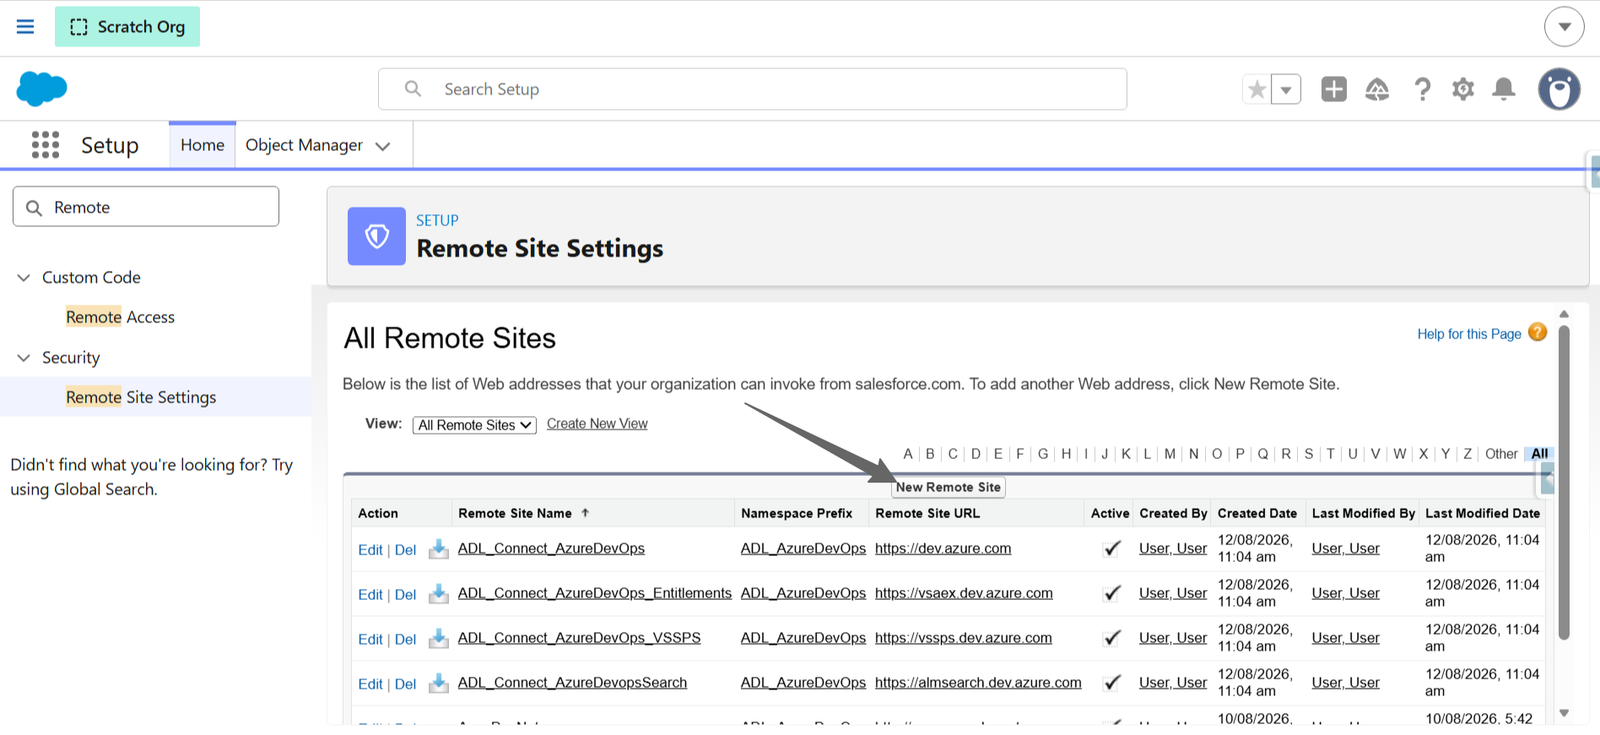
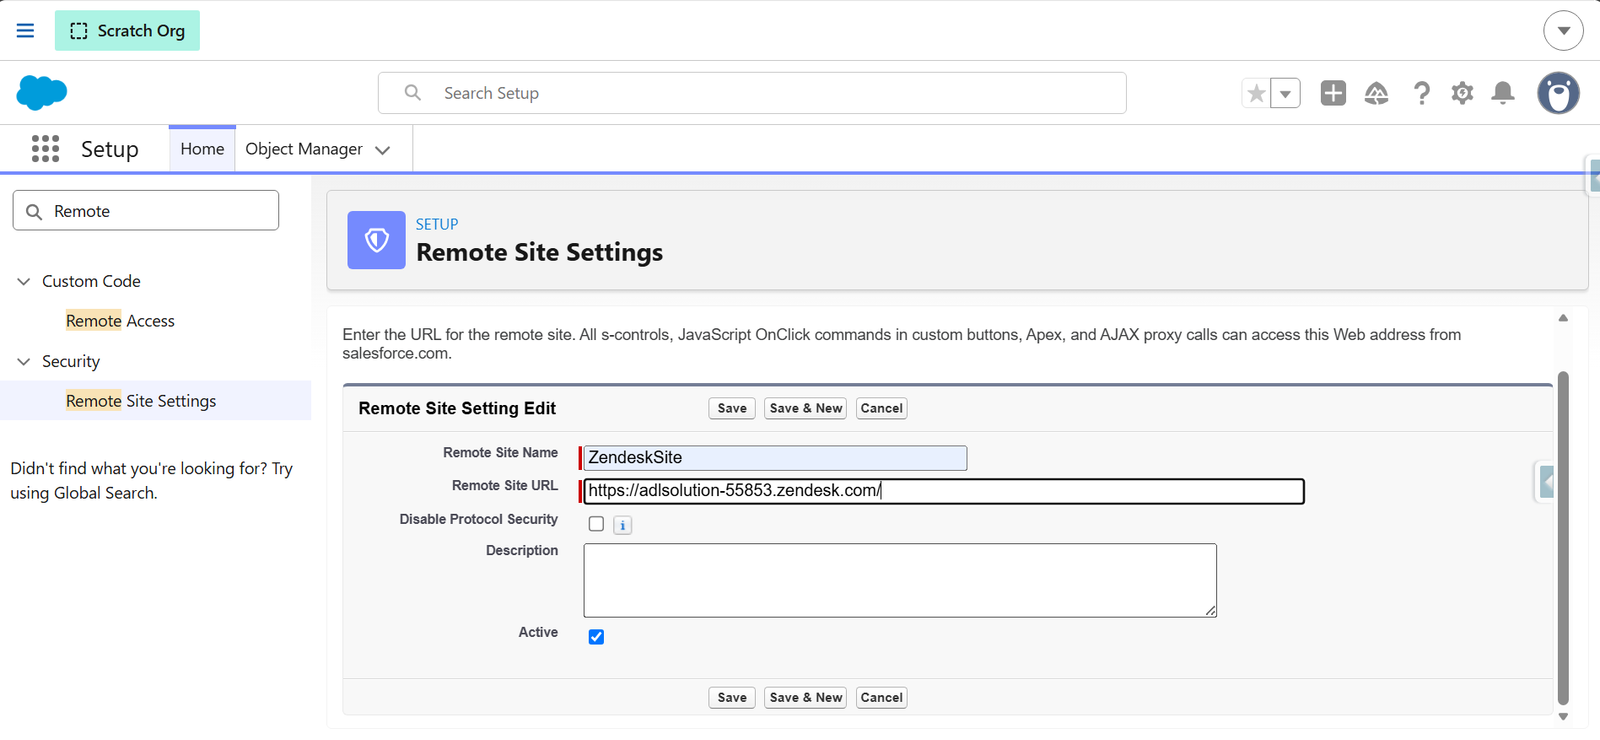
For each Zendesk URL shown in the prompt, complete the following:
- Remote Site Name – A descriptive name (for example, ZendeskSite).
- Remote Site URL – Paste the corresponding Zendesk URL from the prompt.
- Ensure the Active checkbox is selected.
- Click Save.
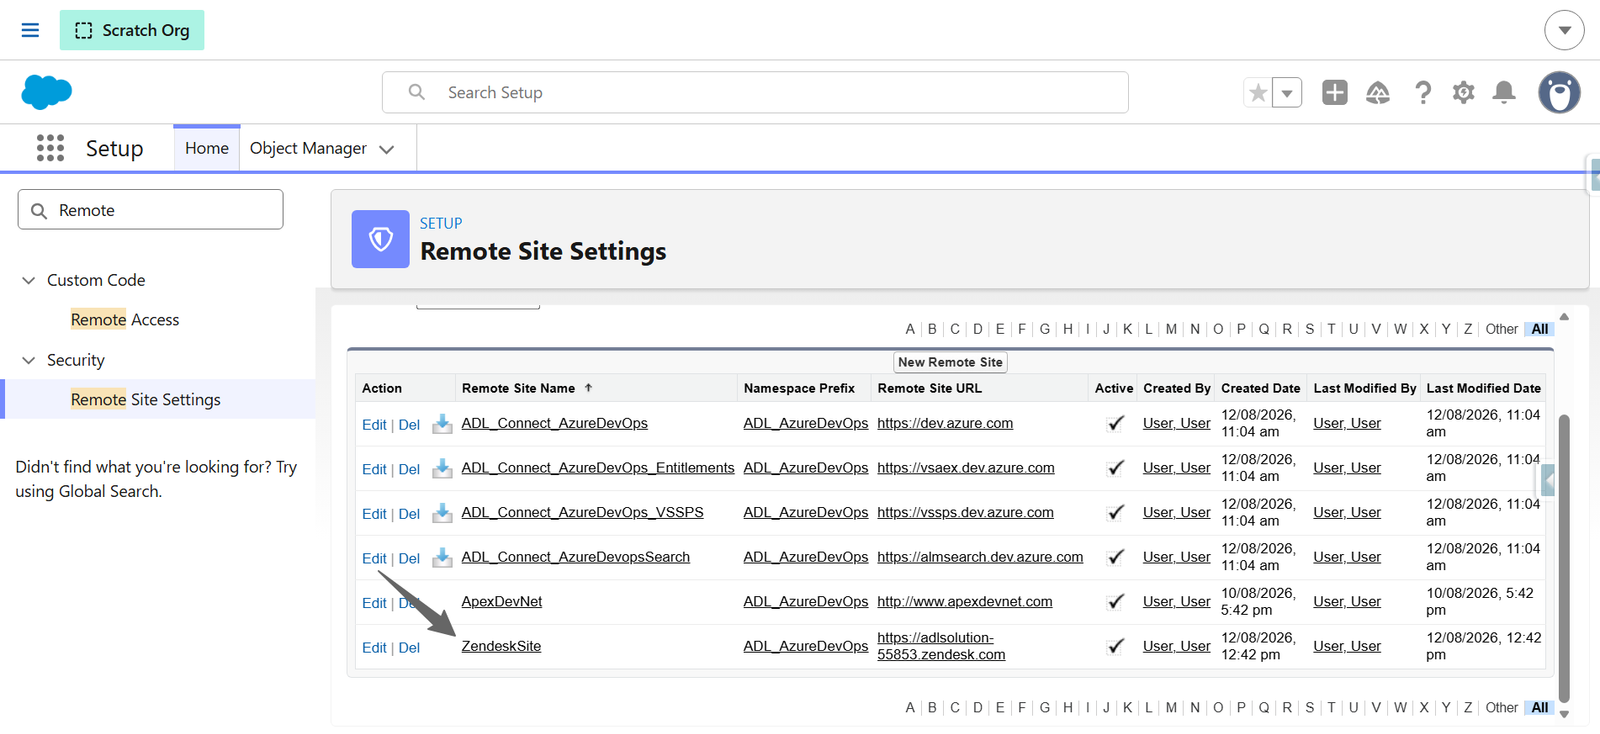
Step 4: Complete the Integration Setup
- Return to the ADL Connect Core Settings page.
- Reopen the New Zendesk Integration dialog (or continue from the earlier prompt) and click Save again.
- ADL Connect validates the credentials against Zendesk and confirms the connection.
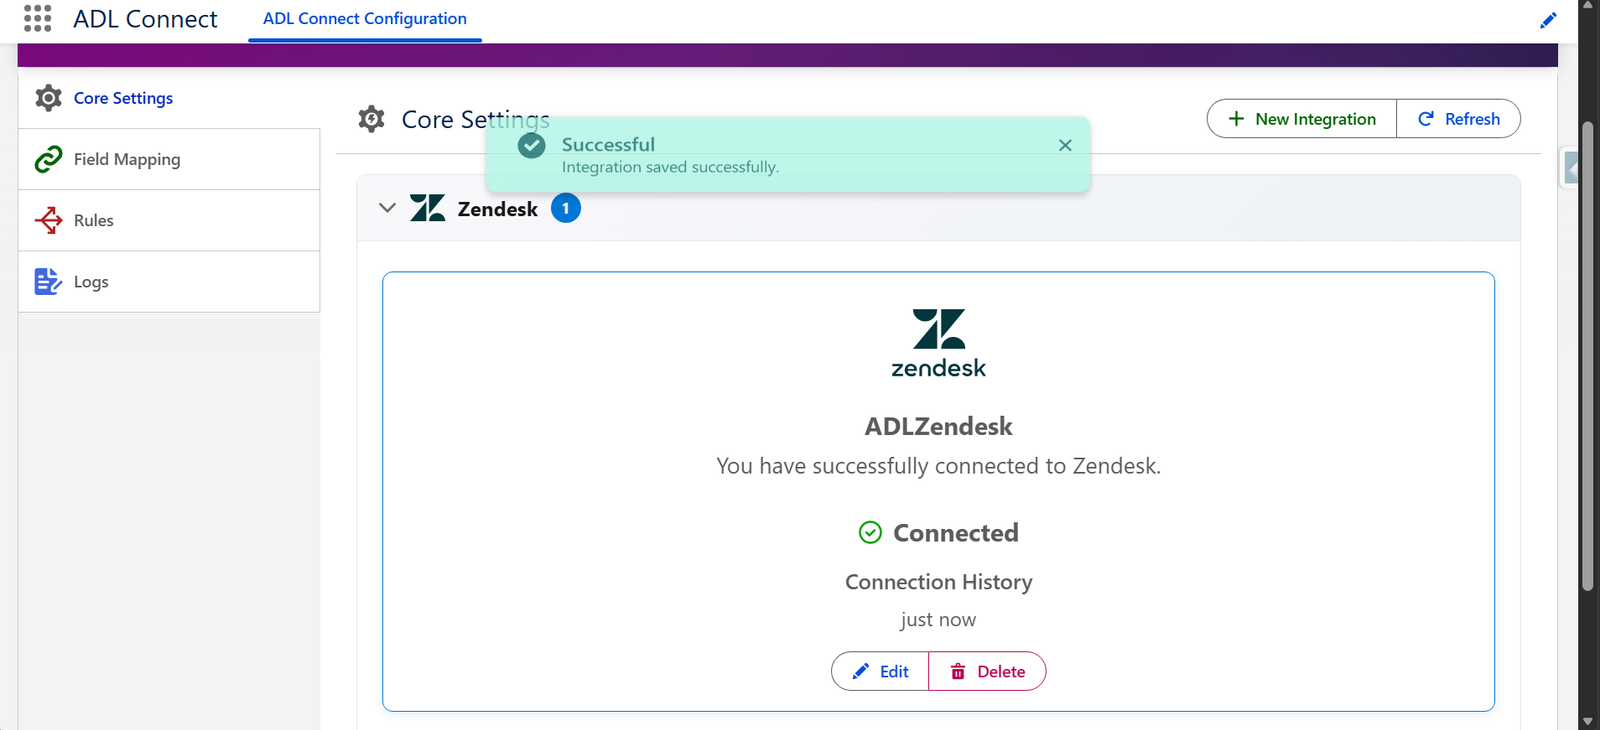
Upon successful validation, a Successful! Integration saved successfully message appears, and the Zendesk integration card displays a green Connected status along with the connection timestamp.
Step 5: Manage the Integration
Once connected, the Zendesk integration card in Core Settings provides the following options:
- Edit – Update the integration details, such as the name, Zendesk domain URL, email address, or API token.
- Delete – Remove the integration from ADL Connect.
- Refresh – Re-validate the connection status at any time.
Additional integrations can be added at any time using the + New Integration button, allowing multiple Zendesk accounts or environments to be connected in parallel.
Troubleshooting Tips
- If the Remote Site Settings Required prompt reappears after saving, confirm that all required Zendesk URLs are added, active, and entered exactly as shown in the prompt.
- If the connection fails with an authentication error, verify that the Email and API Token are correct and that the API token has not been revoked or regenerated in Zendesk.
- Ensure the Zendesk Domain URL is entered in the correct format (for example, https://yourcompany.zendesk.com/).
- Confirm that the Authentication Type is set to Basic and that the email address belongs to a user account with the required Zendesk permissions.
- If the connection remains unsuccessful, generate a new API token in Zendesk and update the integration configuration before saving again.
Configure Field Mapping
Field Mapping Configuration (Salesforce ↔ Zendesk)
Field mapping establishes the relationship between Salesforce objects and Zendesk ticket forms or ticket types. This configuration defines which Salesforce records create or link to which Zendesk tickets and ensures that data flows correctly between both systems.
As part of this setup, a custom Zendesk ticket field must be configured to store the Salesforce Record ID, enabling reliable cross-system linkage and bidirectional synchronization.
Step 1: Create a New Connector Mapping
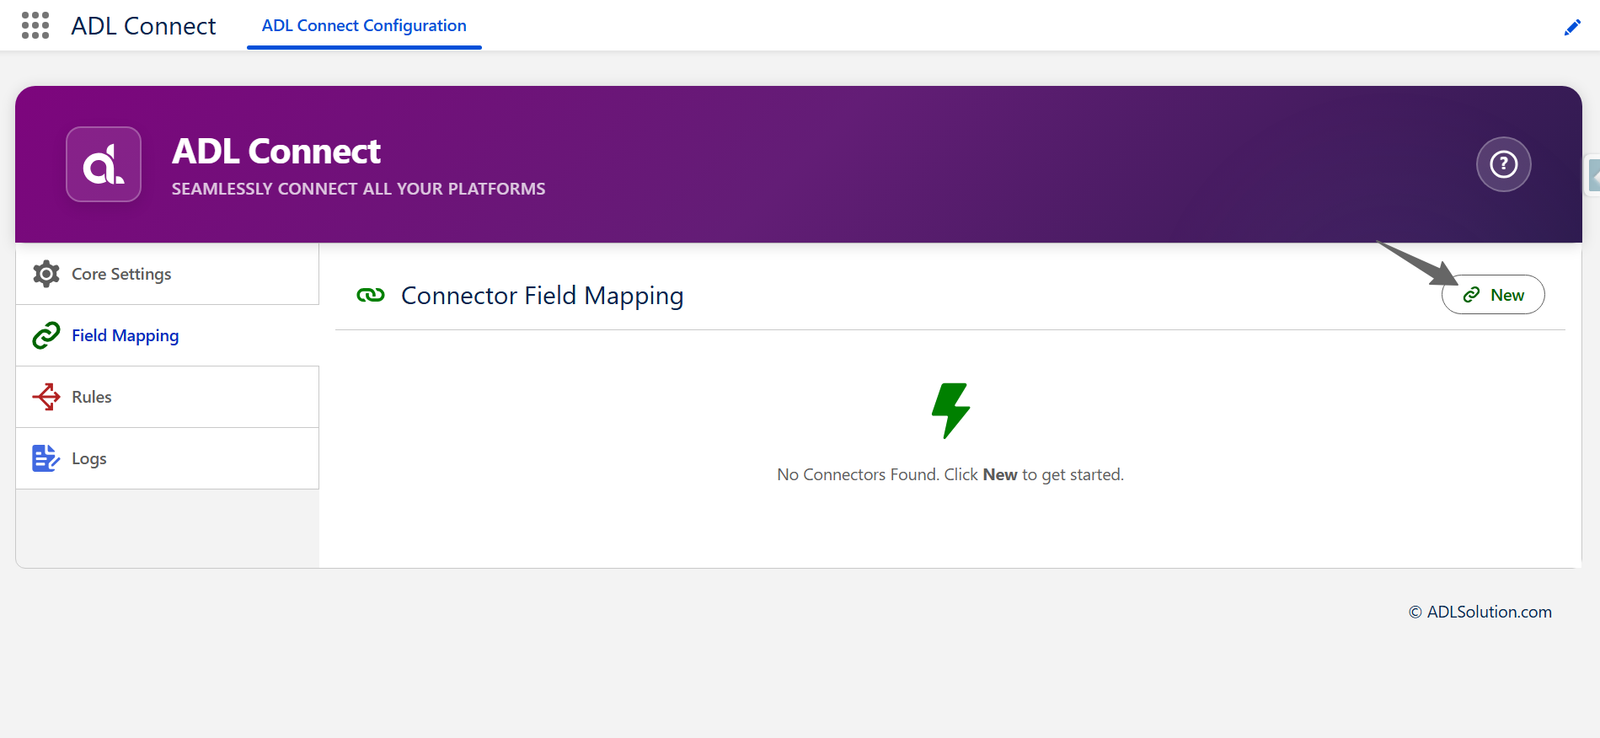
- In ADL Connect, navigate to the Field Mapping section from the left navigation panel.
- If no connectors are configured yet, the page displays "No Connectors Found. Click New to get started."
- Click New in the top-right corner to begin a new mapping.
Step 2: Select the Zendesk Integration
- In the New Connection dialog, select the Zendesk integration card (for example, ADLZendesk) that was configured earlier in Core Settings, then click Next.
- This identifies the Zendesk environment to which the mapping belongs.
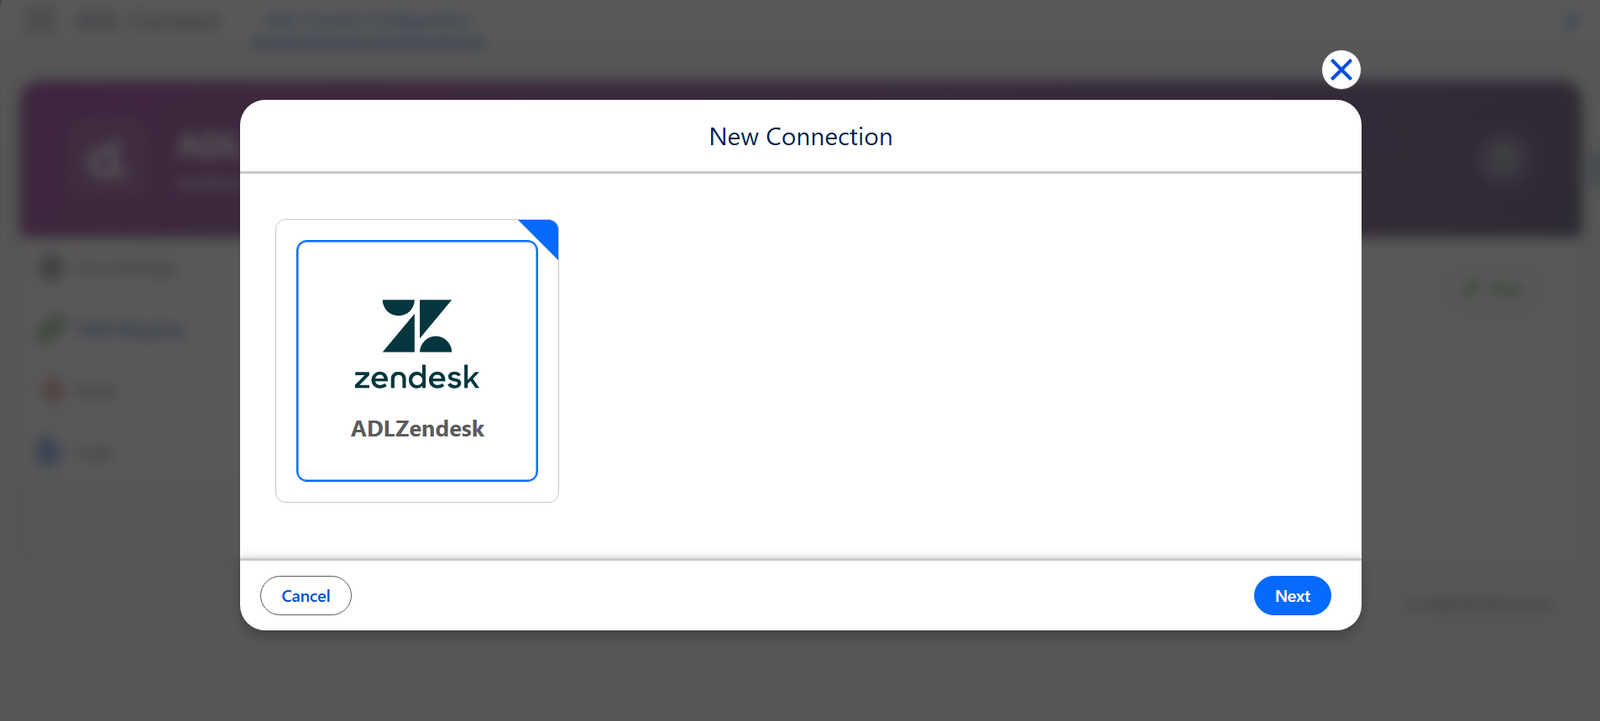
This name becomes the reference point for all synchronization rules and field mappings related to this integration.
Step 3: Configure the Connection Details
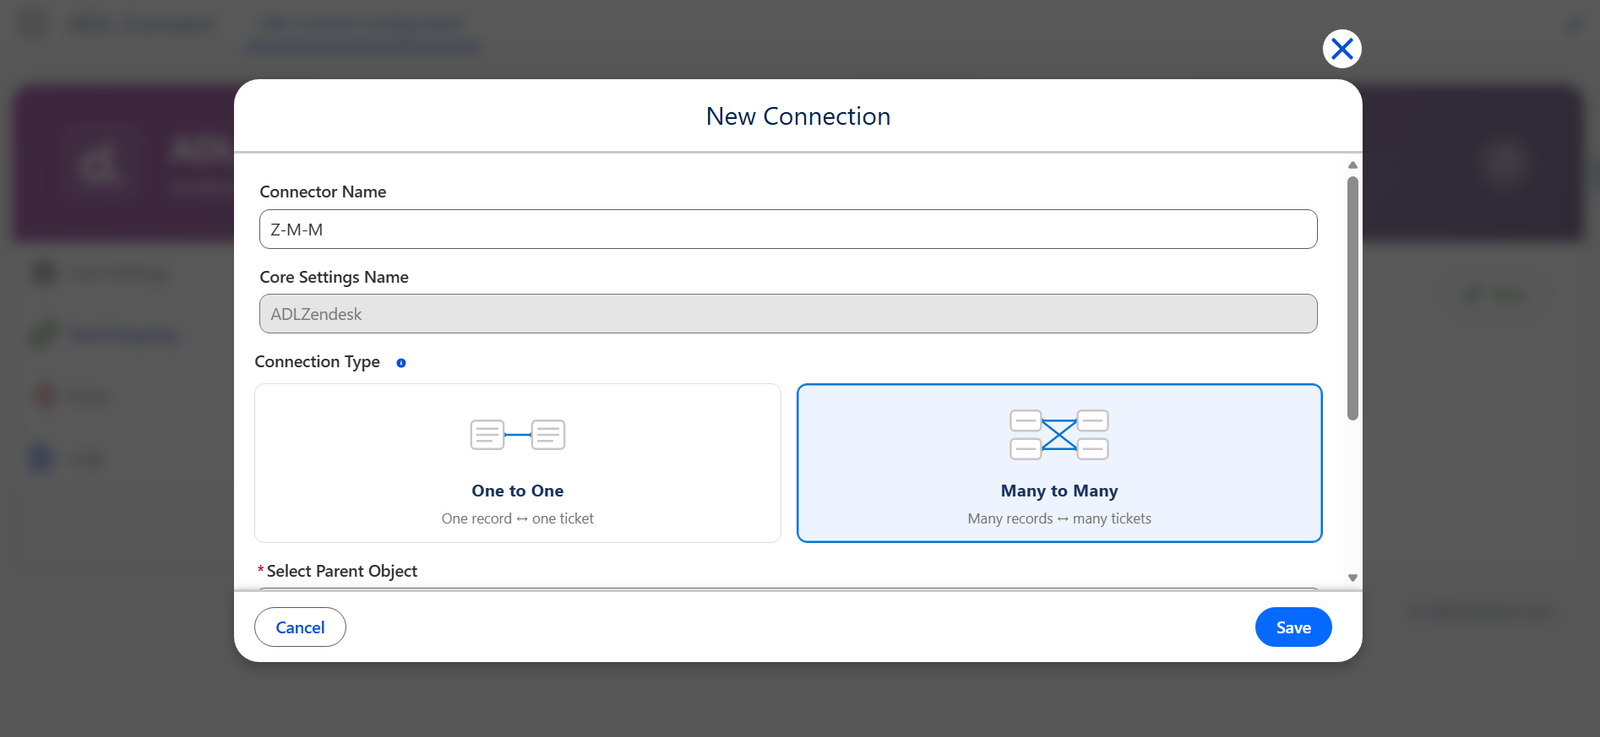
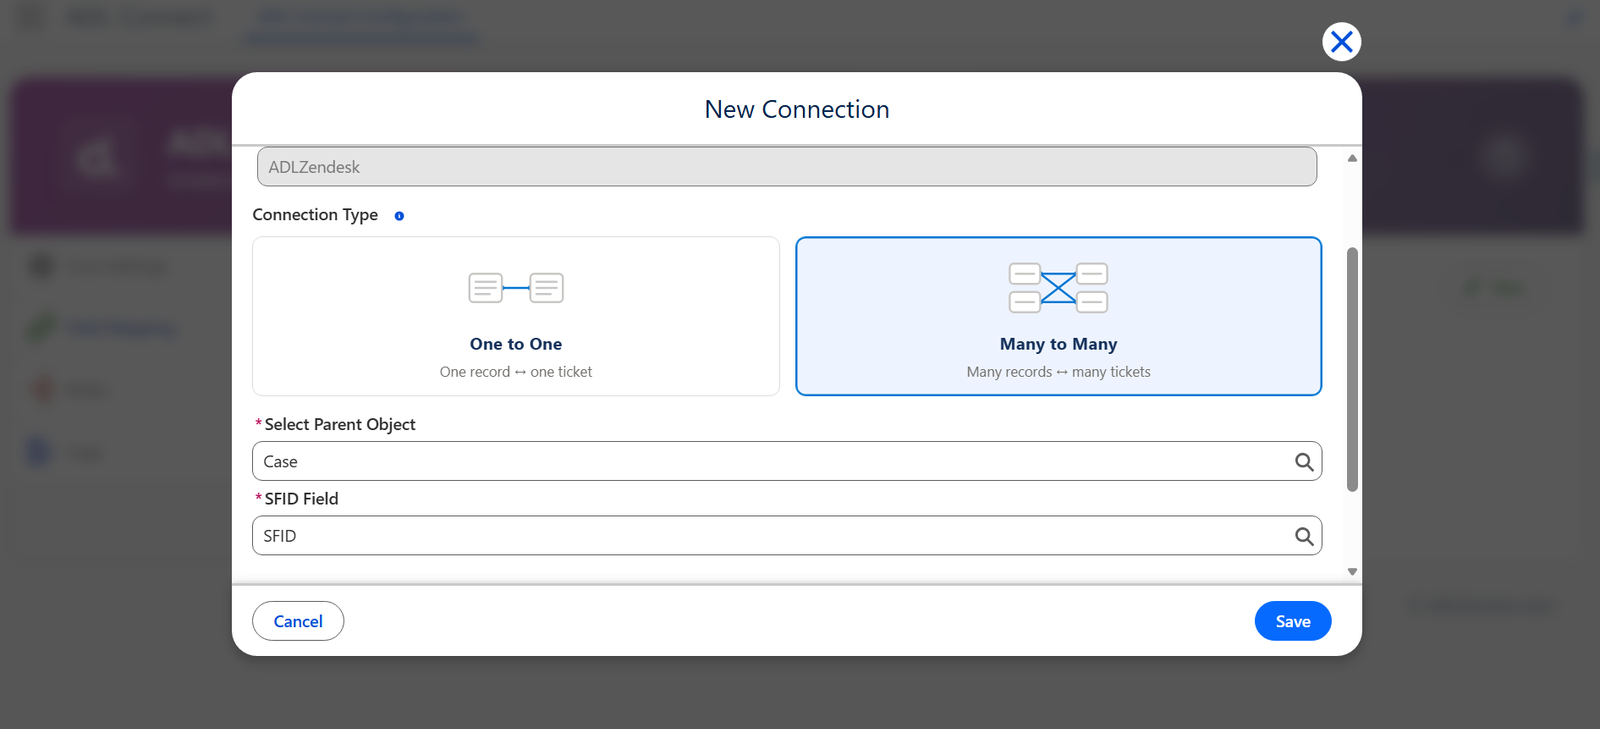
In the New Connection form, provide the following:
- Connector Name – A descriptive name for the mapping (for example, Z-M-M).
- Core Settings Name – Automatically populated based on the selected integration (for example, ADLZendesk).
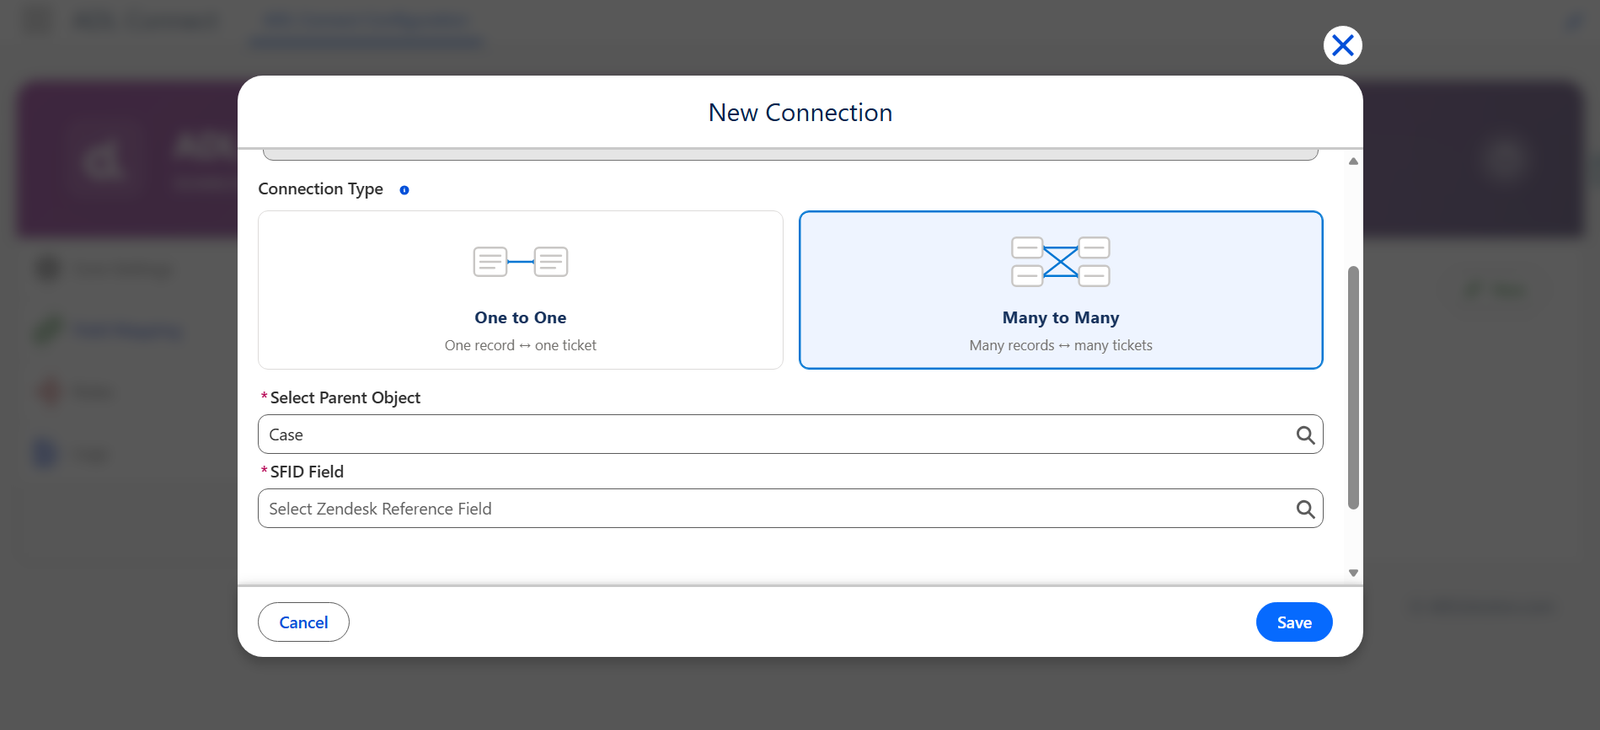
- Connection Type – Choose the relationship type:
One to One – One Salesforce record ↔ one Zendesk request
Many to Many – Many Salesforce records ↔ many Zendesk requests
- Select Parent Object – Choose the Salesforce object whose records will be synchronized (for example, Case, Opportunity, or a custom object).
Step 4: Select or Create the Zendesk Field to Store Salesforce Record ID
To maintain a persistent link between Salesforce records and Zendesk tickets, Zendesk must store the Salesforce Record ID in a dedicated custom ticket field.
Option A: Select an Existing Custom Ticket Field
- Open the Salesforce Record ID Mapping Field dropdown.
- If a suitable Zendesk custom ticket field already exists, select it.
Option B: Create a New Zendesk Custom Ticket Field (Recommended)
If no appropriate field exists, create one using the steps below
5. Create a Custom Field in Zendesk
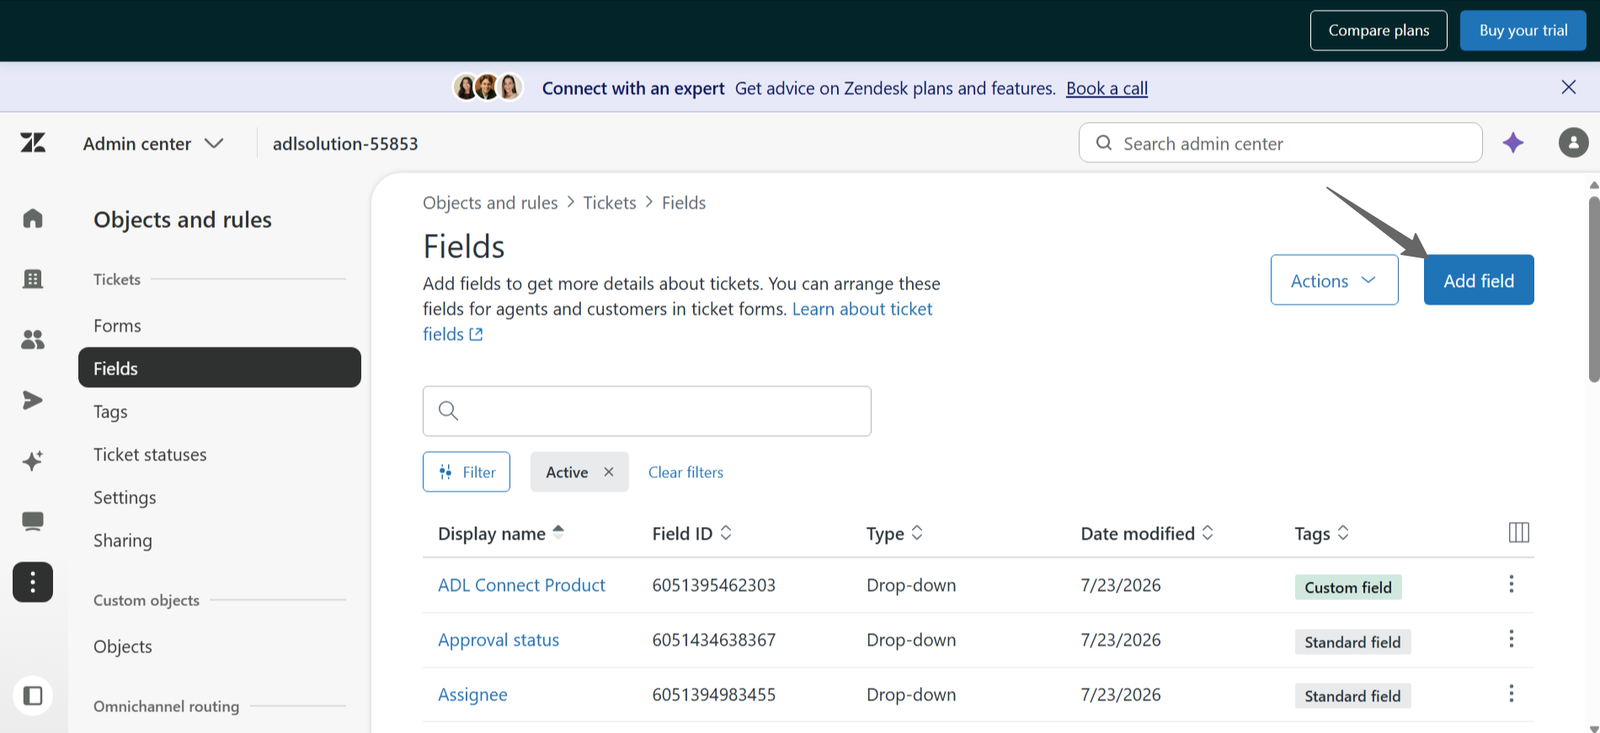
- Sign in to Zendesk and open Admin Center.
- Navigate to Objects and Rules → Tickets → Fields.
- Click Add field.
- Select the required Field Type (for example, Text, Dropdown, Checkbox, or Date).
- Enter the Display name and Description (Optional) and click Save.
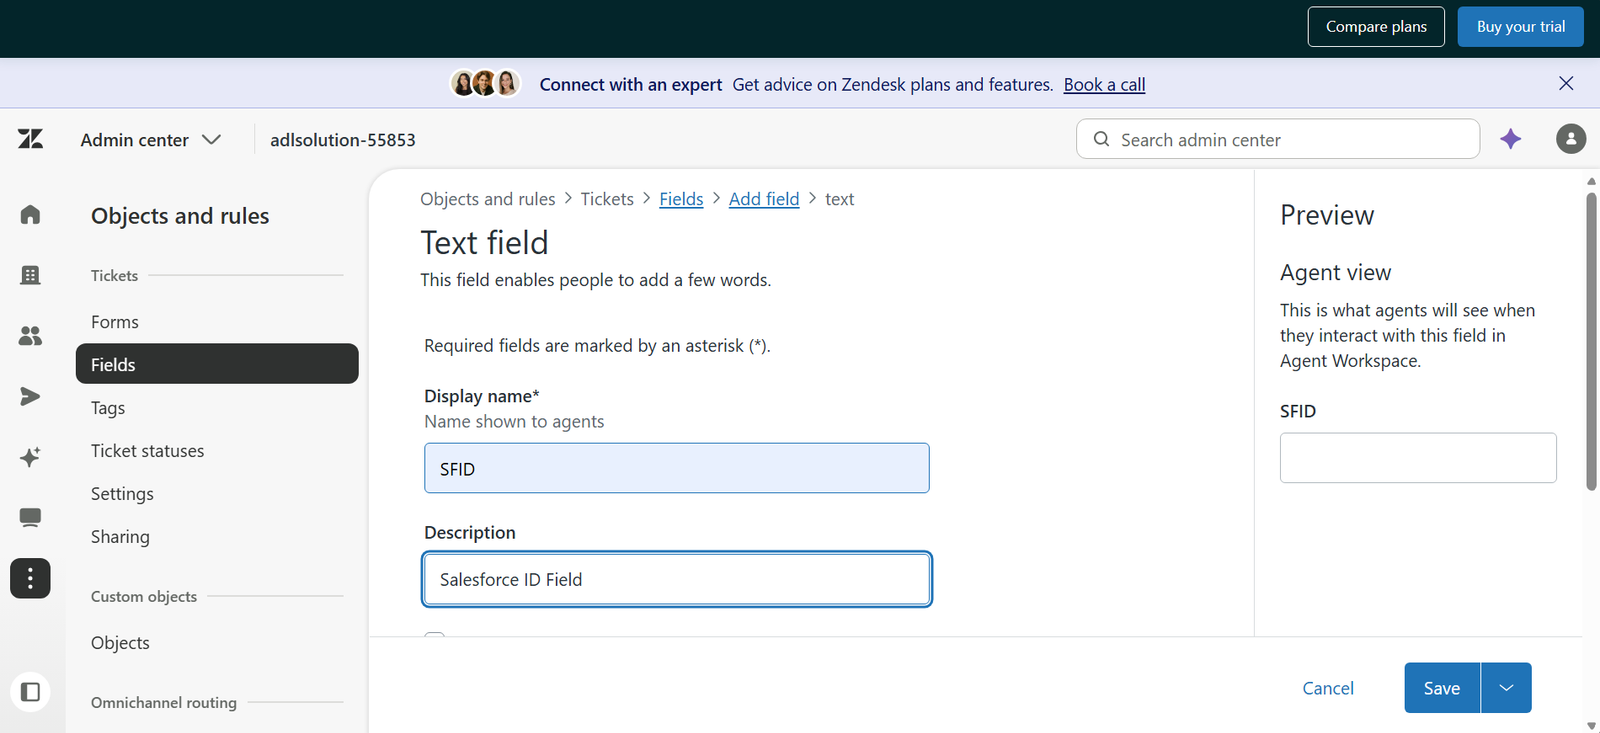
The custom field is now available in Zendesk tickets and can be used for ADL Connect field mappings.
Step 6: Save the Mapping
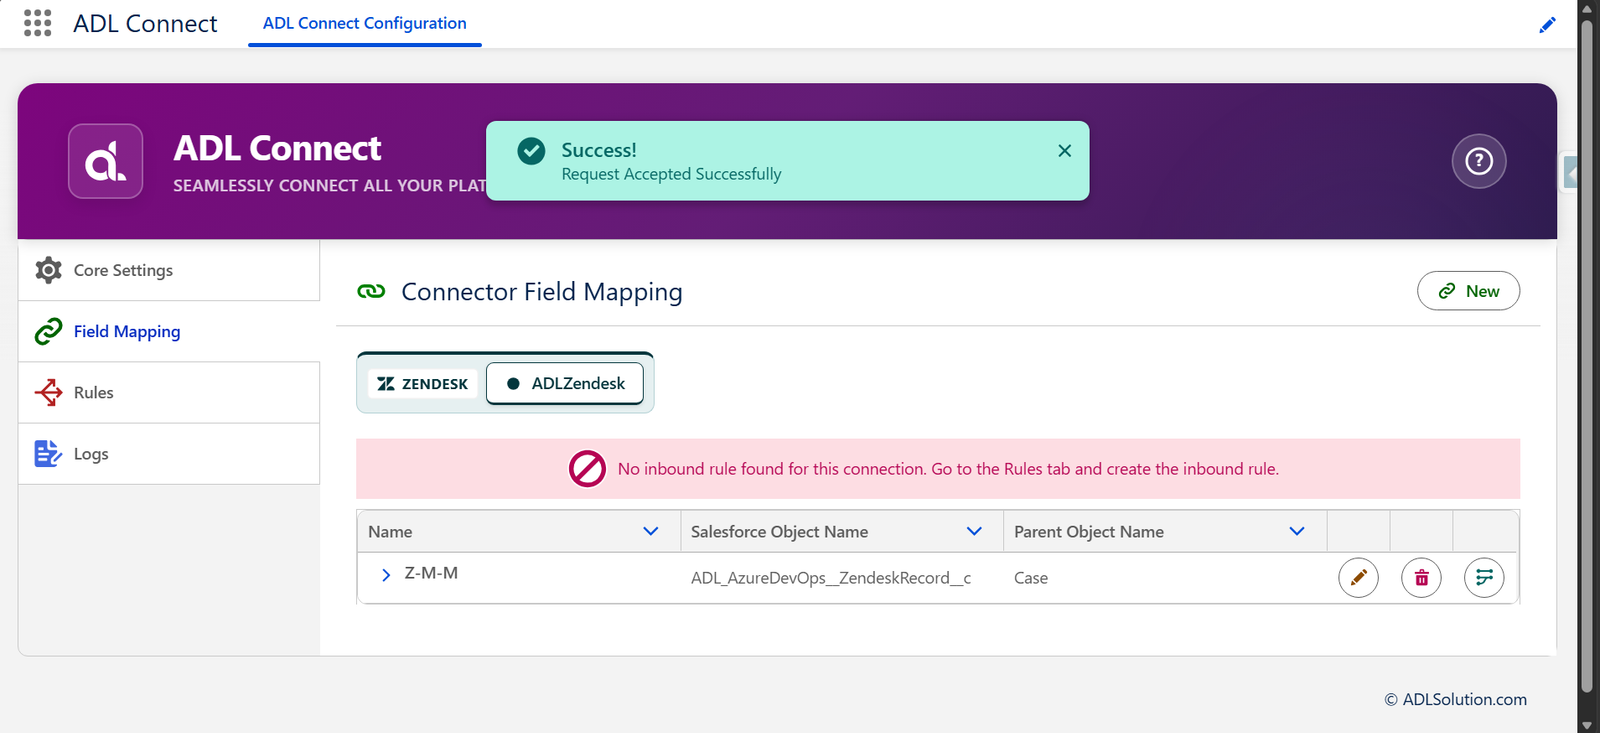
- Click Save to complete the field mapping configuration.
- The connector mapping is now active and appears in the Connector Field Mapping list, displaying the Name, Salesforce Object Name, and Parent Object Name.
Result
- The field mapping is successfully established.
- This configuration links the selected Salesforce object with the Zendesk integration, ensuring that Zendesk tickets created through ADL Connect maintain a reference to their originating Salesforce record.
- This mapping serves as the foundation for:
- Field-level synchronization
- Inbound and outbound sync rules
- Zendesk ticket creation and update workflows
Configuring Field Level Mappings
Field Mapping Configuration
Once the connector mapping has been established, the next step is to configure field-level mappings.
Field mappings define how individual Salesforce fields correspond to Zendesk fields and determine the direction of data synchronization.
These mappings ensure that updates made in either system flow correctly and consistently based on business requirements.
Follow the steps below to configure field mappings for the selected connector mapping.
Step 1: Open the Field Mapping Section
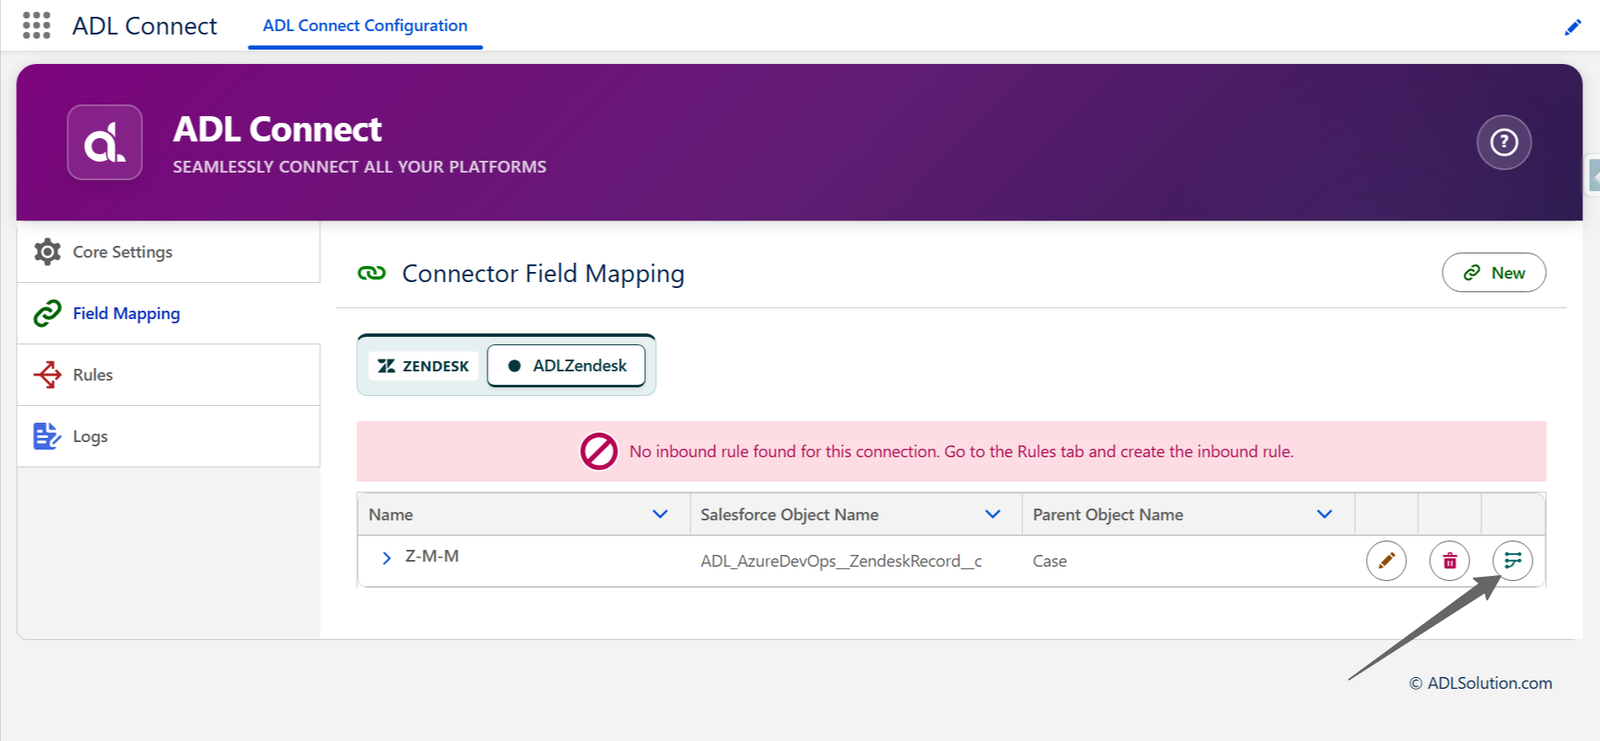
- Navigate to the connector mapping created earlier in the Field Mapping section of ADL Connect.
- Locate and click the Field Mapping action button on the connector row.
This opens the configuration panel where you define how data moves between Salesforce and Zendesk.
Step 2: Select the Salesforce Field
- In the Salesforce Field dropdown, select the field you want to synchronize.
- The system automatically displays all available fields from the Salesforce object associated with the connector mapping.
- Choose the appropriate field based on your integration requirements.
Examples include:
- Subject
- Priority
- Status
- Any custom field created for integration purposes
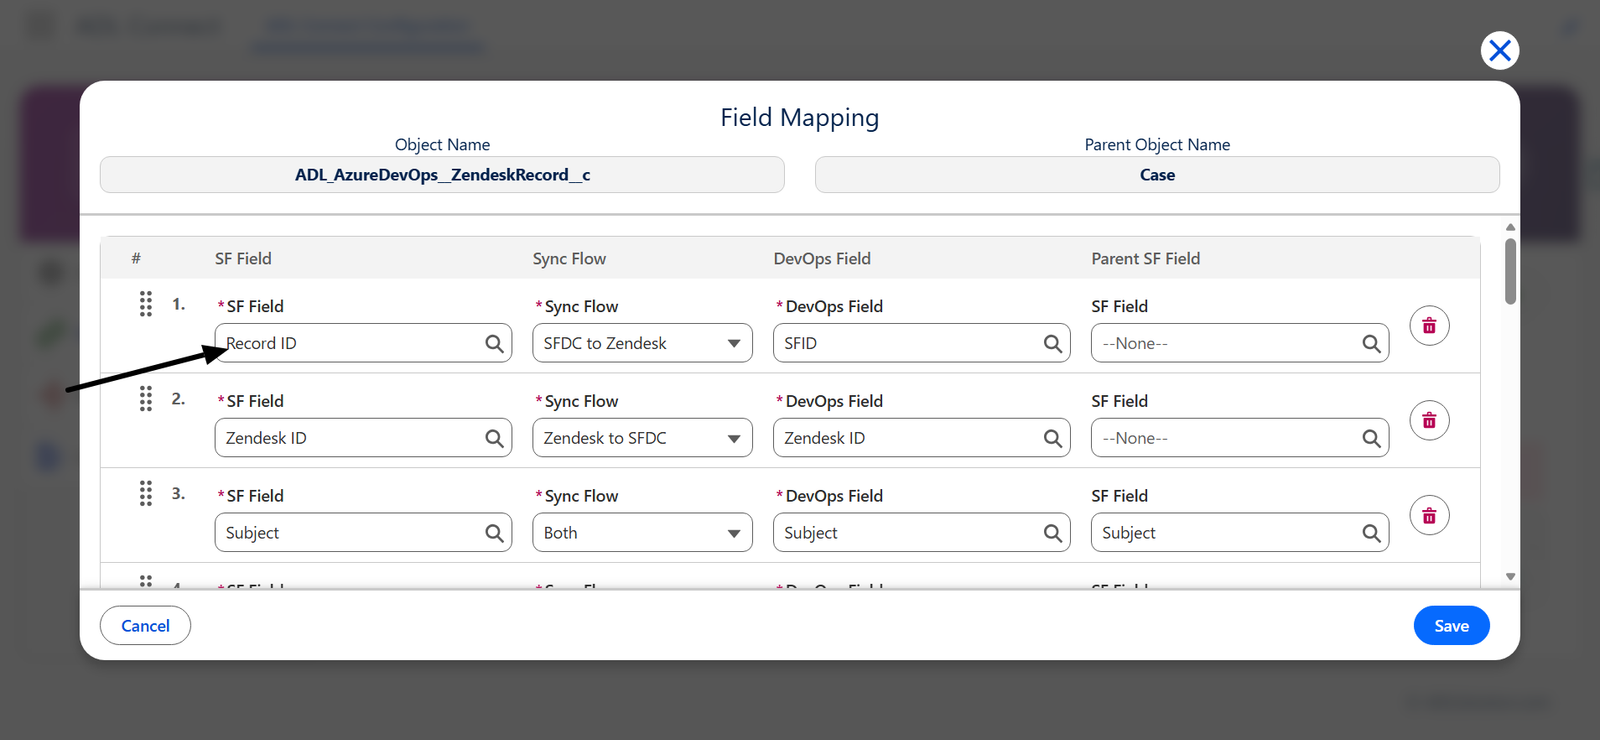
This selection determines which Salesforce data will participate in the synchronization process.
Step 3: Select the Zendesk Field
- In the Zendesk Field dropdown, select the corresponding Zendesk field to map to the chosen Salesforce field.
- The dropdown lists all standard and custom Zendesk fields available for the selected request template.
Examples include:
- Subject
- Description
- Status
- Priority
- Assigned To
- Any custom field
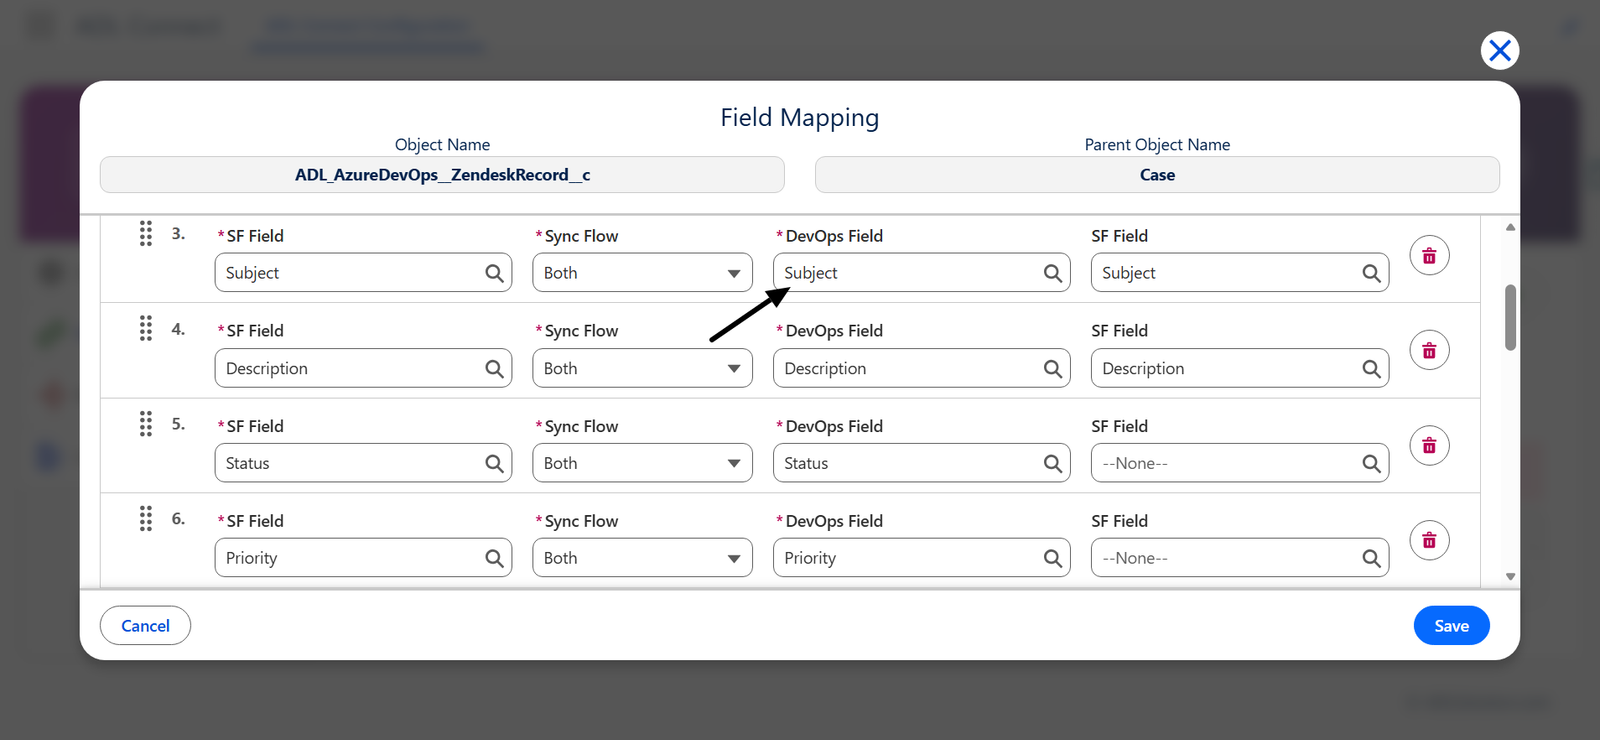
Ensure the selected Salesforce and Zendesk fields are of compatible data types to avoid synchronization errors.
Step 4: Define the Sync Direction
Use the Sync Direction option to control how updates flow between the two systems:
- Salesforce → Zendesk – Updates made in Salesforce are pushed to Zendesk only.
- Zendesk → Salesforce – Updates made in Zendesk are reflected back in Salesforce only.
- Both – Bidirectional synchronization; updates from either system are reflected in the other.
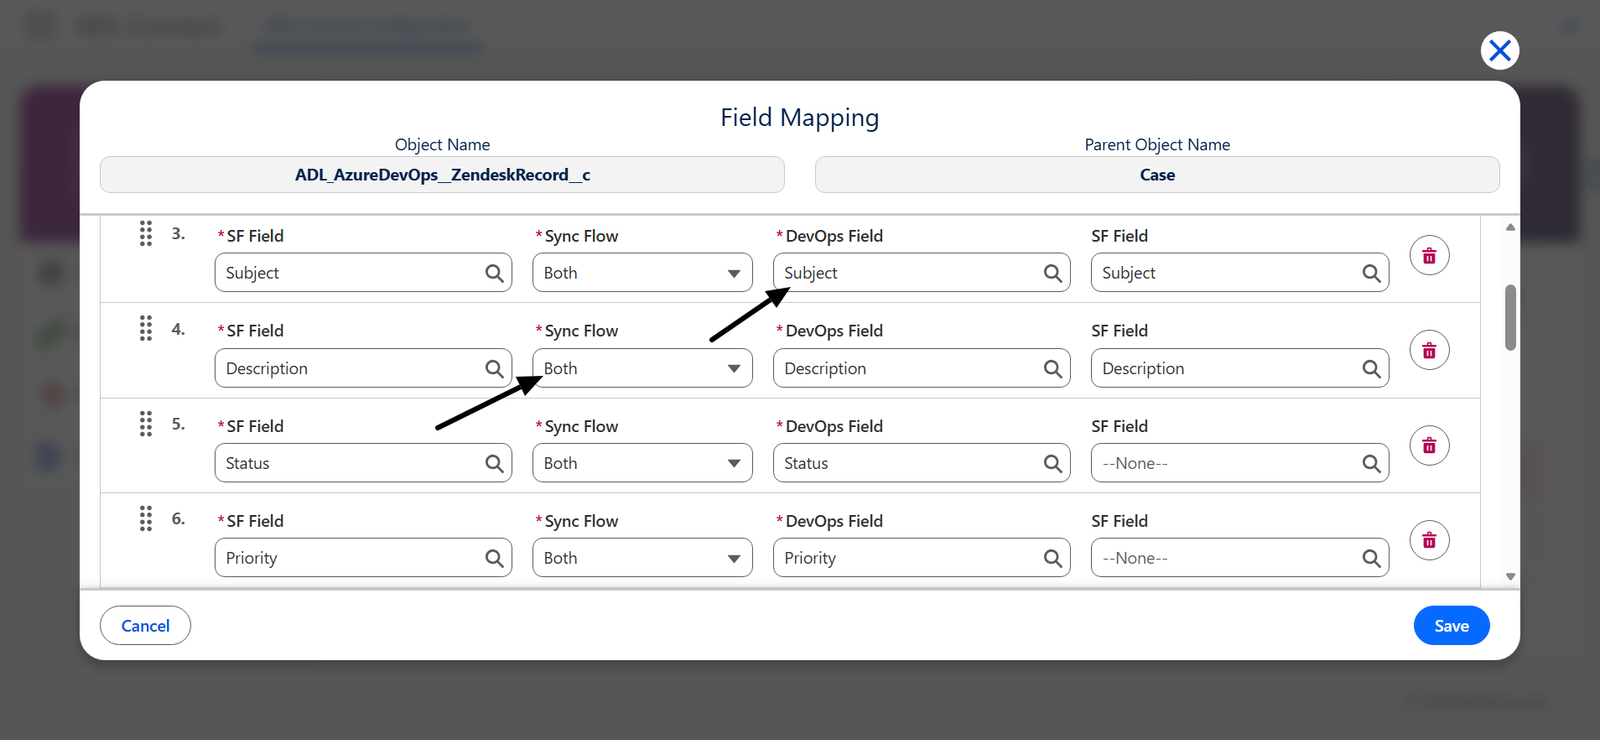
Select the direction that best matches how the field should behave in your business process.
Step 5: Save the Field Mapping
- Review the selected Salesforce field, Zendesk field, and sync direction.
- Click Save to add the field mapping to the connector.
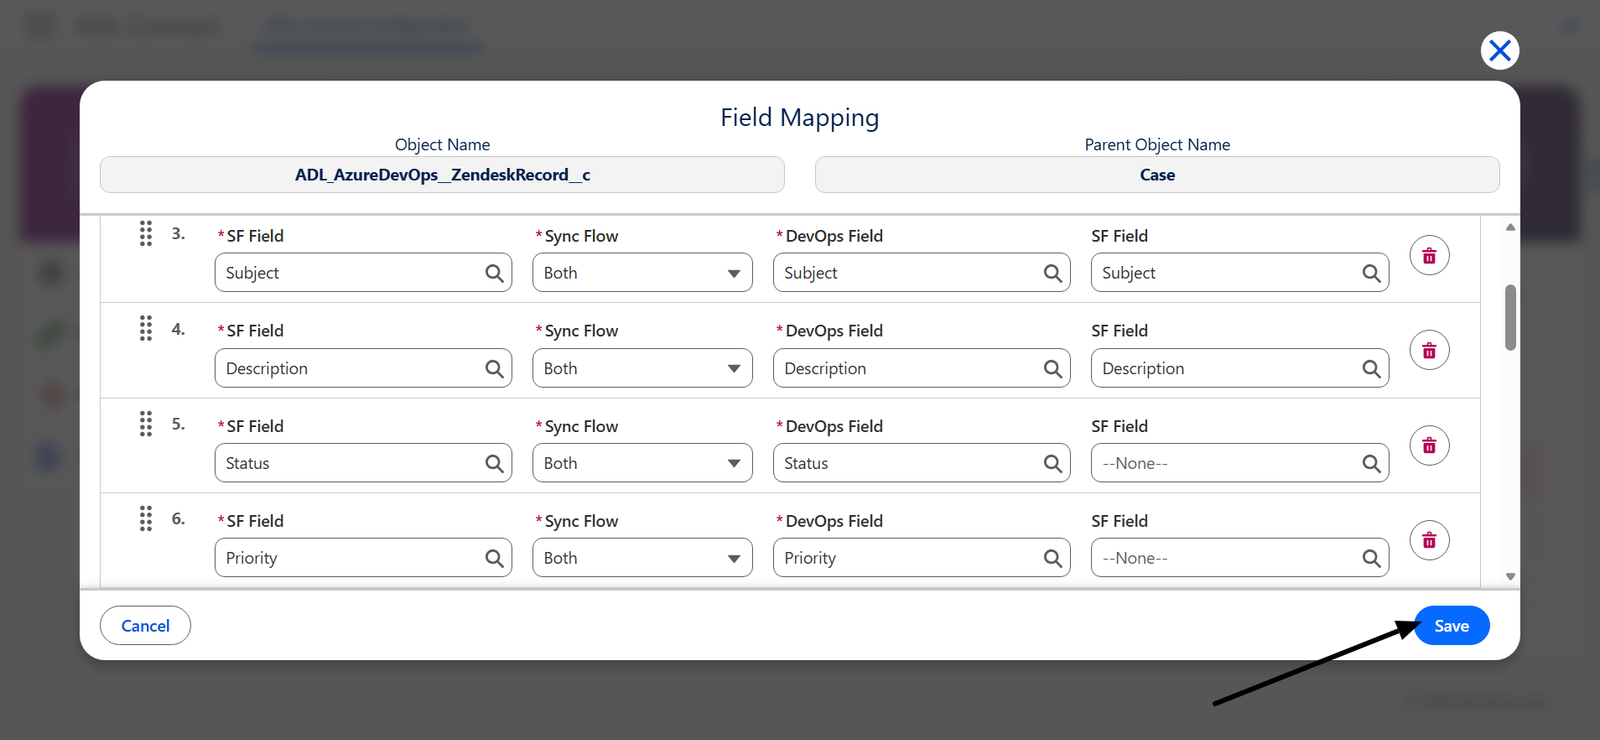
The newly created field mapping now appears in the field mapping list for that connector.
Step 6: Add Additional Field Mappings
- Click Add Field Mapping (or the + button) to create additional mappings.
- Repeat Steps 2 through 5 for each field that needs to be synchronized between Salesforce and Zendesk.
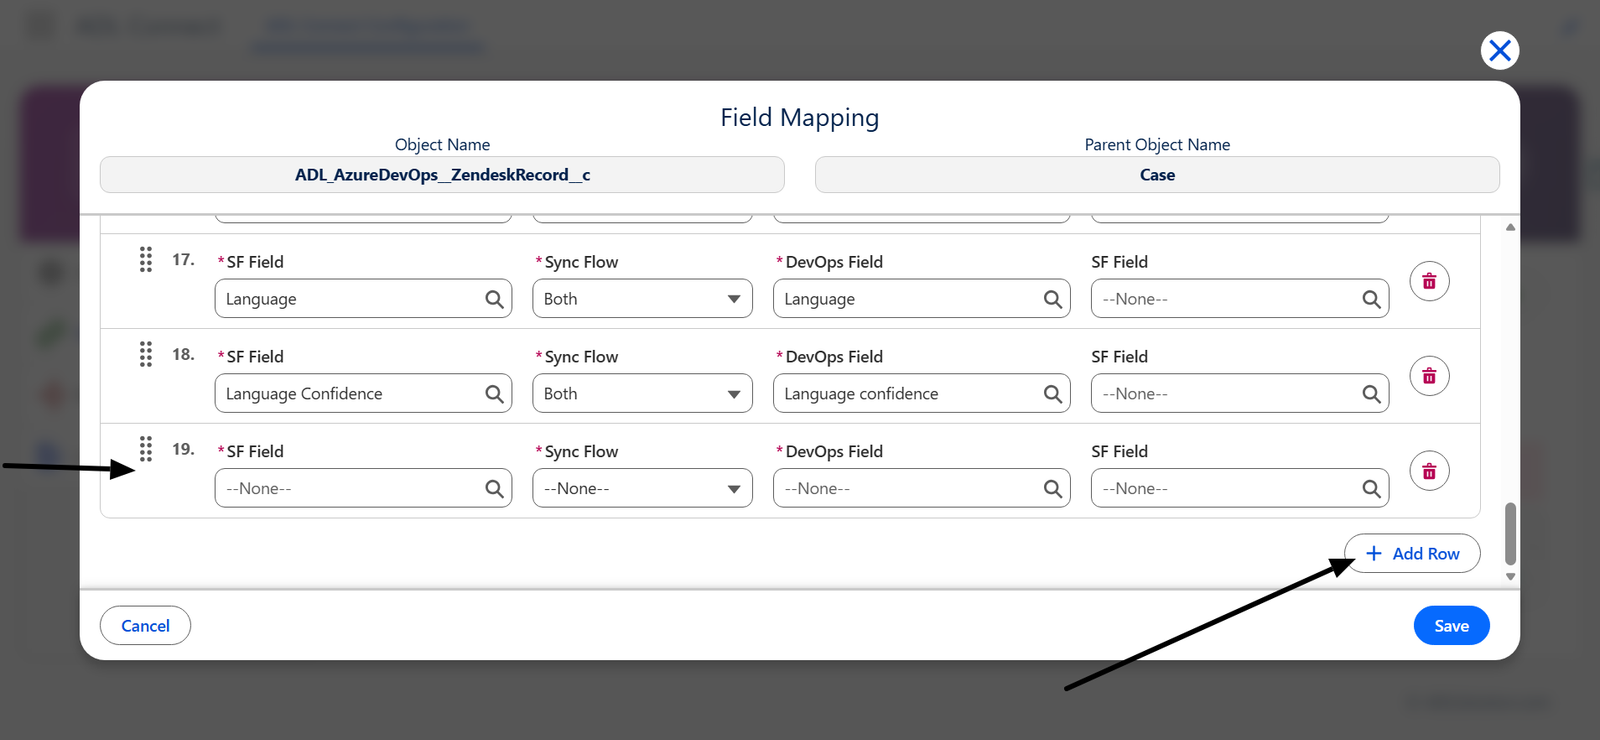
There is no limit to the number of fields that can be mapped, but only fields relevant to the integration should be configured to keep synchronization efficient.
Step 7: Edit or Remove Existing Mappings
Each mapping in the list can be managed using the row-level actions:
- Edit – Modify the Salesforce field, Zendesk field, or sync direction.
- Delete – Remove the mapping from the connector.
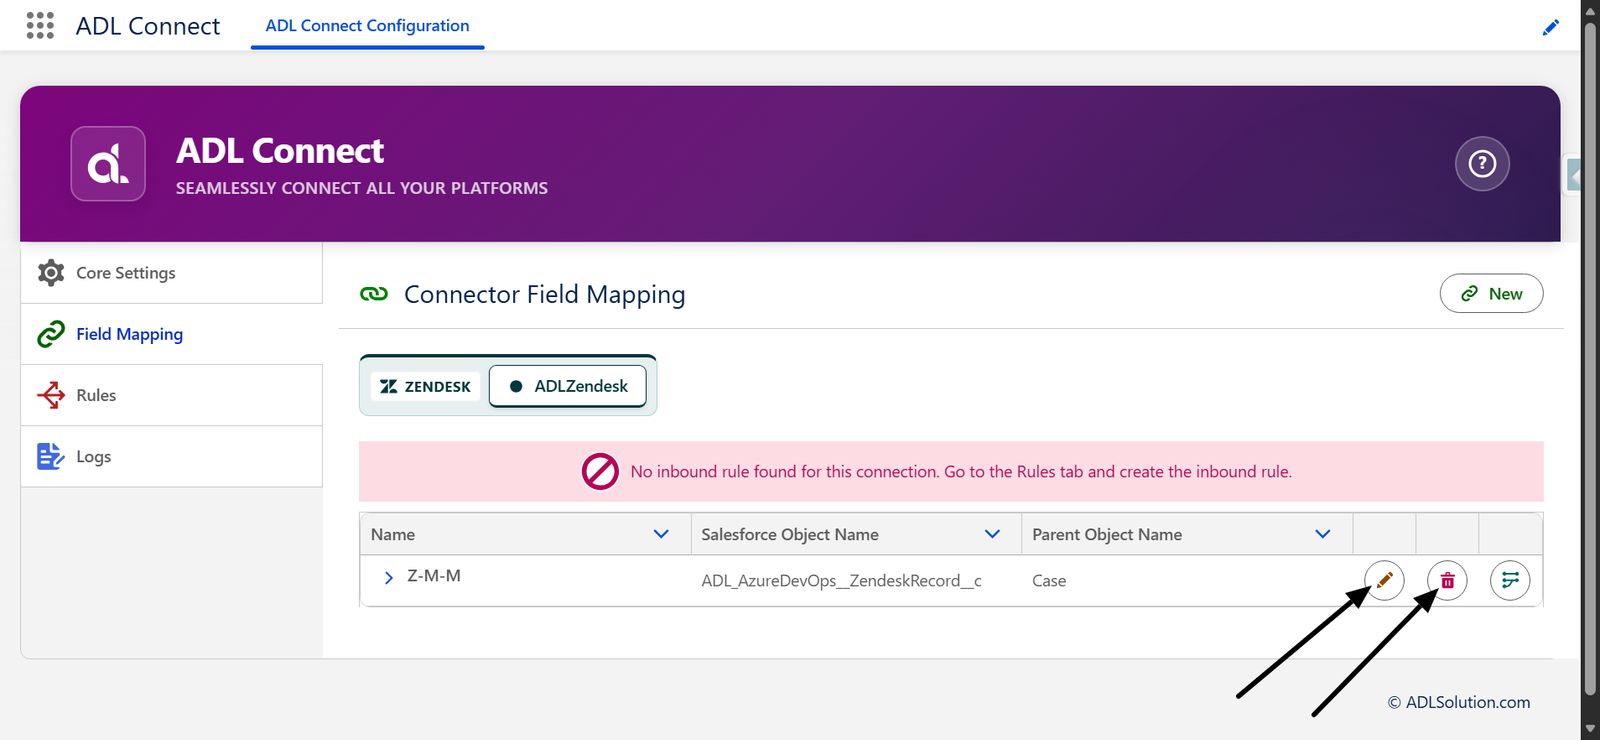
Changes take effect immediately for subsequent synchronizations.
Result
Field-level mappings are successfully configured.
This configuration ensures that data flows between Salesforce and Zendesk according to the defined direction, keeping records aligned across both platforms.
The completed field mappings serve as the basis for:
- Accurate bidirectional synchronization
- Consistent updates across teams
- Reliable reporting and traceability across Salesforce and Zendesk
Inbound Rules and Site Configuration
Inbound rules allow Zendesk to send updates back into Salesforce through ADL Connect. These updates can include:
- Field value changes
- Status transitions
- Notes
- Assignments
To enable inbound synchronization, you must:
- Create an Inbound Rule in ADL Connect
- Configure a Salesforce Site to receive Zendesk webhook requests
Follow the steps below to complete the configuration.
Prerequisites
Before proceeding, ensure that:
- A Connector Mapping has already been created in ADL Connect
- The Zendesk integration instance is configured and authenticated
- You have Salesforce System Administrator access to configure Salesforce Sites
Step 1: Open the Inbound Rule Configuration
- Navigate to the Rules section in ADL Connect.
- Locate the connector mapping you previously created.
- Click New Inbound Rule.
This opens the inbound rule configuration interface where you define how incoming updates are processed.
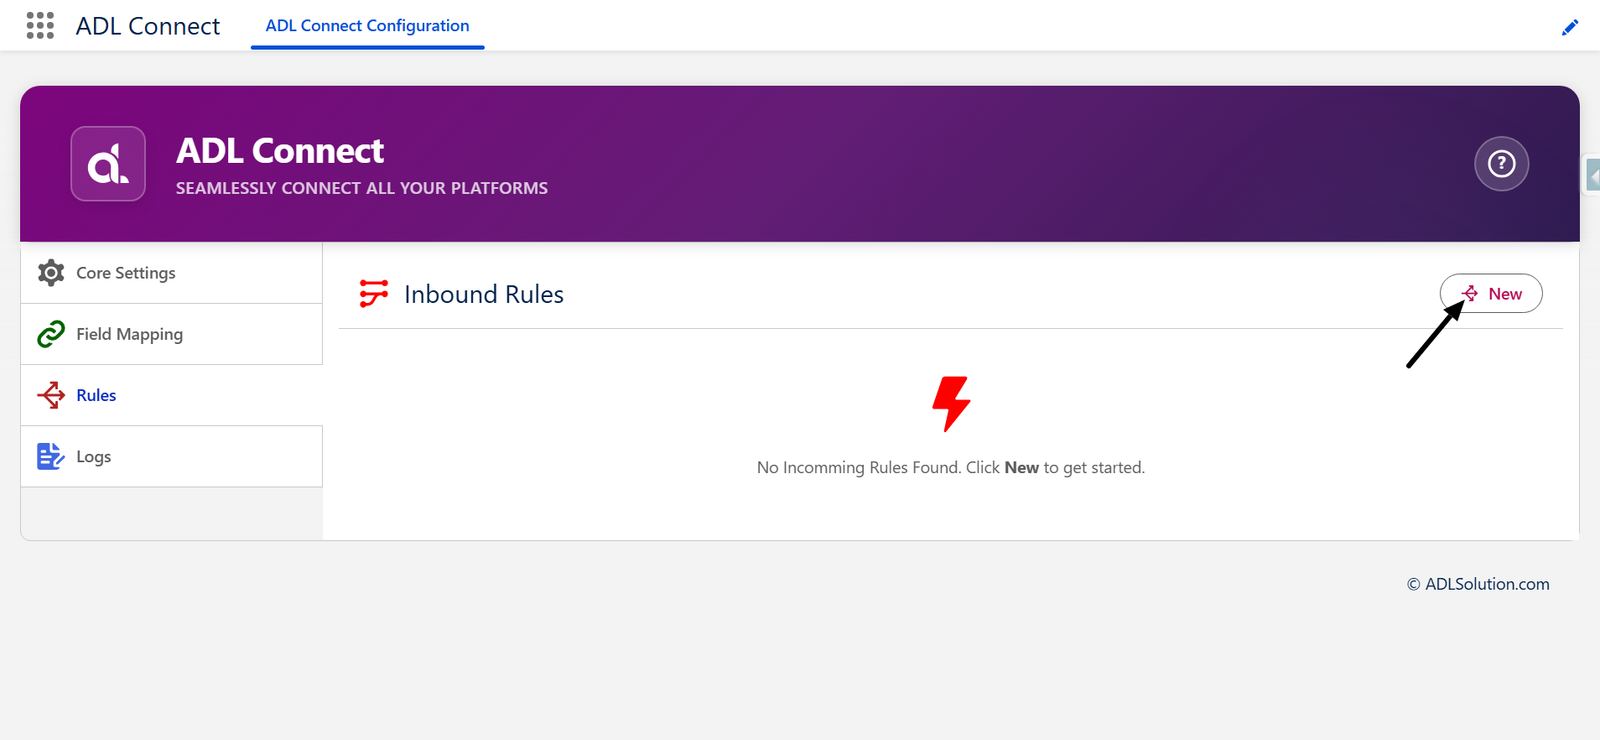
Step 2: Select the Integration App
- In the Integration App dropdown, select the Zendesk integration instance (for example, ADLZendesk).
- This ensures the inbound rule is connected to the correct Zendesk environment and authentication setup.
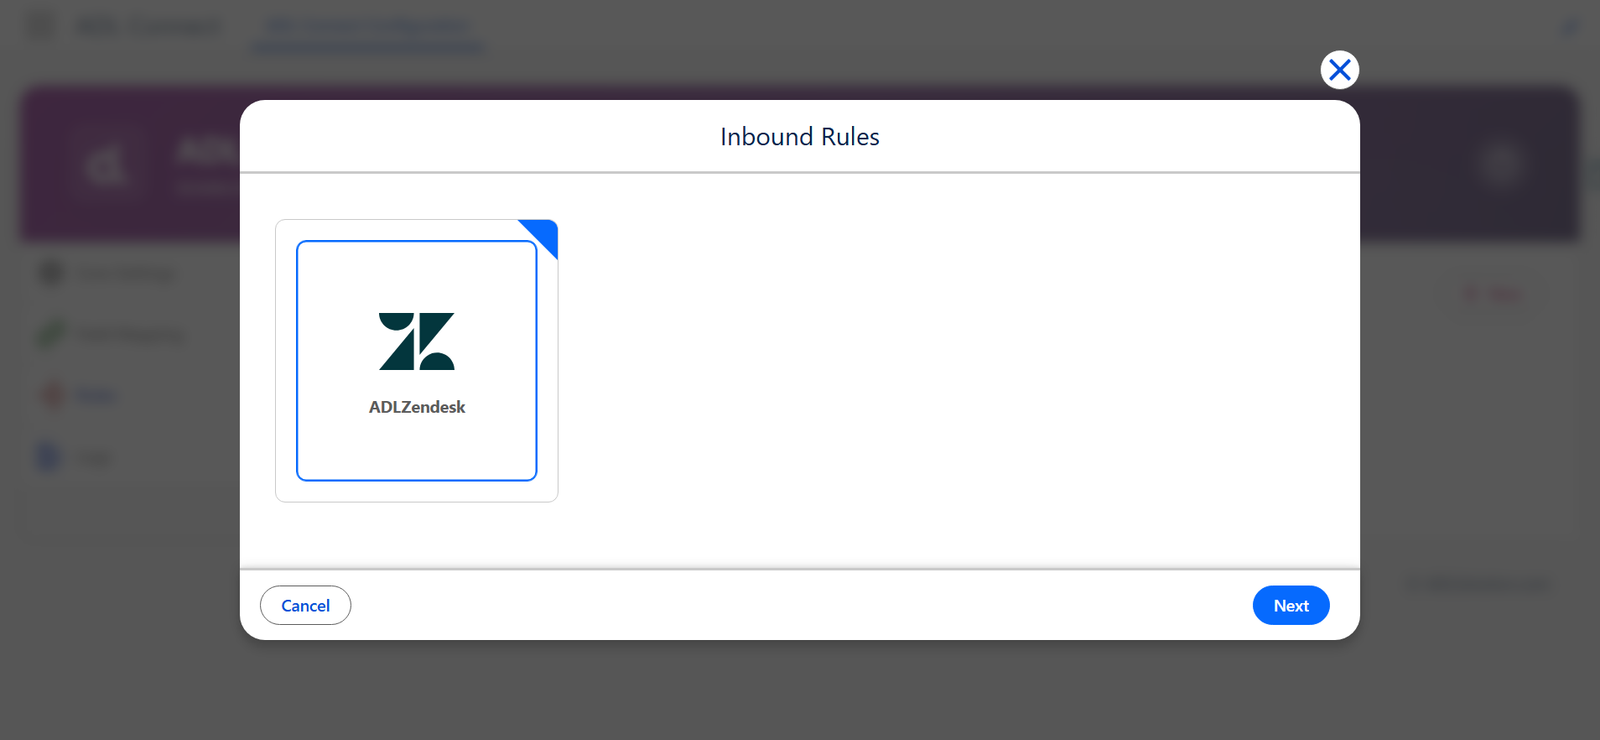
Step 3: Choose the Connector Mapping
- In the Connector Mapping field, select the mapping created earlier.
- Verify that the selected mapping corresponds to:
- The correct Salesforce object
- The intended Zendesk Connector Mapping
This ensures inbound data is applied to the correct records.
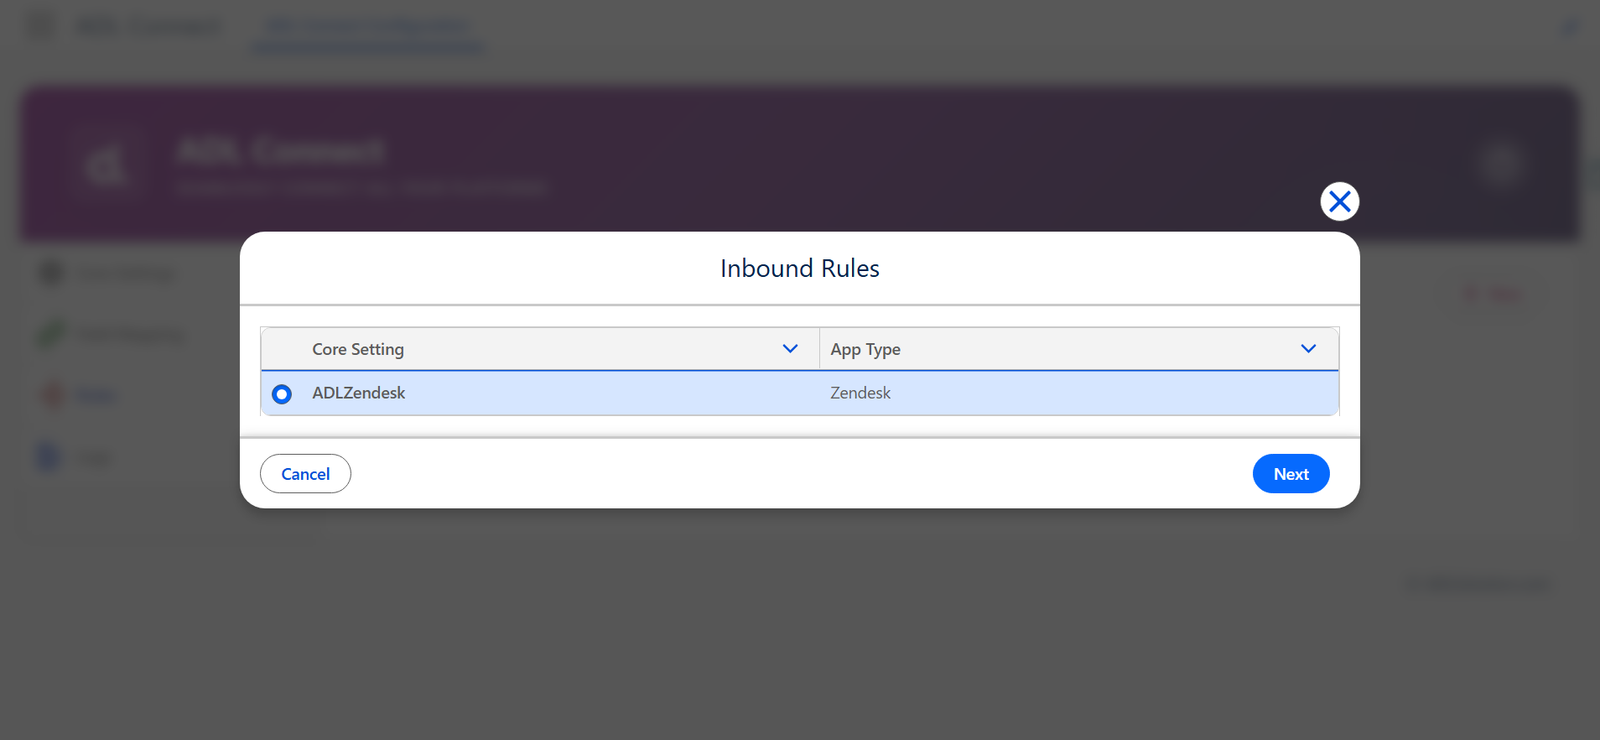
Configuring the Salesforce Site for Inbound Access
To allow Zendesk to call back into Salesforce, a Salesforce Site must be created. This Site provides the public endpoint URL used by Zendesk webhooks.
Step 4: Copy the Site Subdomain Prefix ID
- In the inbound rule configuration panel, locate the Site Subdomain Prefix ID.
- Copy this value — it will be used while creating the Salesforce Site.
- Click Add in the Site configuration section.
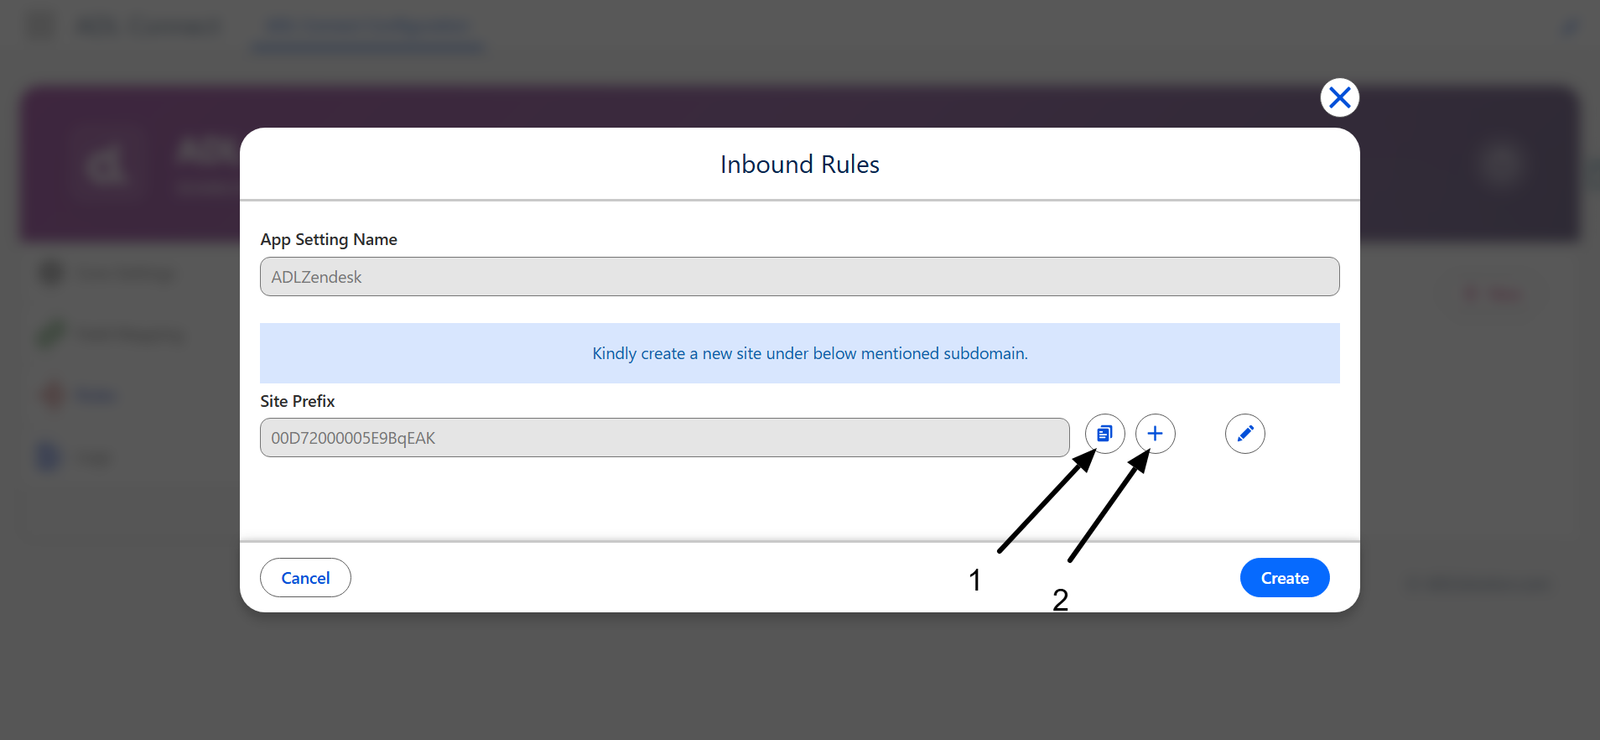
You will be redirected to the Salesforce Sites setup page.
Step 5: Register a Salesforce Site Domain (If Not Already Enabled)
If Salesforce Sites have not been enabled previously:
- You will be prompted to register a Site Domain.
- Enter a unique domain name and click Save.
- Once registered, you can proceed to create a new Site.
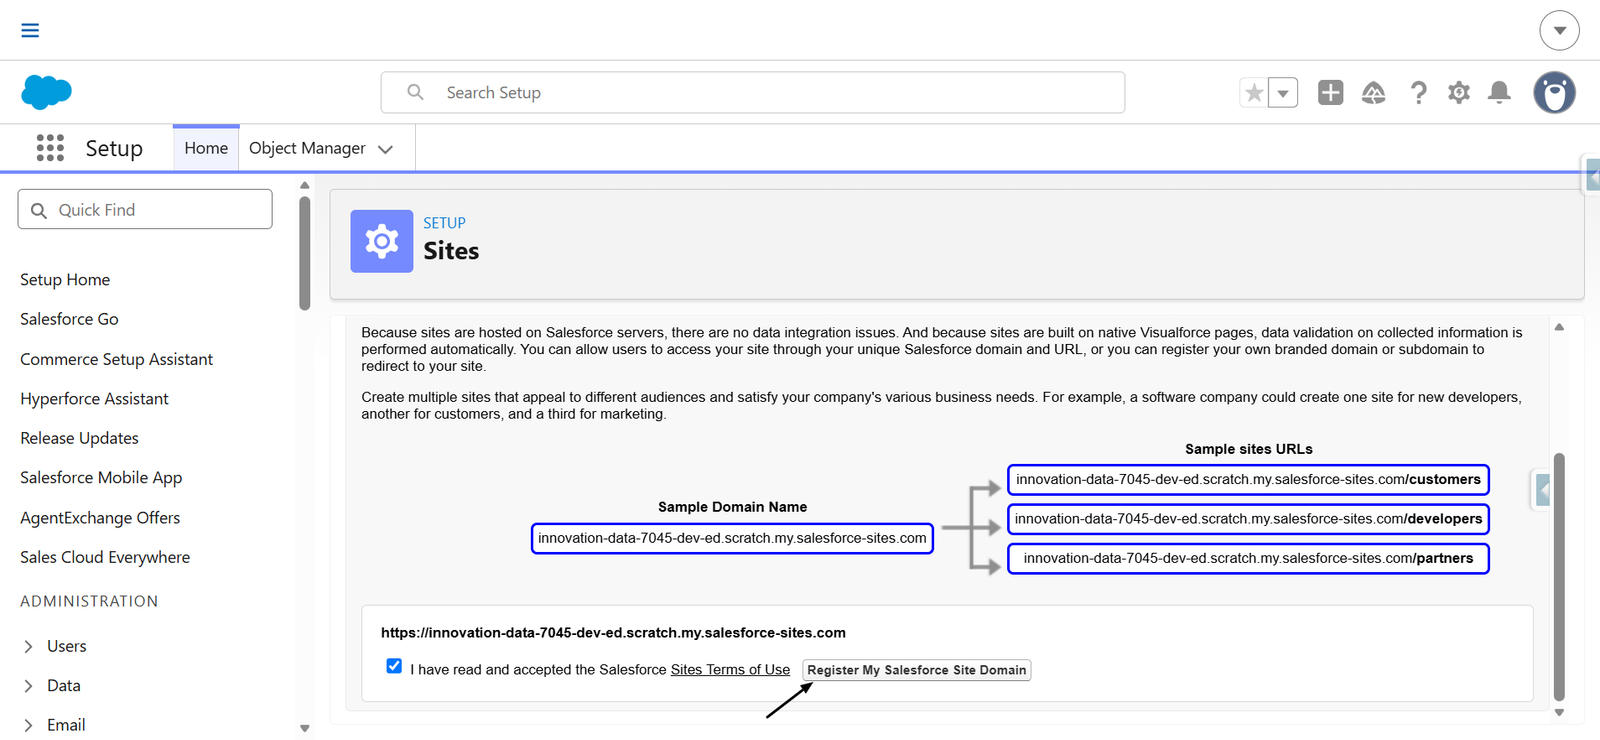
This is a one-time setup per Salesforce org.
Step 6: Create a New Salesforce Site
- On the Sites page, click New.
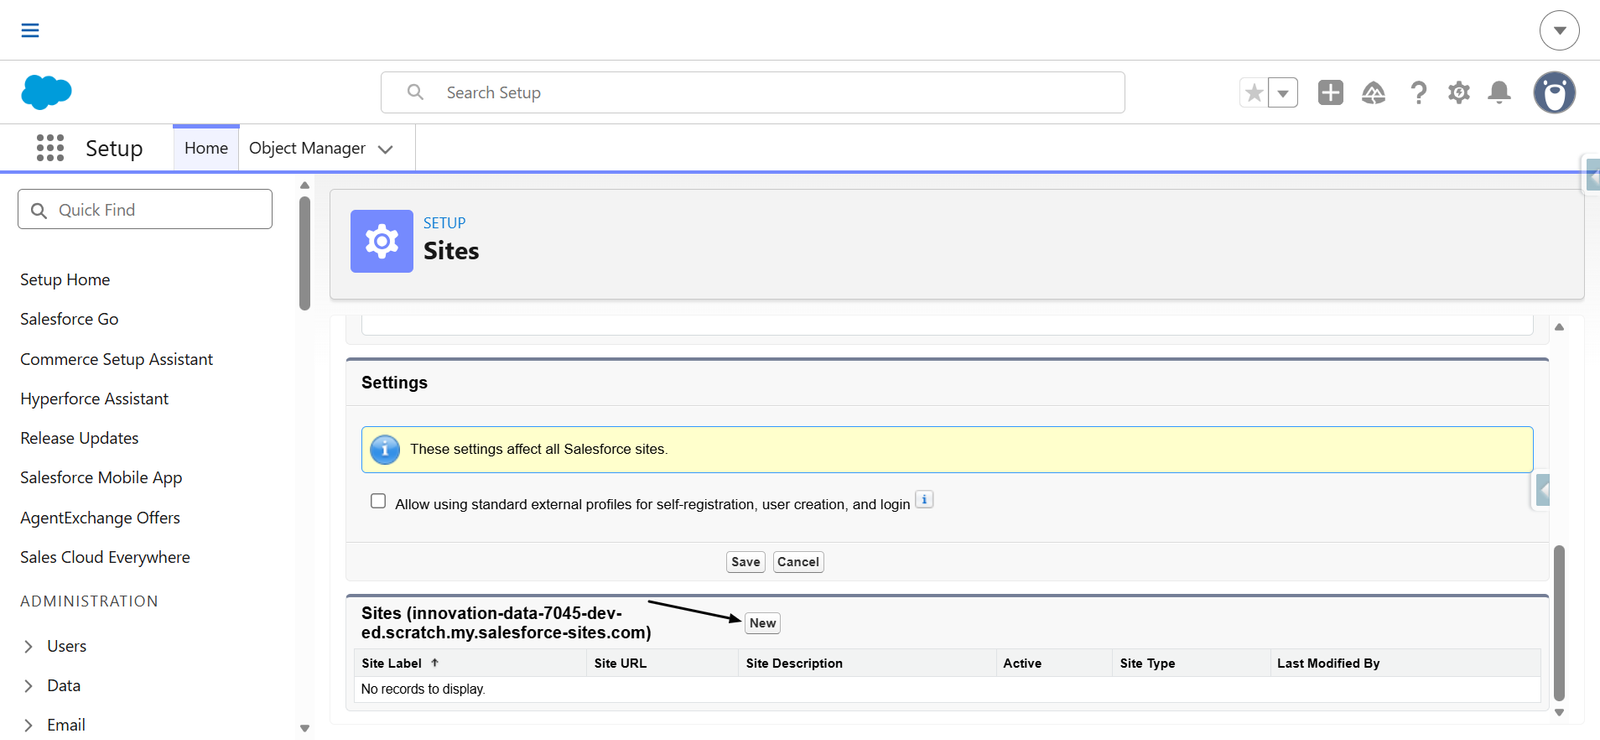
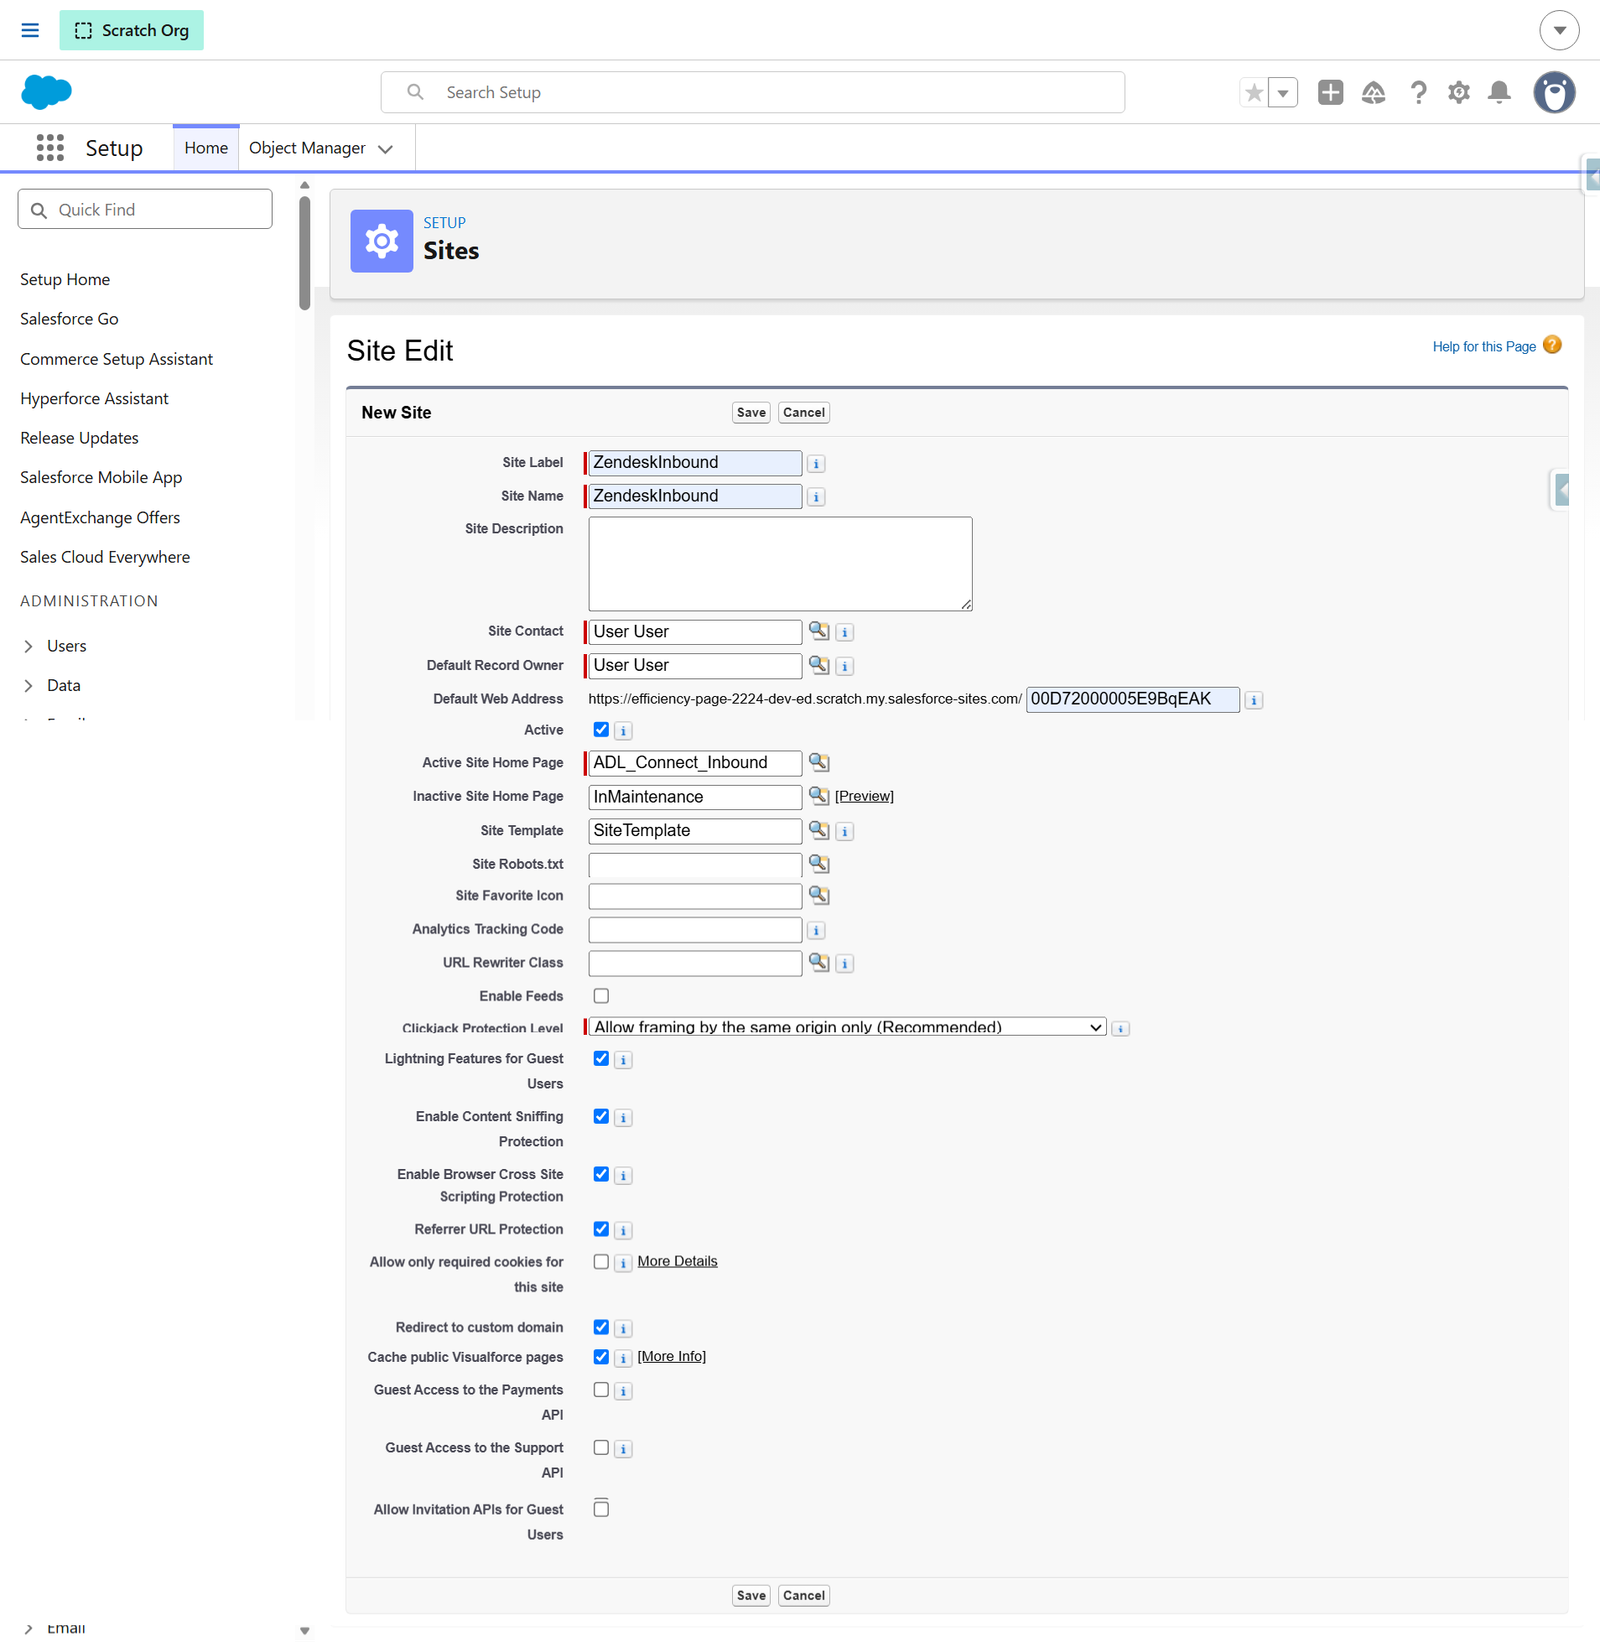
- Enter a Site Label, for example:
- ADL Connect Inbound Site
- Zendesk Inbound
- In the Site Name / Subdomain Prefix field, paste the Site Subdomain Prefix ID copied earlier.
- This ensures the Site URL matches what ADL Connect expects.
- Complete the required fields:
- Active: ✔ Enabled
- Site Contact
- Default Web Address
- Set Active Site Home Page to:
- ADL Connect Inbound
- Click Save to create the Site.
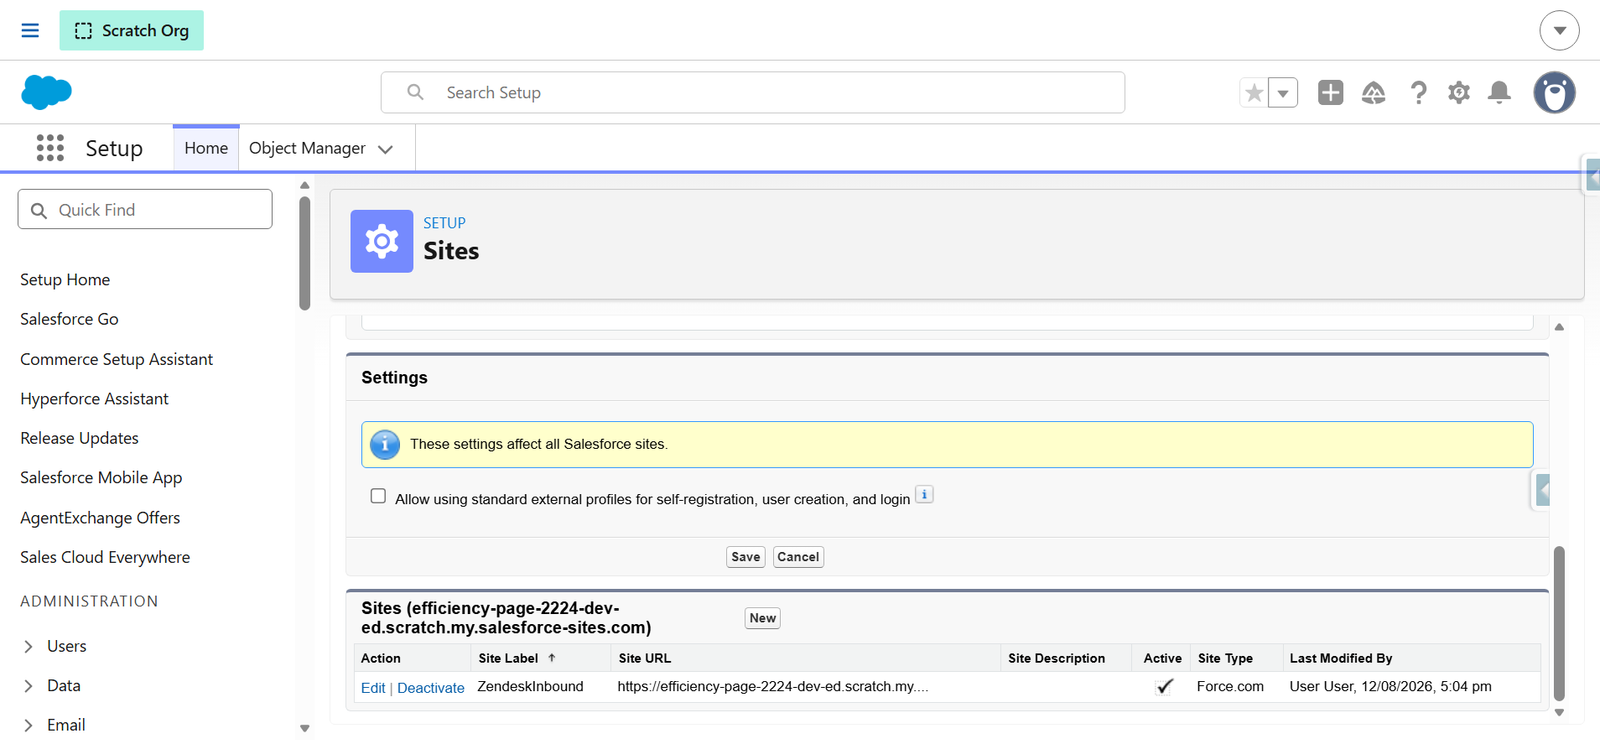
The Site will now generate a public-facing URL that Zendesk uses for inbound updates.
Step 7: Finalize the Inbound Rule in ADL Connect
- Return to ADL Connect.
- Confirm that the newly created Salesforce Site is selected in the inbound rule configuration.
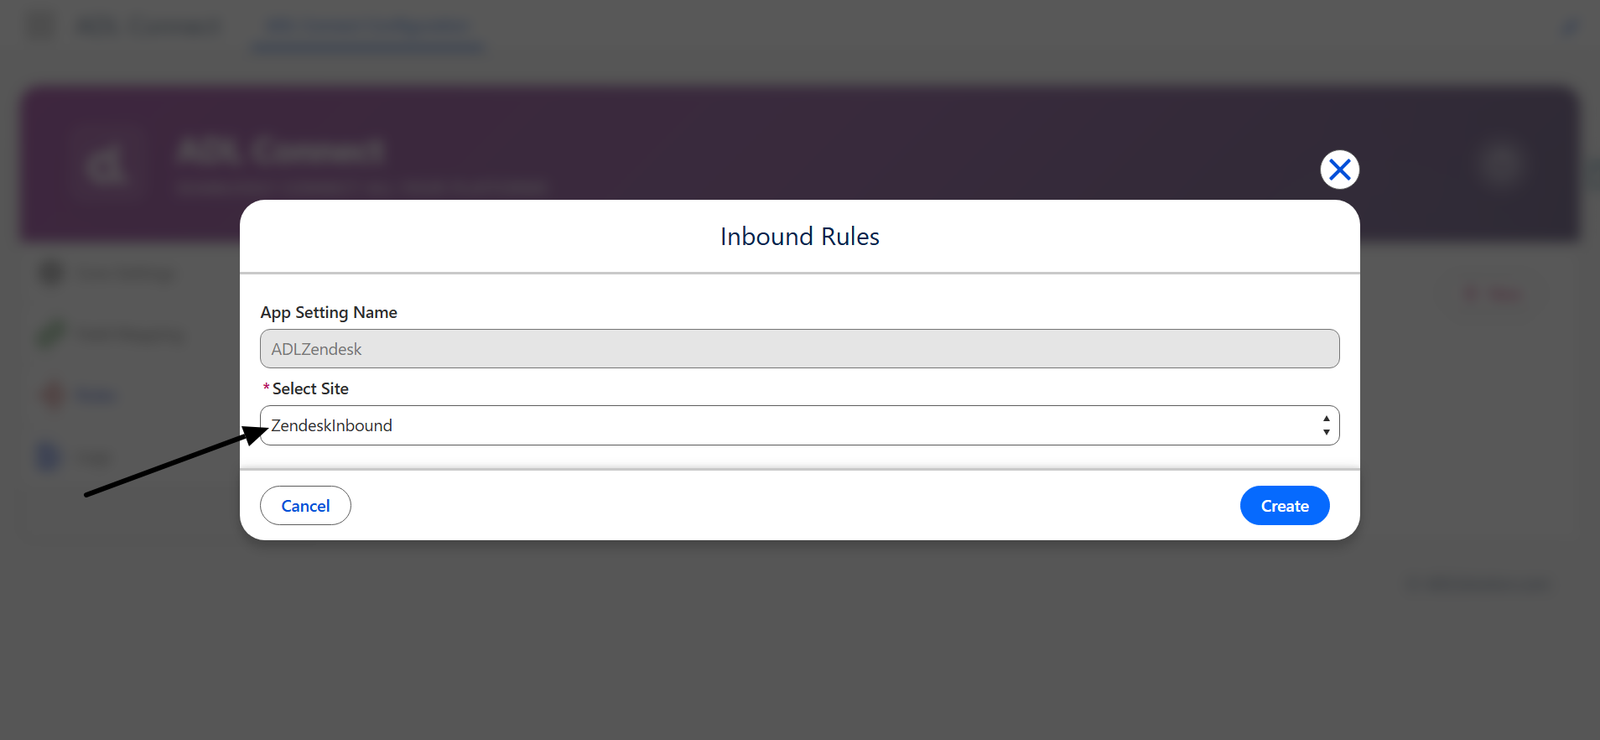
- Assign the Permission Set to the Site User
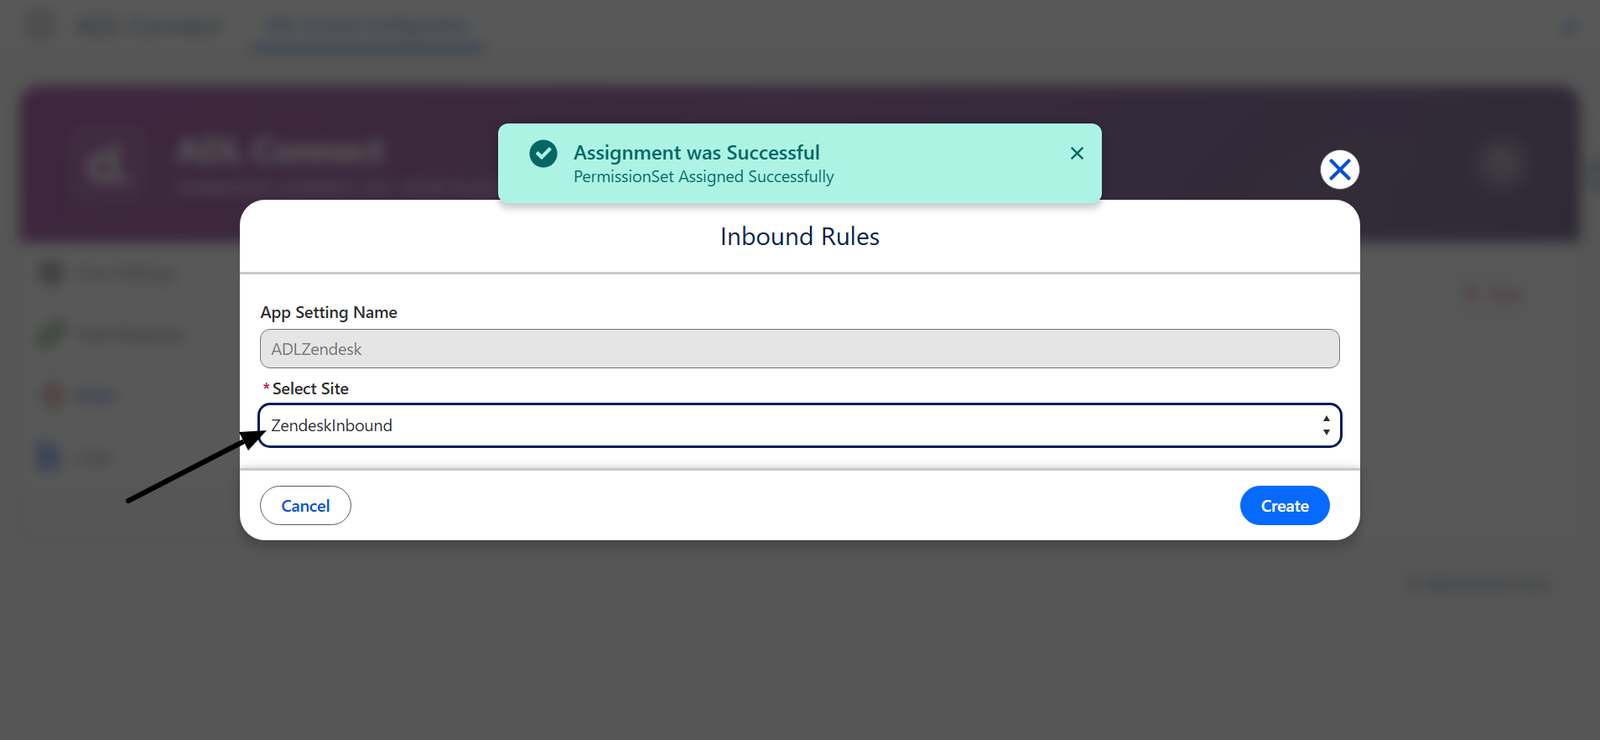
- Click Create again to Create the Inbound Rule for the connector.
- New Inbound Rule is created for the Field Mapping.
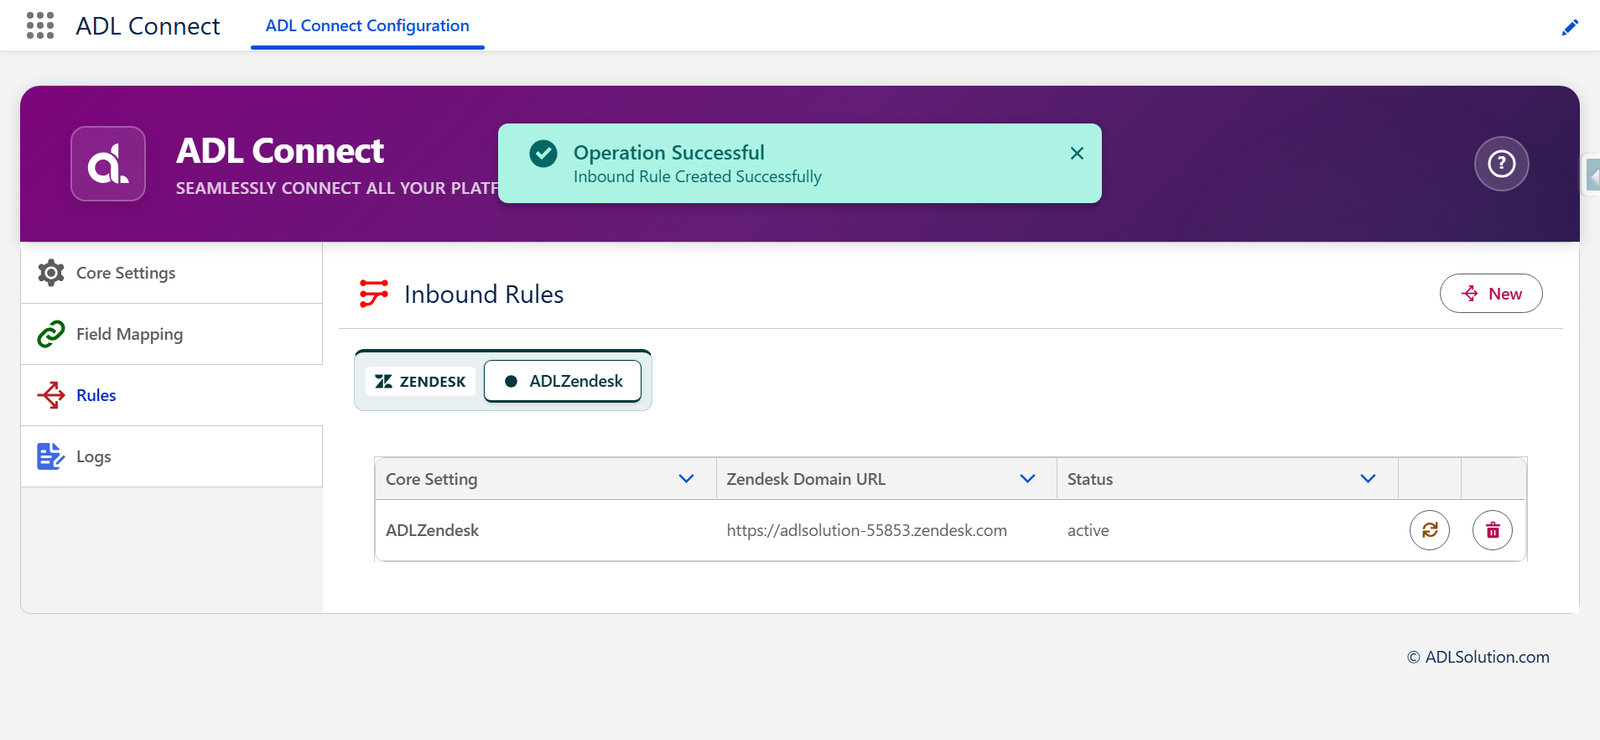
Inbound processing is now enabled for the selected connector mapping.
Configuring Sharing Settings for Guest User Access
To allow the Zendesk Site Guest User to access records required for inbound processing, a Sharing Rule must be created for the DevOps Project object. This ensures that when Zendesk sends updates through the Salesforce Site, the Guest User has permission to read the necessary records without granting overly broad access.
Step 1: Open Sharing Settings
- Navigate to Setup in Salesforce.
- In the Quick Find box, search for Sharing Settings.
- Select Sharing Settings from the results.
Step 2: Locate the DevOps Project Sharing Rules Section
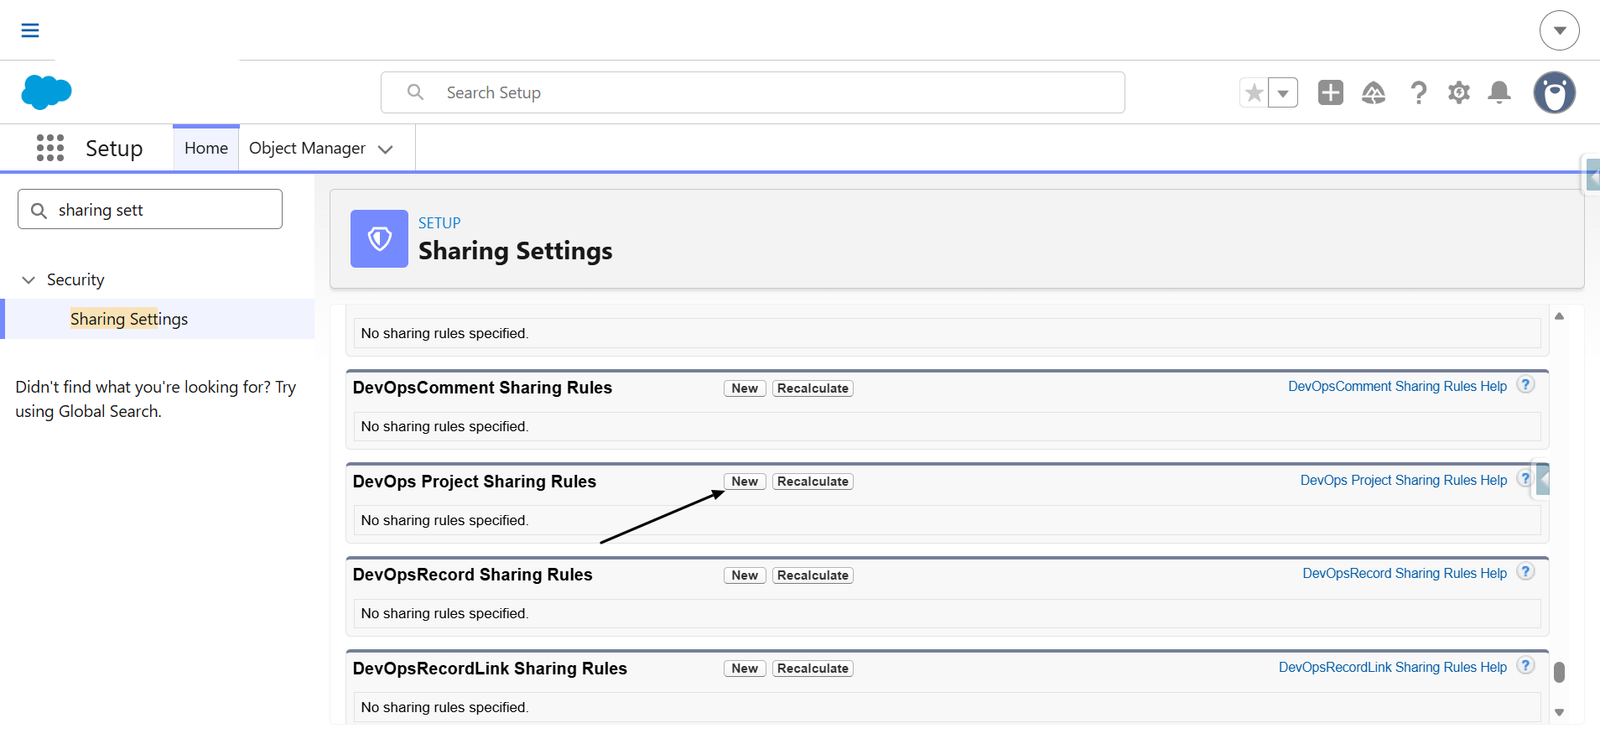
- Scroll down the Sharing Settings page until you find the DevOps Project Sharing Rules section.
- Click New next to this section to create a new sharing rule.
Step 3: Enter the Rule Details
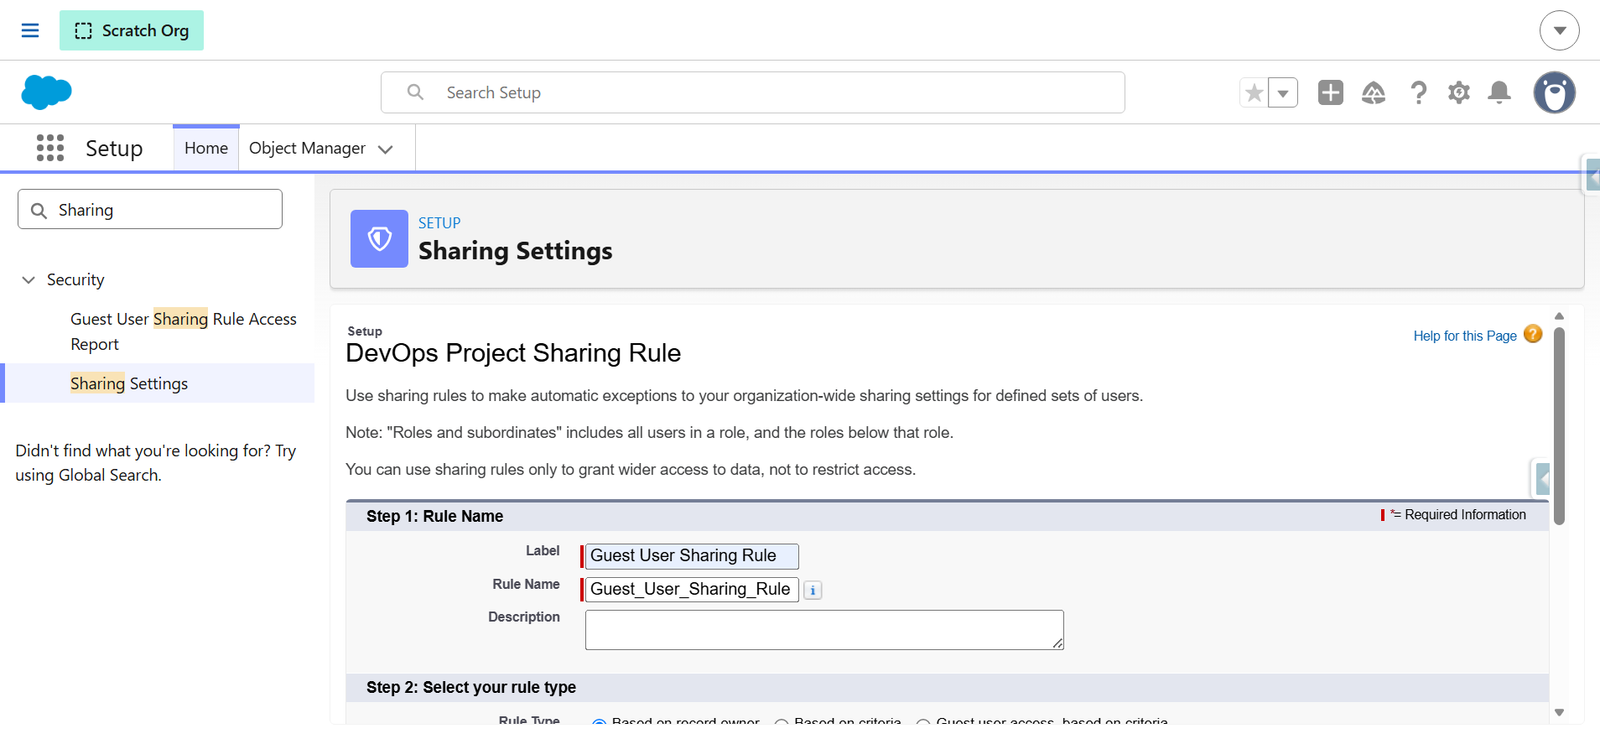
In the Step 1: Rule Name panel:
- Label – Enter a descriptive name (for example, Site Guest User Rule).
- Rule Name – Automatically populated based on the label (for example, Site Guest User Rule).
- Description – (Optional) Add a short description explaining the purpose of the rule.
Step 4: Select the Rule Type
In the Step 2: Select your rule type panel:
- Choose Guest user access, based on criteria.
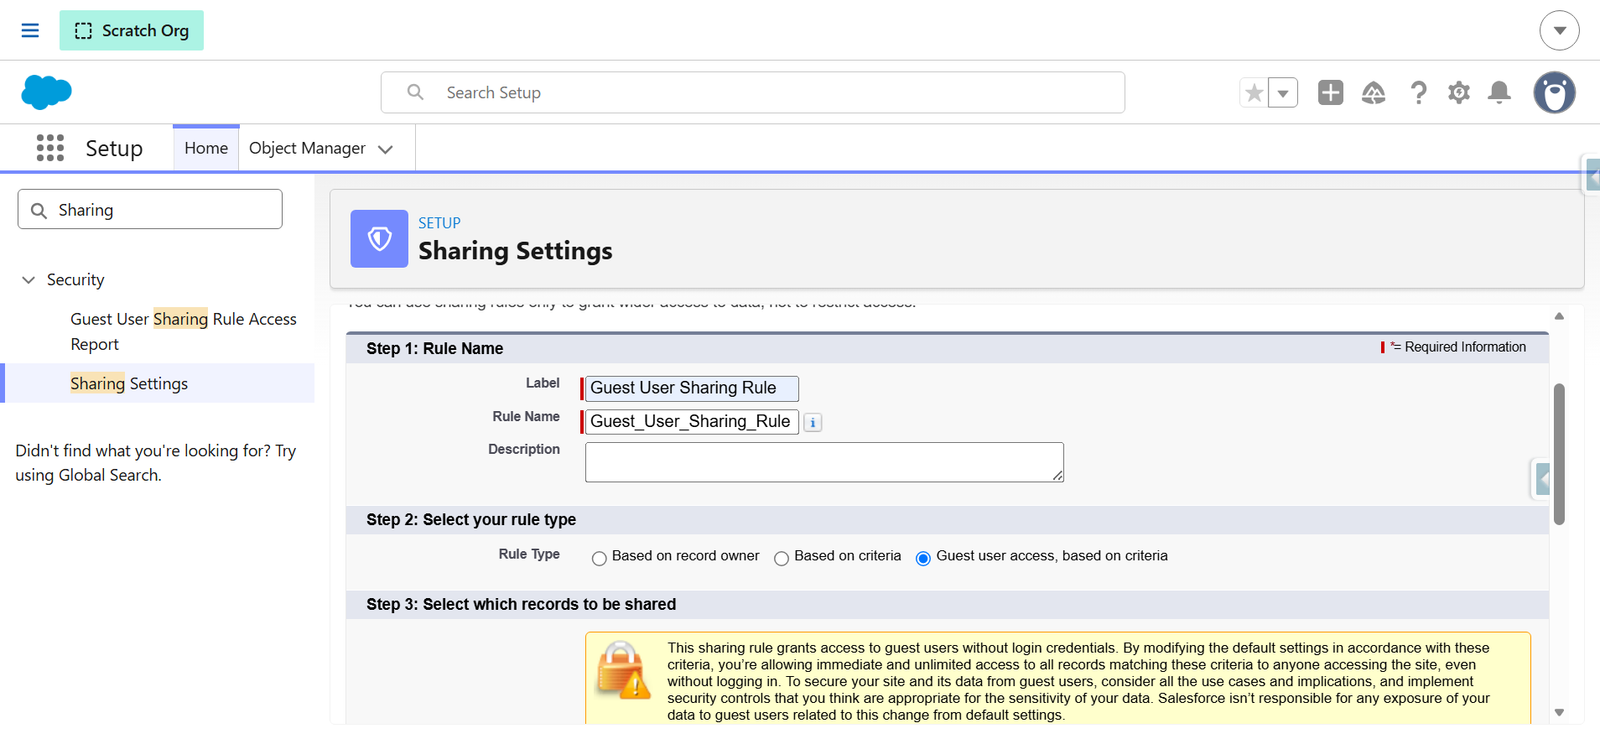
This rule type grants controlled record access to unauthenticated users accessing Salesforce through the Site.
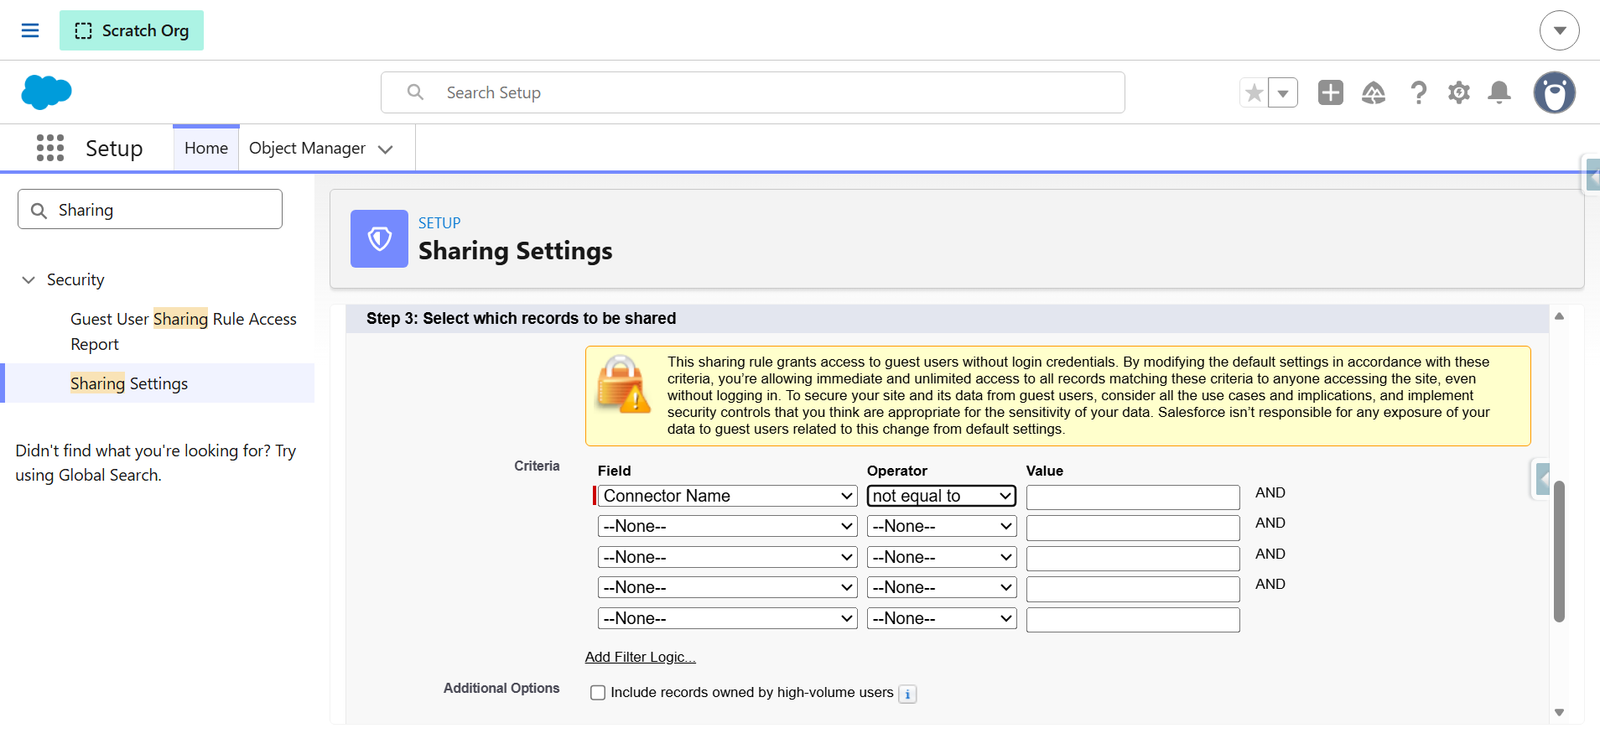
Step 5: Define the Sharing Criteria
In the Step 3: Select which records to be shared panel:
- Field – Select Connector Name.
- Operator – Select not equal to.
- Value – Leave blank.
This criterion ensures that all DevOps Project records with a Connector Name are shared with the Site Guest User.
Step 6: Select the User to Share With
In the Step 4: Select the users to share with panel:
- Share with – Select the Zendesk Site Guest User (for example, ZendeskInbound Site Guest User).
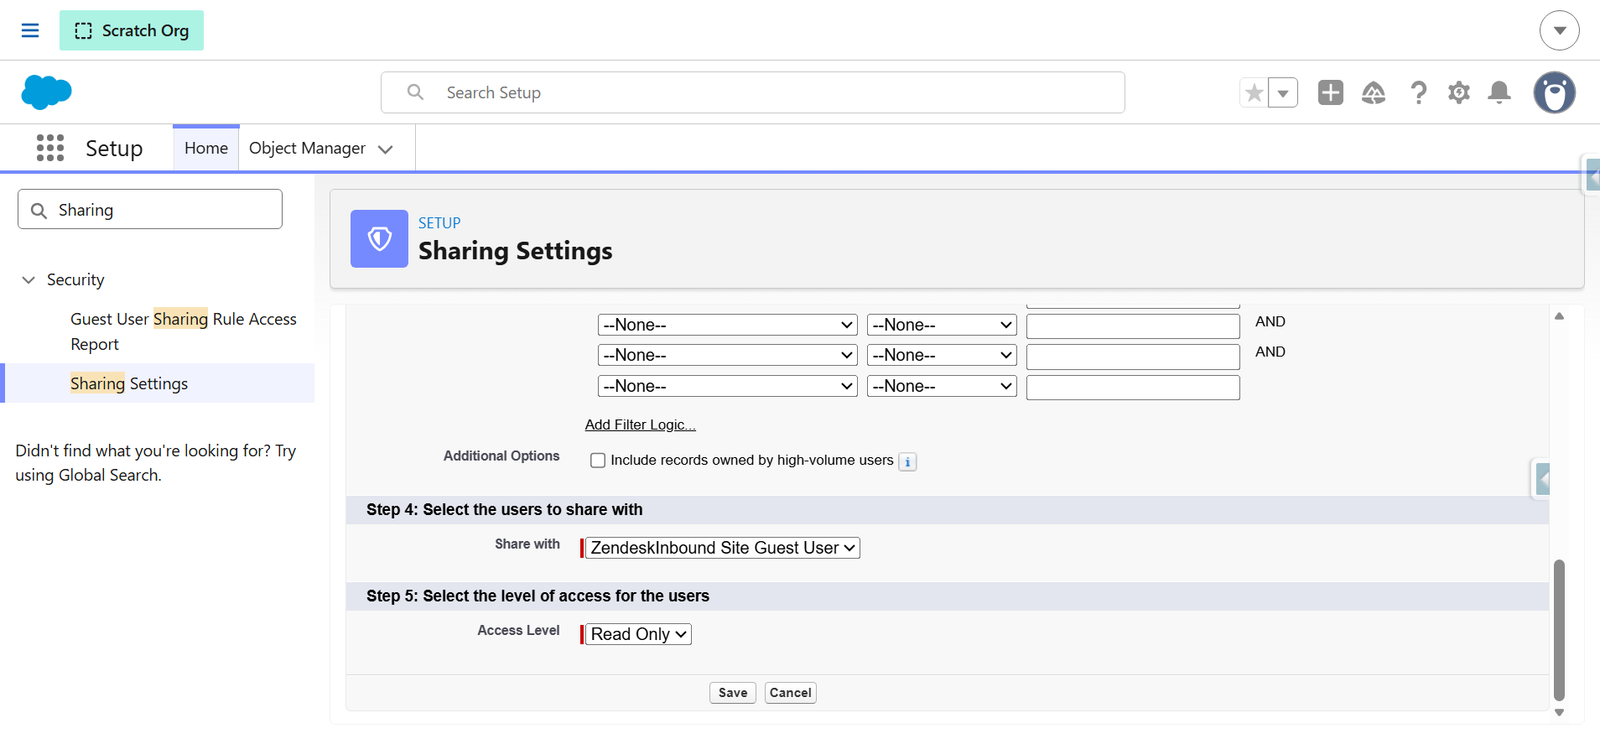
Step 7: Set the Access Level
In the Step 5: Select the level of access for the user's panel:
- Access Level – Select Read Only.
Read-only access is sufficient for inbound processing and enforces least-privilege security.
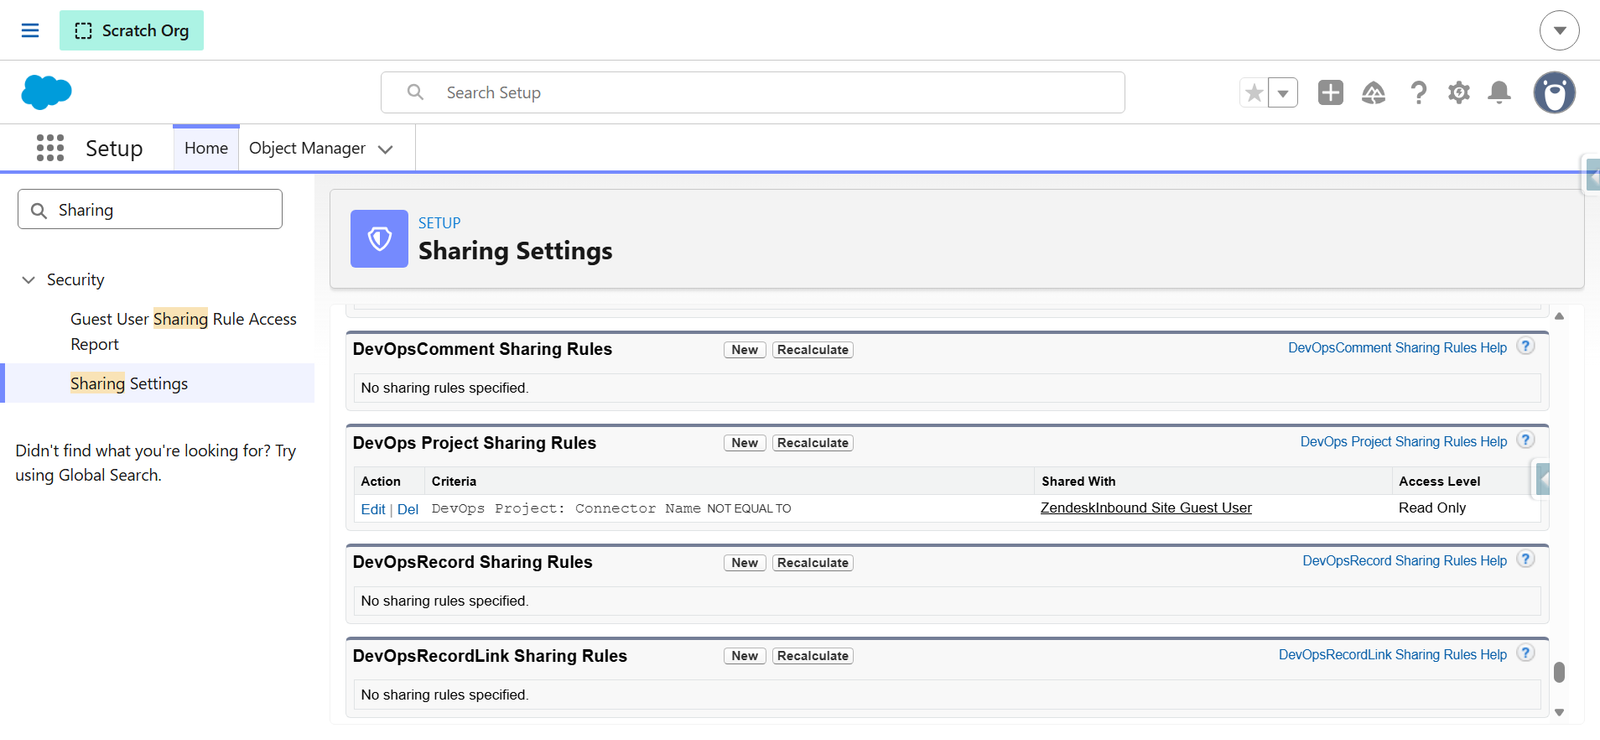
Step 8: Save the Sharing Rule
- Click Save to create the sharing rule.
- If prompted with a confirmation dialog about sharing rule recalculation, click Yes to proceed.
The newly created sharing rule now appears under the DevOps Project Sharing Rules section, showing the criteria, the Guest User it is shared with, and the access level.
Result
After completing this configuration:
- Zendesk can push real-time updates into Salesforce
- The Salesforce Site acts as the secure inbound endpoint
- The Site Guest User has the minimum required access to process inbound records
- ADL Connect processes inbound field updates, status changes, notes, and assignments
Configuring Case Page Layout
ADL Connect allows users to create, view, and manage Zendesk requests directly from Salesforce Case records. This is achieved by adding a set of ADL Connect components to the Case Lightning Record Page and leveraging the configured connector mappings and synchronization rules.
This article explains how to configure the Case page layout so that Zendesk request management is fully available on every Case record.
Prerequisites
Before proceeding, ensure that:
- ADL Connect is installed and configured
- Zendesk integration and Connector Mapping are already set up
- You have permission to edit Lightning Record Pages
- Inbound and outbound sync rules are configured (if bi-directional sync is required)
Step 1: Open and Edit the Case Record Page
- Open any existing Case record in Salesforce.
- Click Edit Page from the Setup gear menu to open the Lightning App Builder.
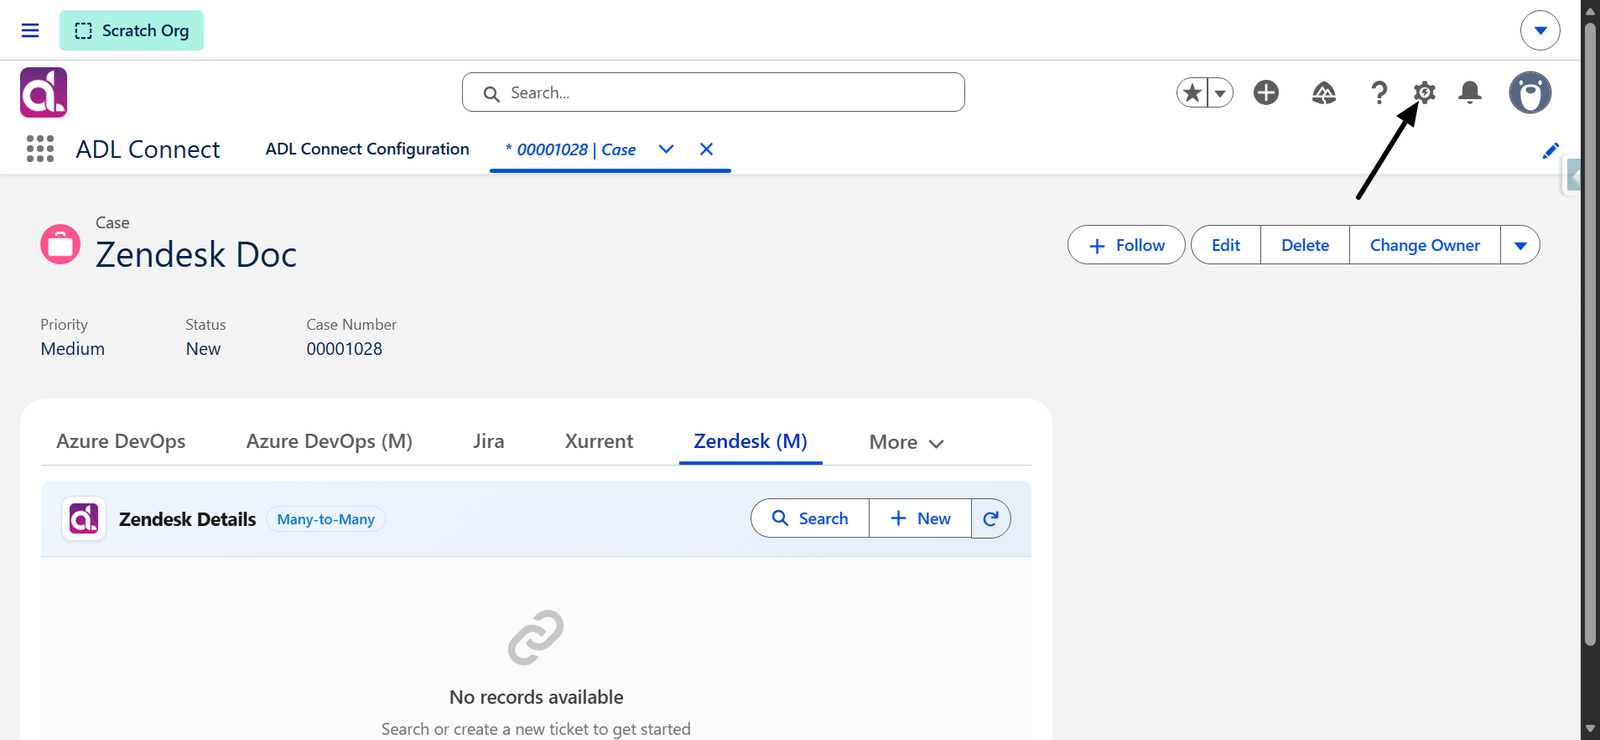
This opens the Case record layout where managed components can be added.
Step 2: Add the ADL Zendesk Components
In the Lightning App Builder, scroll to Custom – Managed Components in the left panel and drag the following Zendesk components into the desired region of the Case page:
Component | Purpose |
|---|---|
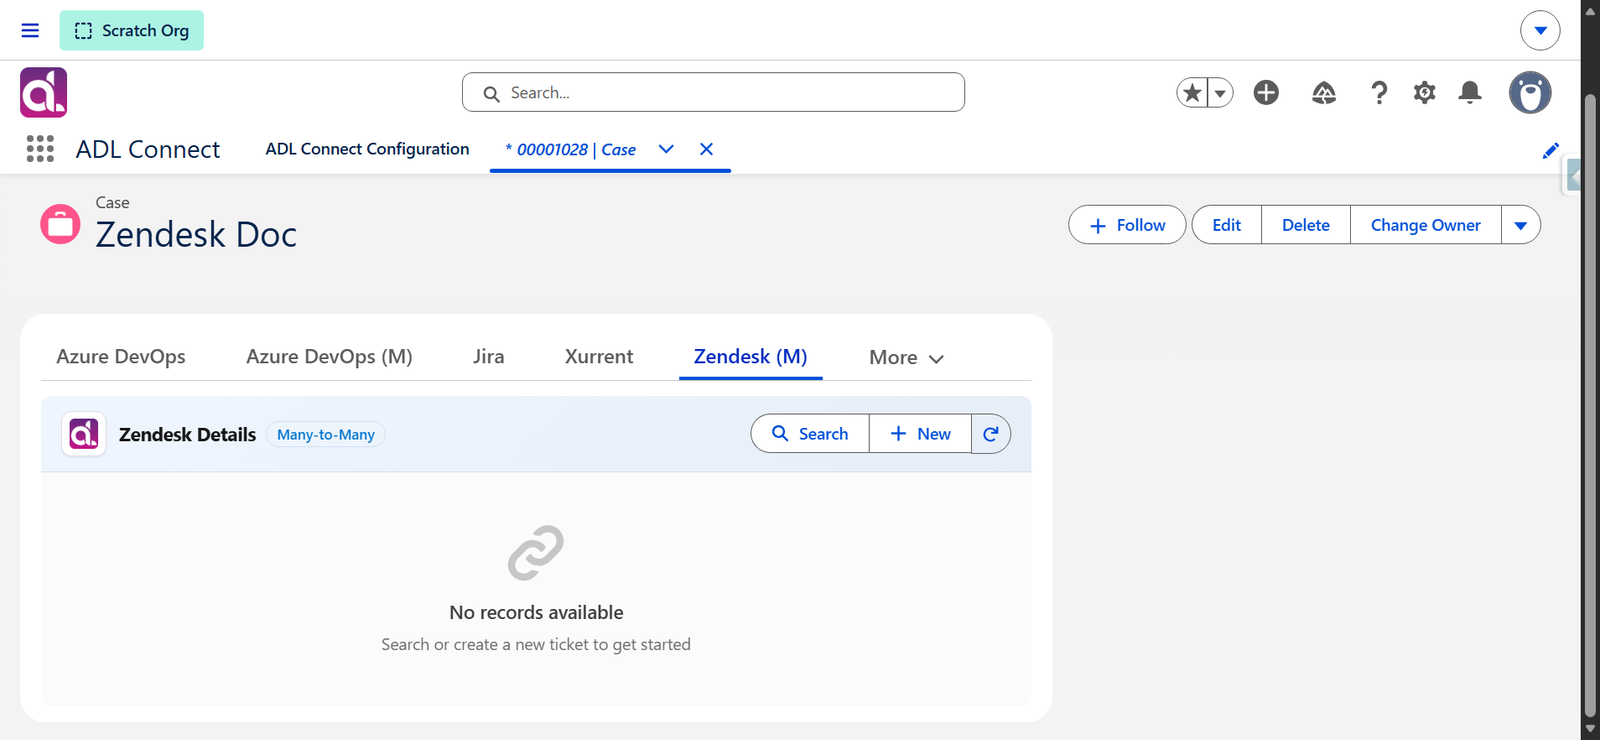
ADL Zendesk Details | Displays linked Zendesk ticket details and allows creating or searching Zendesk tickets. |
ADL Zendesk Workflow | Shows the workflow linked to the Zendesk ticket. |
ADL Zendesk Attachments | Displays attachments associated with the Zendesk ticket. |
ADL Zendesk Comments | Enables viewing and sending comments on the Zendesk ticket. |
ADL Zendesk Activity | Shows activity history for the Zendesk ticket. |
Each component is also available in a (M) – Many to Many variant (for example, ADL Zendesk Details (M)), which should be used when the connector mapping is configured as Many to Many.
Use the standard variants for One-to-One connector mappings and the (M) variants for Many to Many connector mappings — do not mix the two on the same tab.
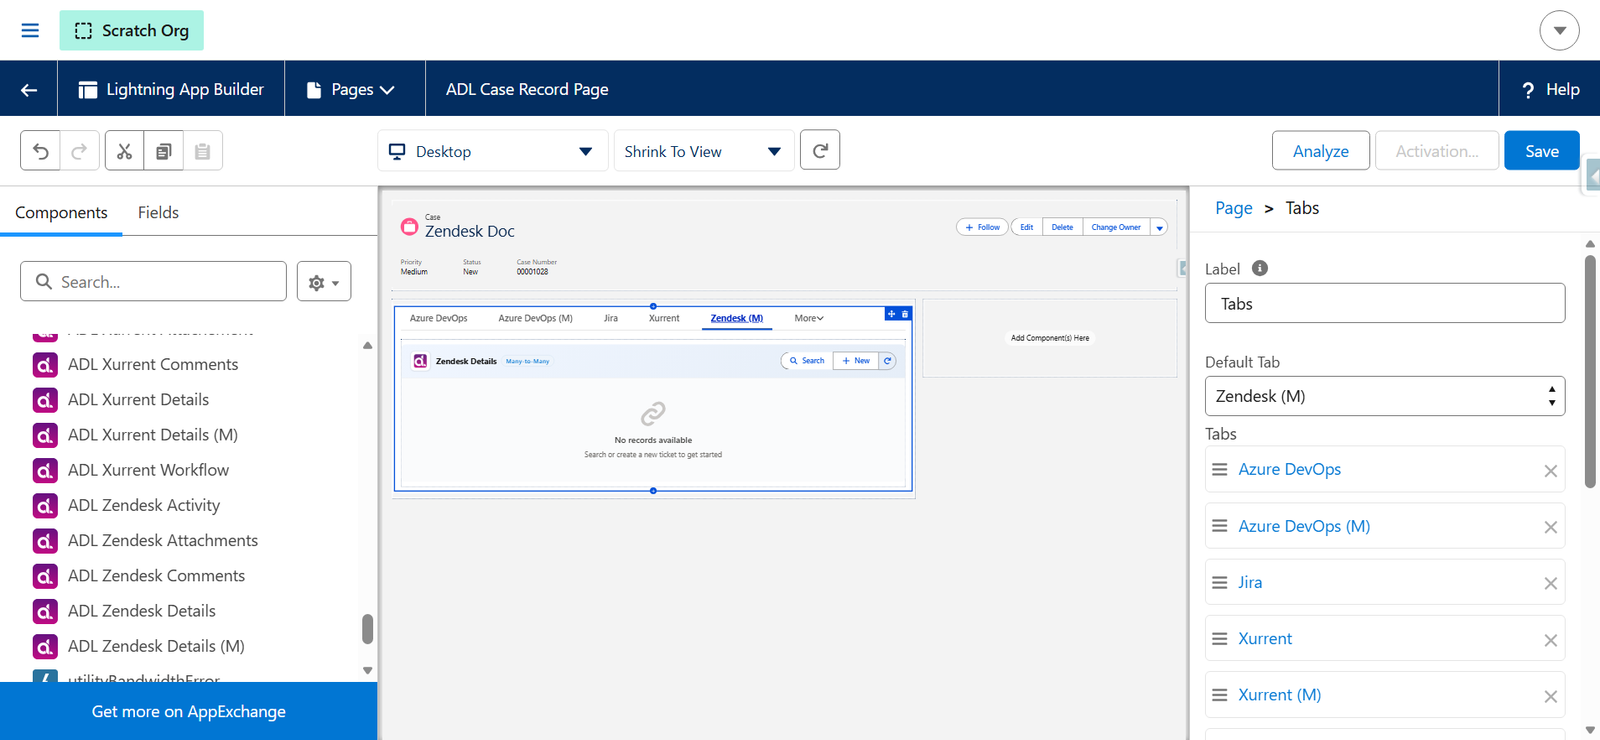
Step 3: Organize Components Using Tabs (Recommended)
If your Case page already includes multiple connectors (Azure DevOps, Jira, ServiceNow, Zendesk, Xurrent), it is recommended to group Zendesk components under dedicated tabs for clarity:
- Add a Tabs component to the page (if not already present).
- Create a tab labelled Zendesk for One-to-One components.
- Create a separate tab labelled Zendesk (M) for Many-to-Many components.
- Drag the corresponding Zendesk components into the appropriate tab.
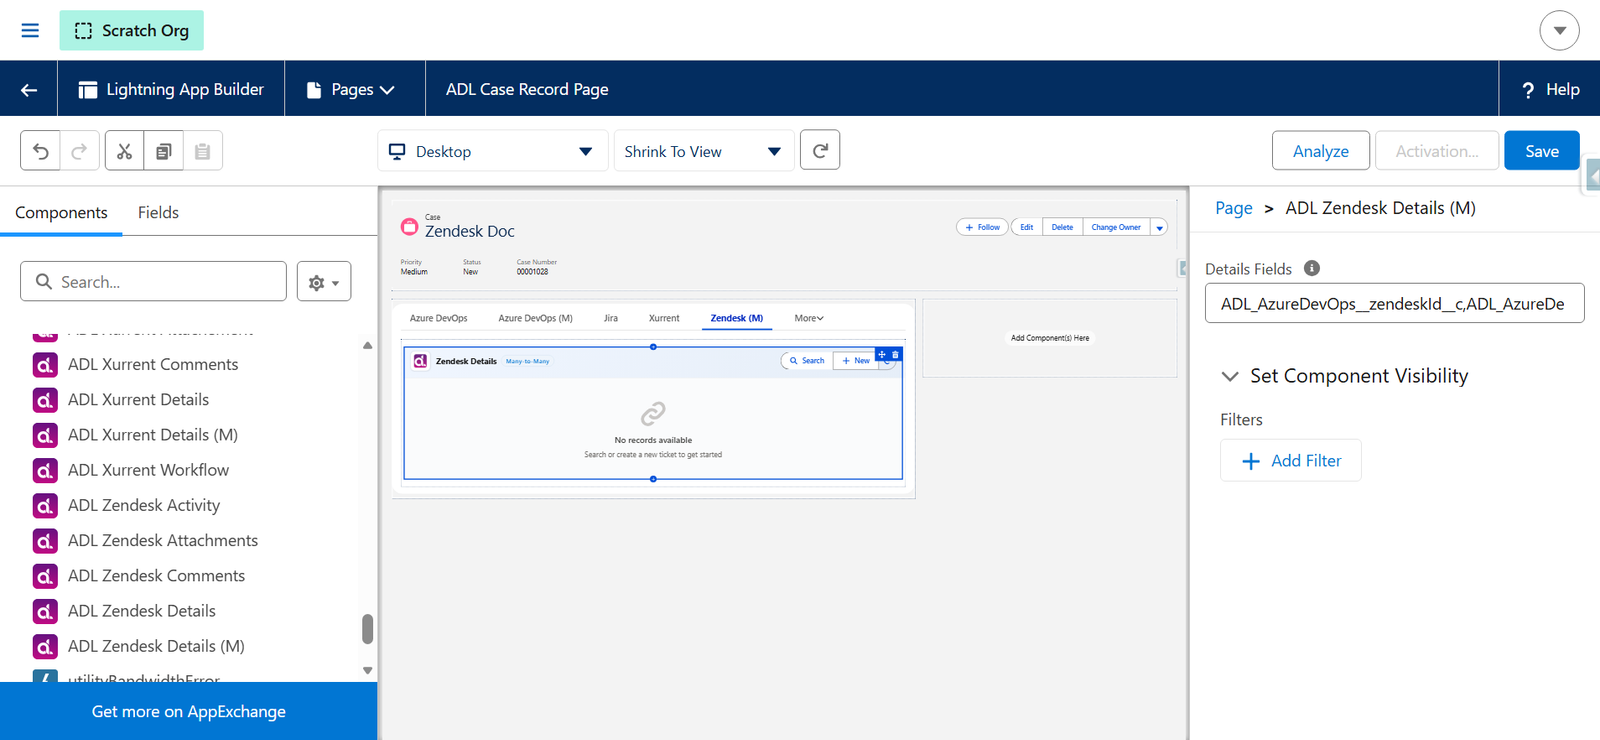
This keeps the Case page organized and avoids clutter when multiple integrations are active.
Step 4: Save and Activate the Page
- Click Save in the top-right corner.
- If prompted, click Activate and assign the page to the required apps, record types, and profiles.
- Return to the Case record to verify that the Zendesk components appear as expected.
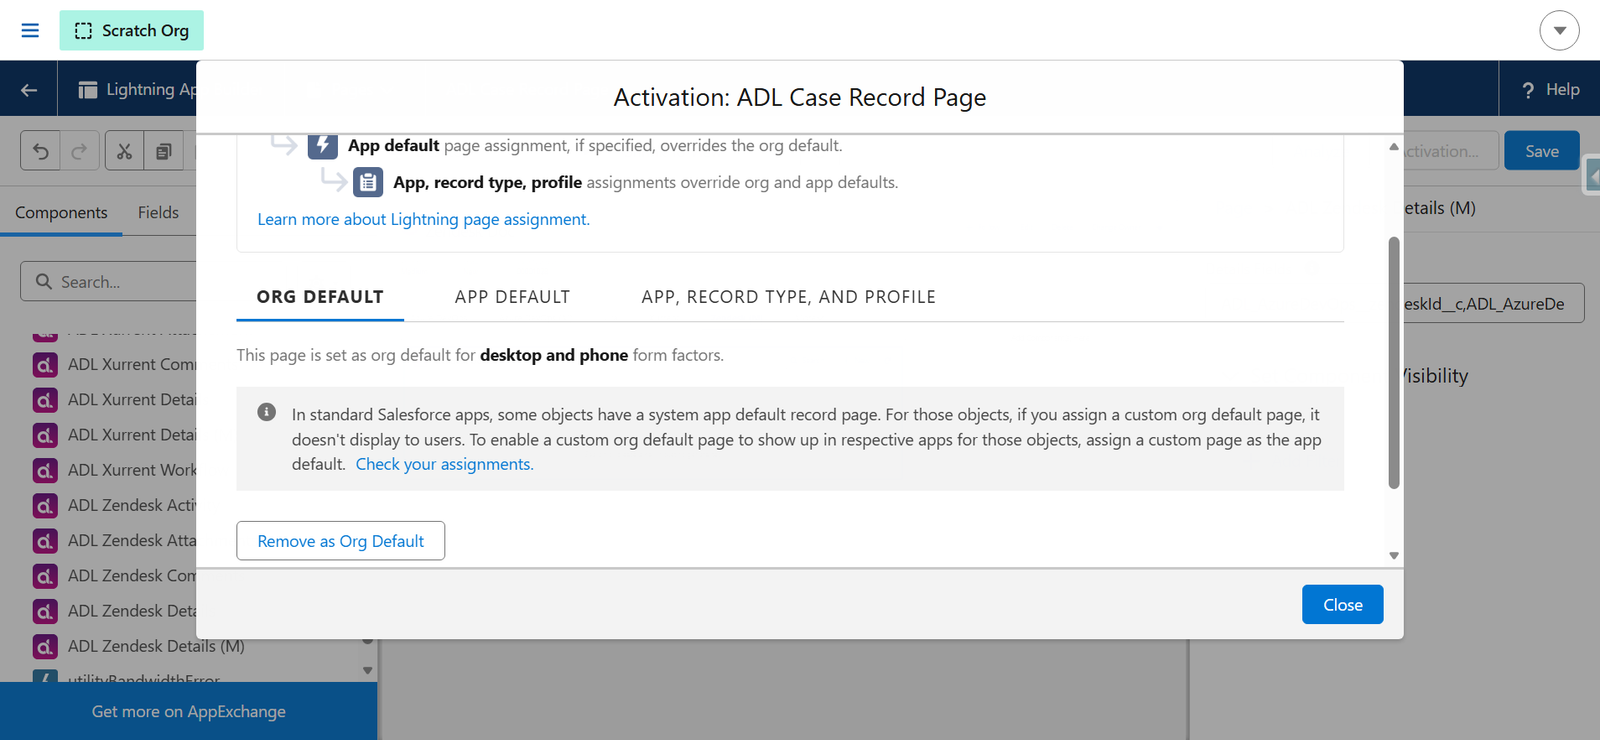
Once activated, every Case record will support full Zendesk ticket management — including creation, updates, workflow tracking, notes, and attachments — directly from within Salesforce.
Creating Zendesk Tickets from Salesforce
Creating and Managing Zendesk Tickets from Salesforce
ADL Connect enables Salesforce users to create and manage Zendesk tickets directly from Salesforce records, such as Cases. This allows Support, Sales, and Customer Service teams to create and track Zendesk tickets without leaving Salesforce.
This guide explains how to create a Zendesk ticket from Salesforce and verify that the ticket is synchronized correctly between Salesforce and Zendesk.
Prerequisites
Before creating a Zendesk ticket, ensure that:
- A Zendesk integration and project mapping has already been configured.
- The ADL Zendesk Details component is added to the Salesforce record page.
- The user has the required Salesforce permissions and Zendesk access.
Creating a Zendesk Ticket from Salesforce
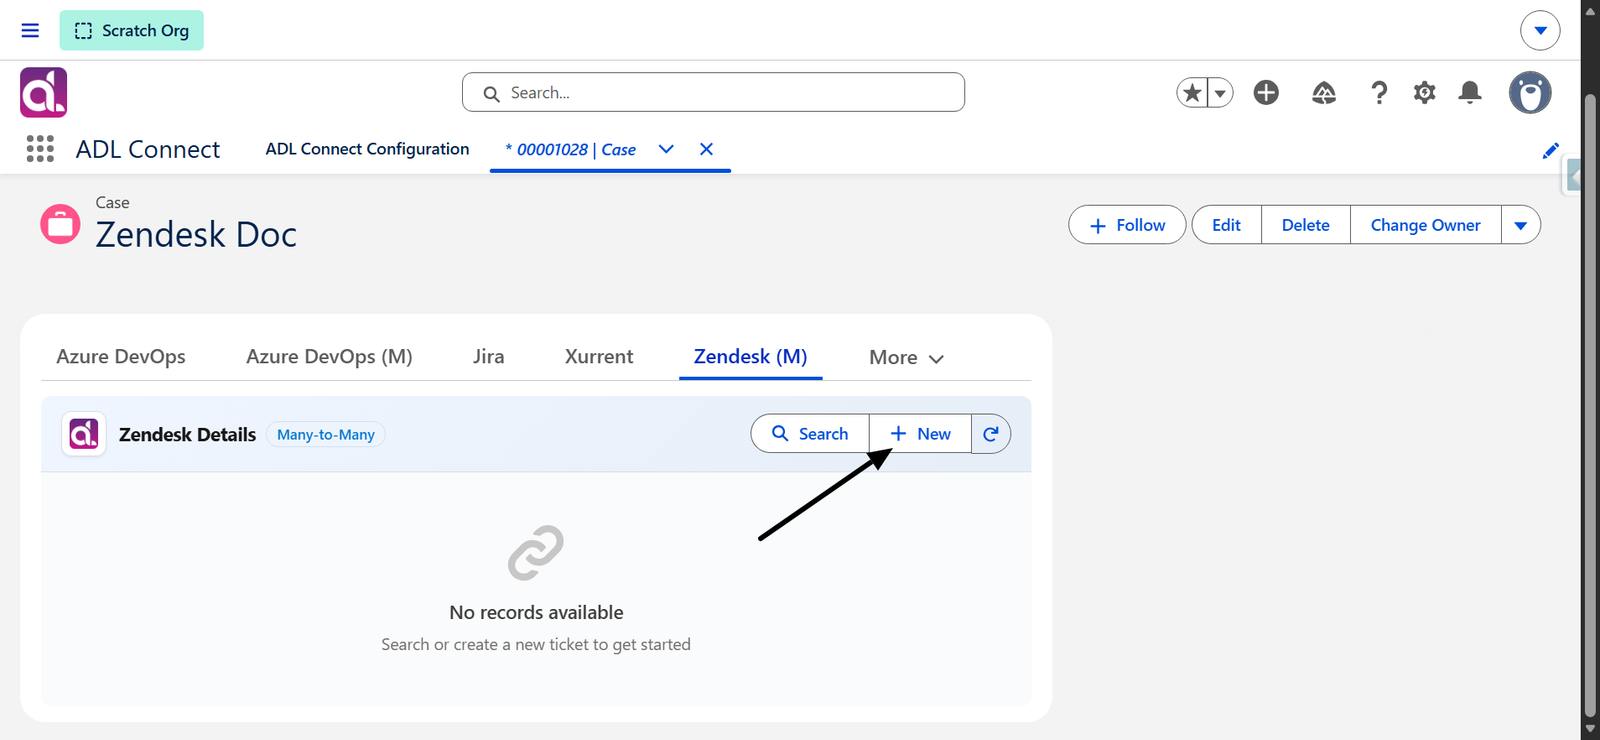
1. Open the Ticket Creation Window
- Open the Salesforce record (typically a Case) from which you want to create a Zendesk ticket.
- Locate the ADL Zendesk Details component.
- Click New.
2. Select the Zendesk Project
In the Zendesk Project field:
- Click inside the lookup field.
- Search for the required Zendesk project.
- Select the mapped project (for example, Z-M-M).
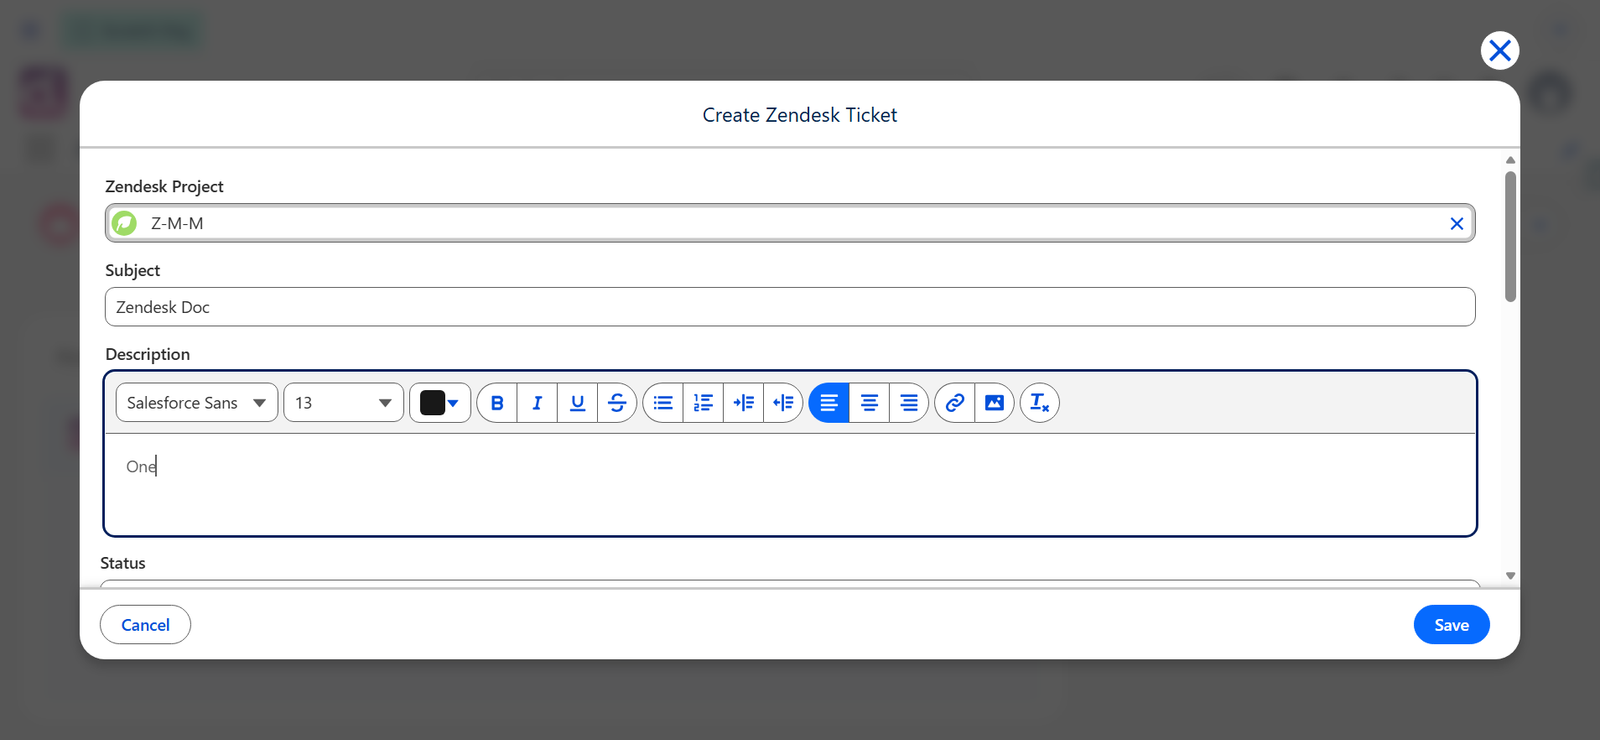
The selected project determines which Zendesk configuration and field mappings will be used for ticket creation.
Step 3: Enter the Ticket Details
- In the Subject field, enter a short summary of the issue (for example, Zendesk Doc).
- In the Description field, provide the details of the issue or request (for example, One).
- Use the Status dropdown to choose the initial status of the Zendesk ticket (for example, Open or Pending).
- Verify that all ticket details have been entered correctly before creating the Zendesk ticket.
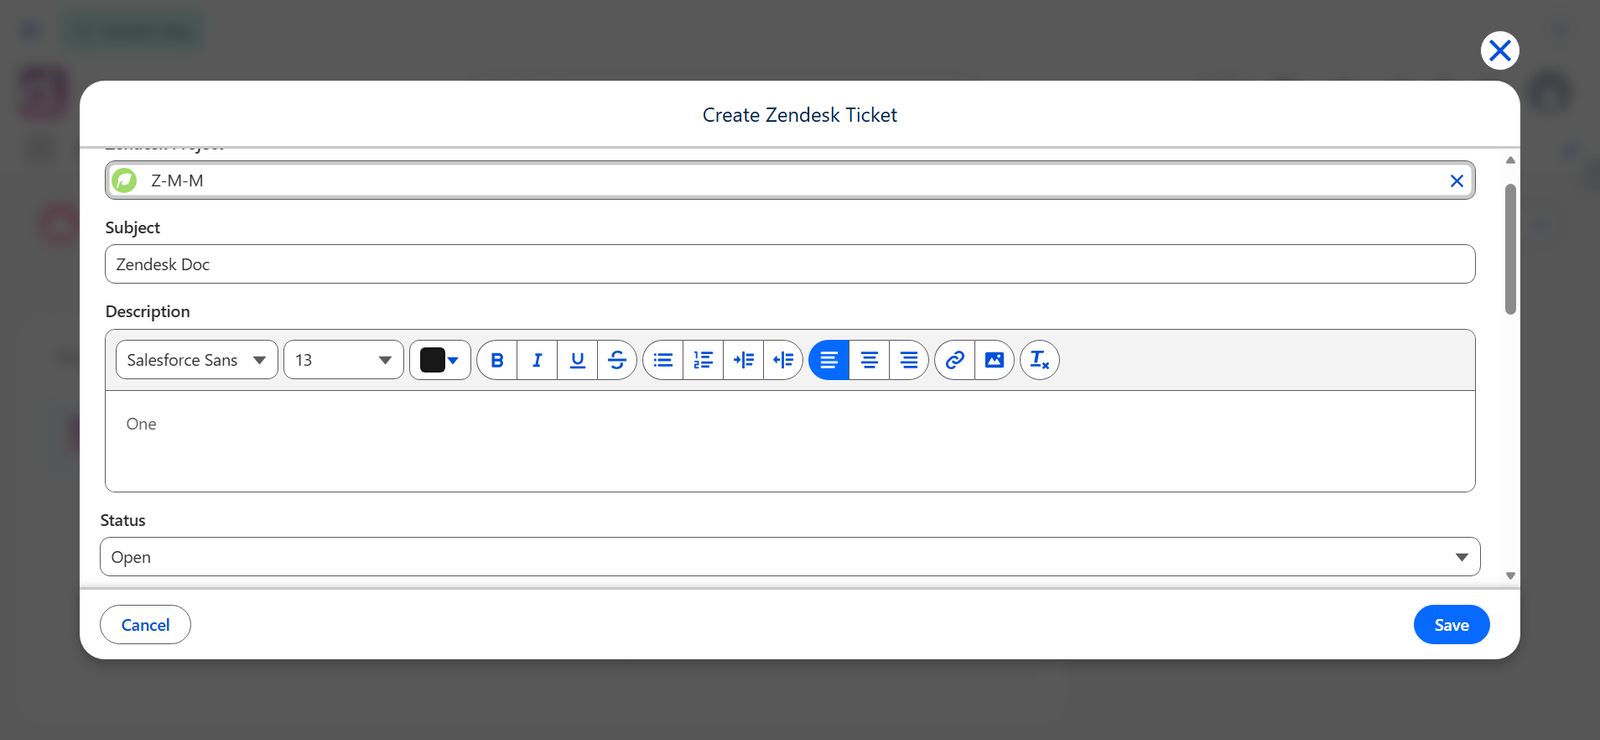
4. Save the Zendesk Ticket
After completing the required fields:
- Verify the Zendesk Project, Subject, Description, and Status values.
- Click Save.
ADL Connect immediately creates the Zendesk ticket and links it with the Salesforce record.
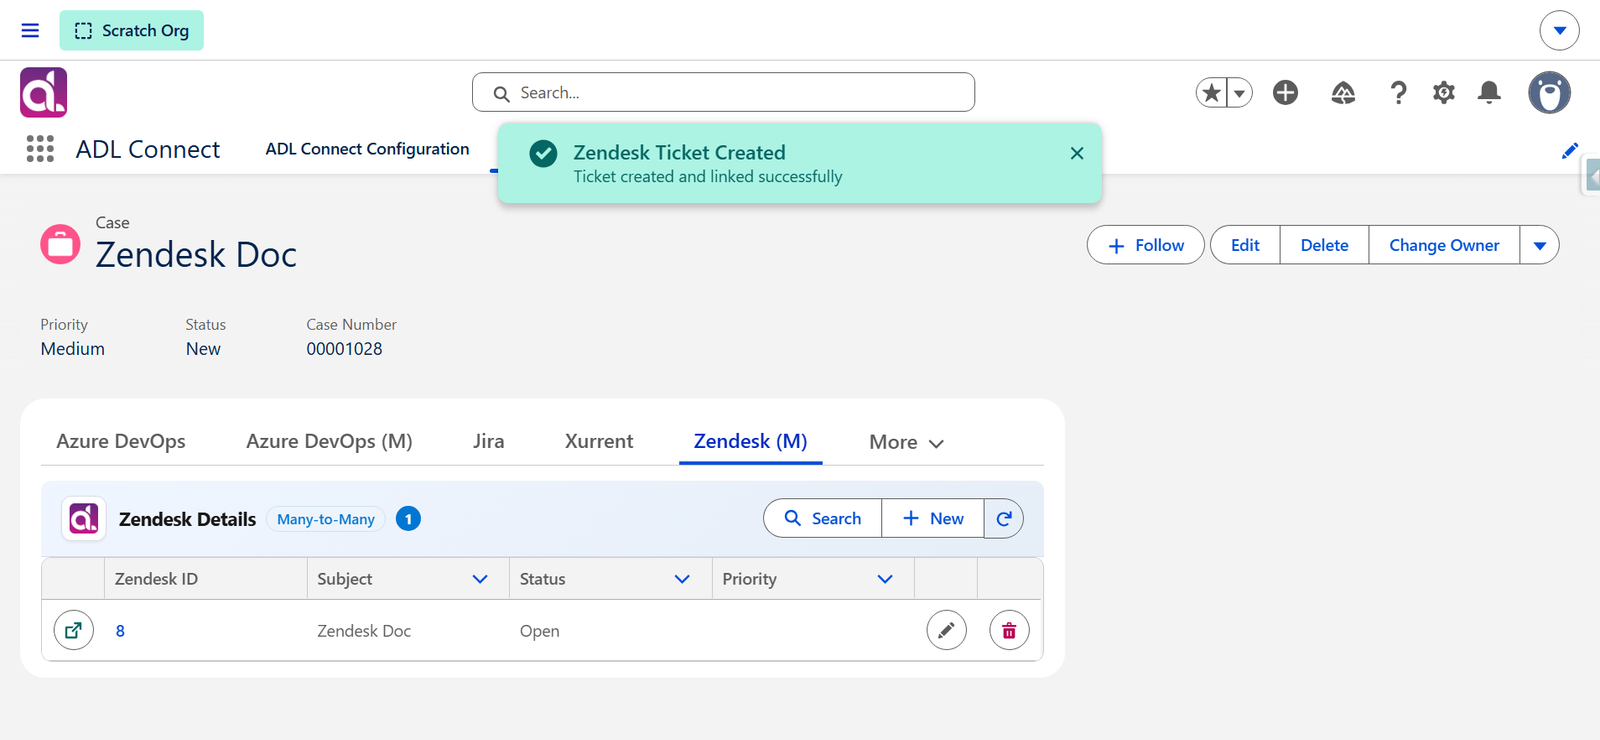
Verifying the Created Zendesk Ticket
5. Open and Review the Ticket
After saving:
- The Zendesk Ticket ID is displayed in the ADL Zendesk Details component.
- Click the ticket ID to open the corresponding Zendesk ticket.
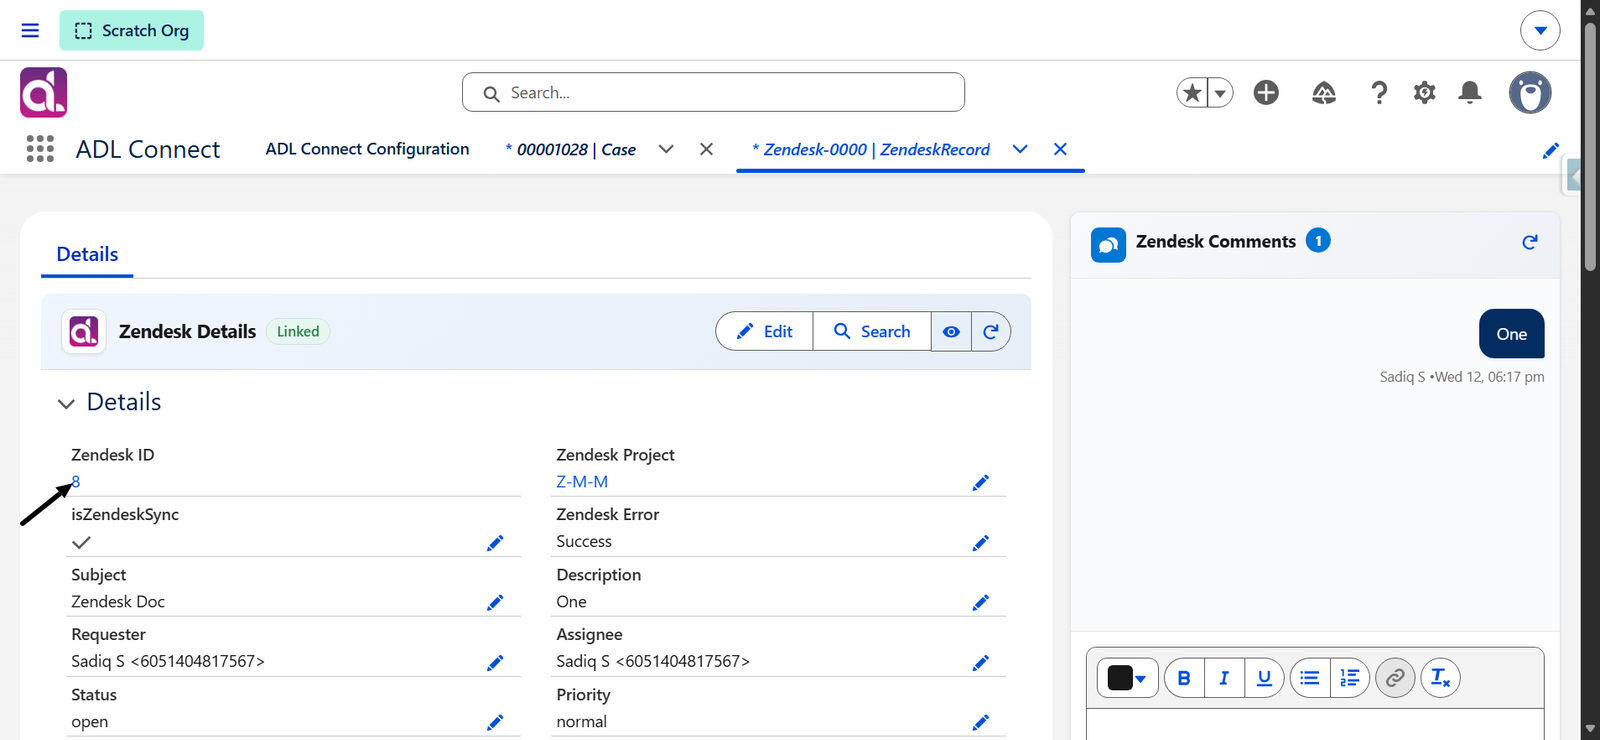
Verify that:
- The ticket is created successfully.
- The subject and description match the values entered in Salesforce.
- The ticket status is correct.
- The Salesforce record reference is stored in the mapped Zendesk field.
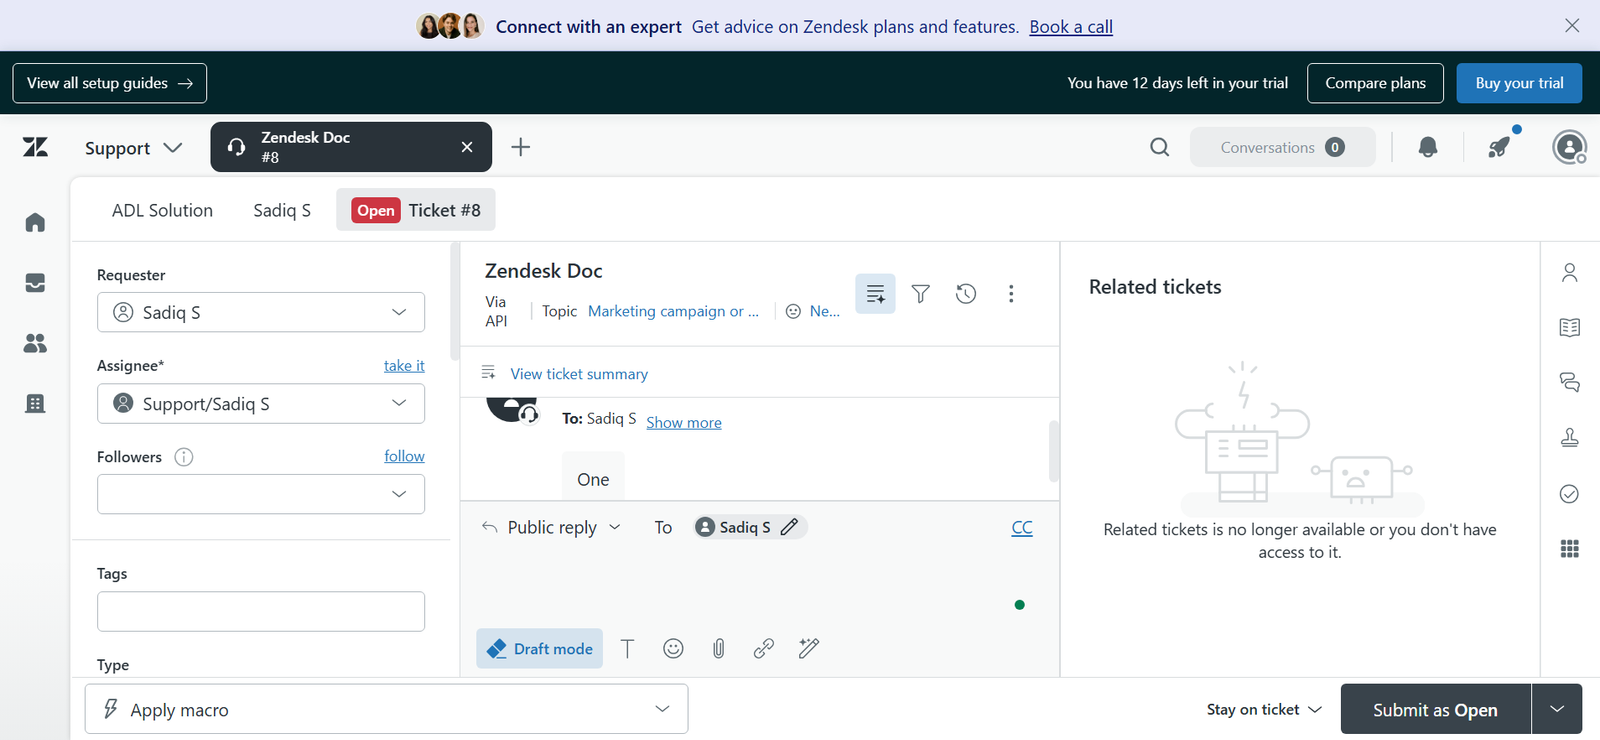
Receiving Zendesk Updates in Salesforce
6. Verify Inbound Synchronization
- Update the ticket directly in Zendesk (for example, change the Status).
- Return to Salesforce.
- Refresh the record.
The updated Zendesk values should appear automatically in the ADL Zendesk Details component, confirming that Zendesk → Salesforce synchronization is working correctly.
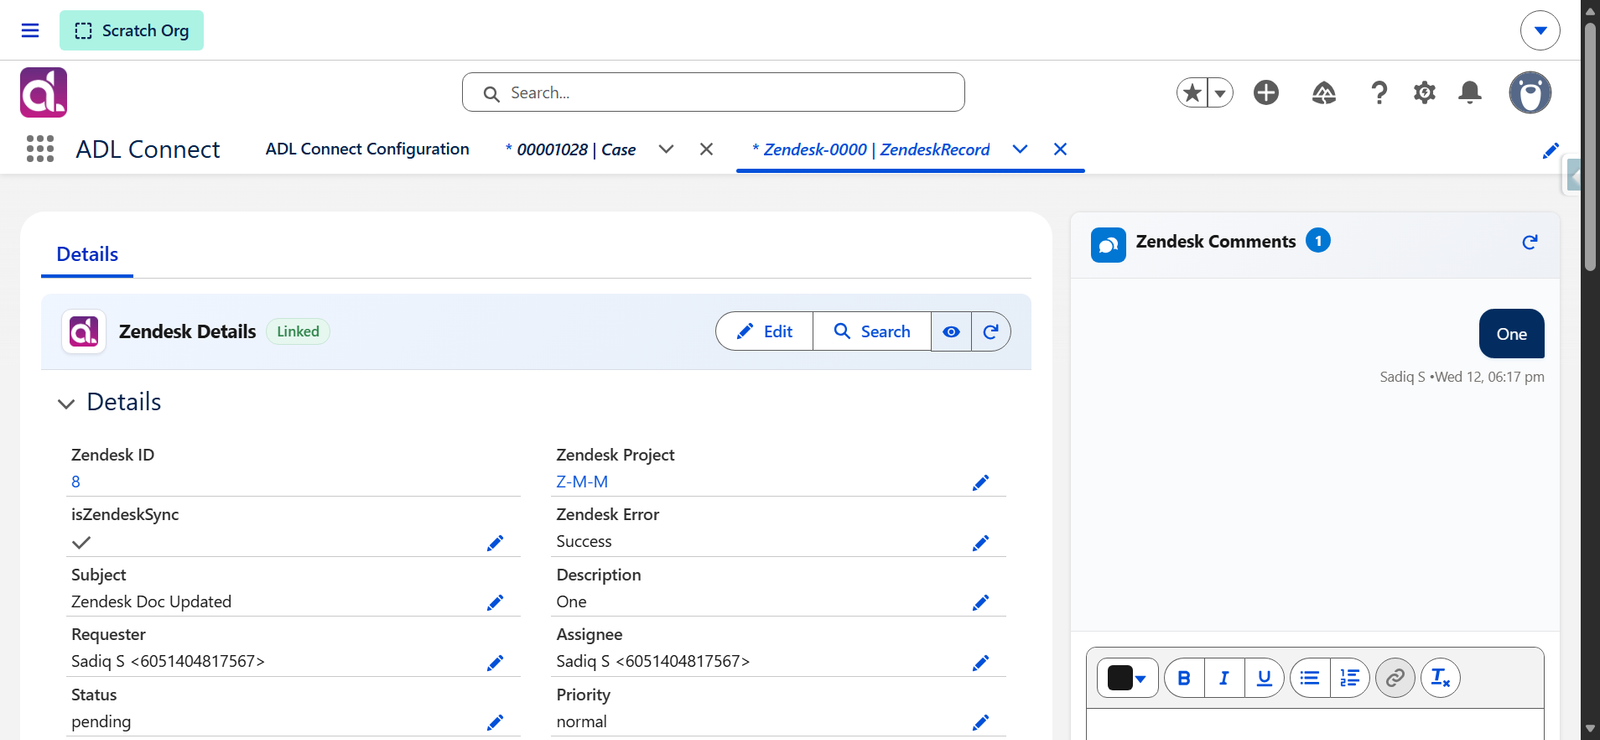
Summary
Using the Create Zendesk Ticket window shown above, Salesforce users can:
- Select a Zendesk Project
- Enter the Subject
- Provide a Description (Only One-time)
- Set the initial Status
- Create Zendesk tickets directly from Salesforce
- Synchronize ticket updates between Salesforce and Zendesk in both directions
This integration helps teams manage Zendesk tickets efficiently from within Salesforce while maintaining real-time visibility across both platforms.
Managing Comments from Salesforce
ADL Connect allows Salesforce users to view, add, and edit Zendesk comments directly from Salesforce. This capability enables customer-facing teams to collaborate with service management teams without leaving the Salesforce interface.
Comments added in either system are synchronized automatically, ensuring consistent and up-to-date communication across both Salesforce and Zendesk.
Prerequisites
Before working with Zendesk comments from Salesforce, ensure that:
- Zendesk integration is configured in ADL Connect
- The Salesforce record (typically a Case) is already linked to a Zendesk ticket
- The ADL Zendesk Comments component has been added to the Case page layout (covered in Configuring Case Page Layout)
- Users have the required Salesforce and Zendesk permissions
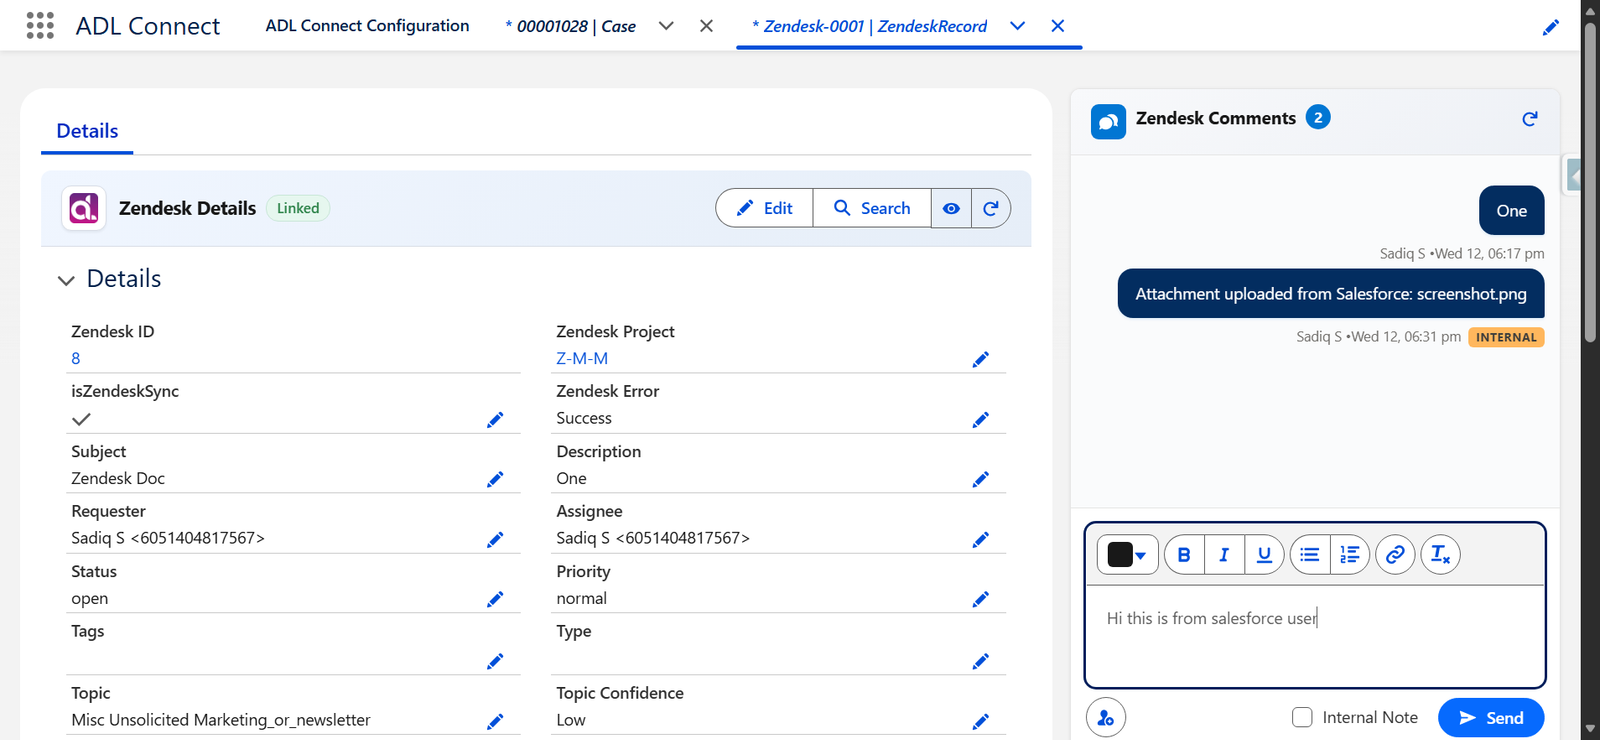
Step 1: Post a Comment to a Zendesk Ticket
- Open the Salesforce record where the ADL Zendesk Comments component is available.
- In the comment input area, type your message.
- Use the rich-text toolbar to format your comment (bold, italic, underline, bullet points, numbered lists, links).
- Click Send.
Select Internal Note to send an internal comment, or leave it unchecked to send a public comment that is visible to the requester in Zendesk.
Once submitted:
- The comment is added to the linked Zendesk ticket
- It becomes immediately visible to Zendesk users assigned to the ticket
Step 2: Mention a Specific Zendesk User
To notify a particular Zendesk user directly within the comment, use the mention feature:
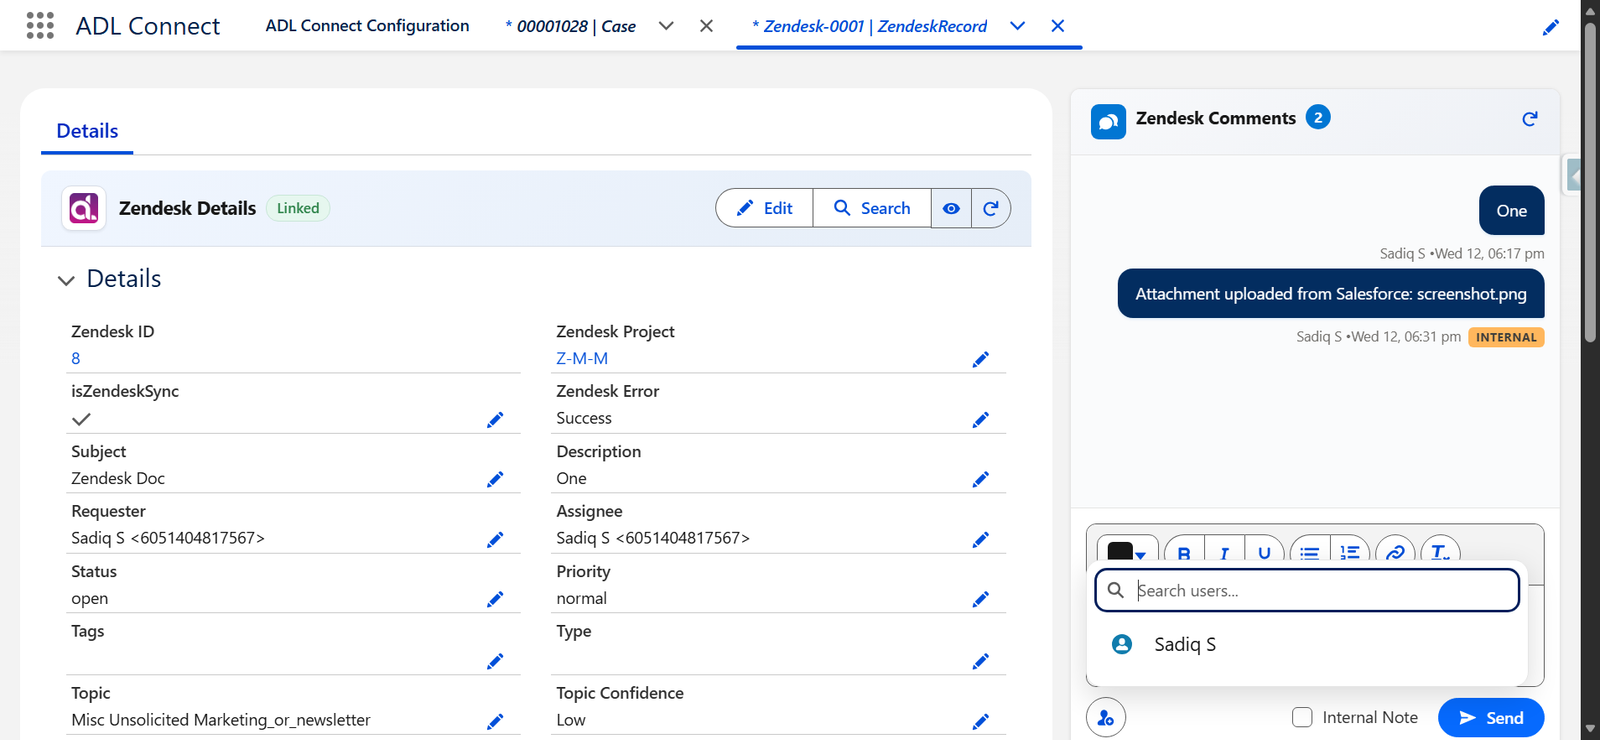
- Click the person icon at the bottom-left of the comment input area.
- A user picker appears — search for and select the Zendesk user you want to mention.
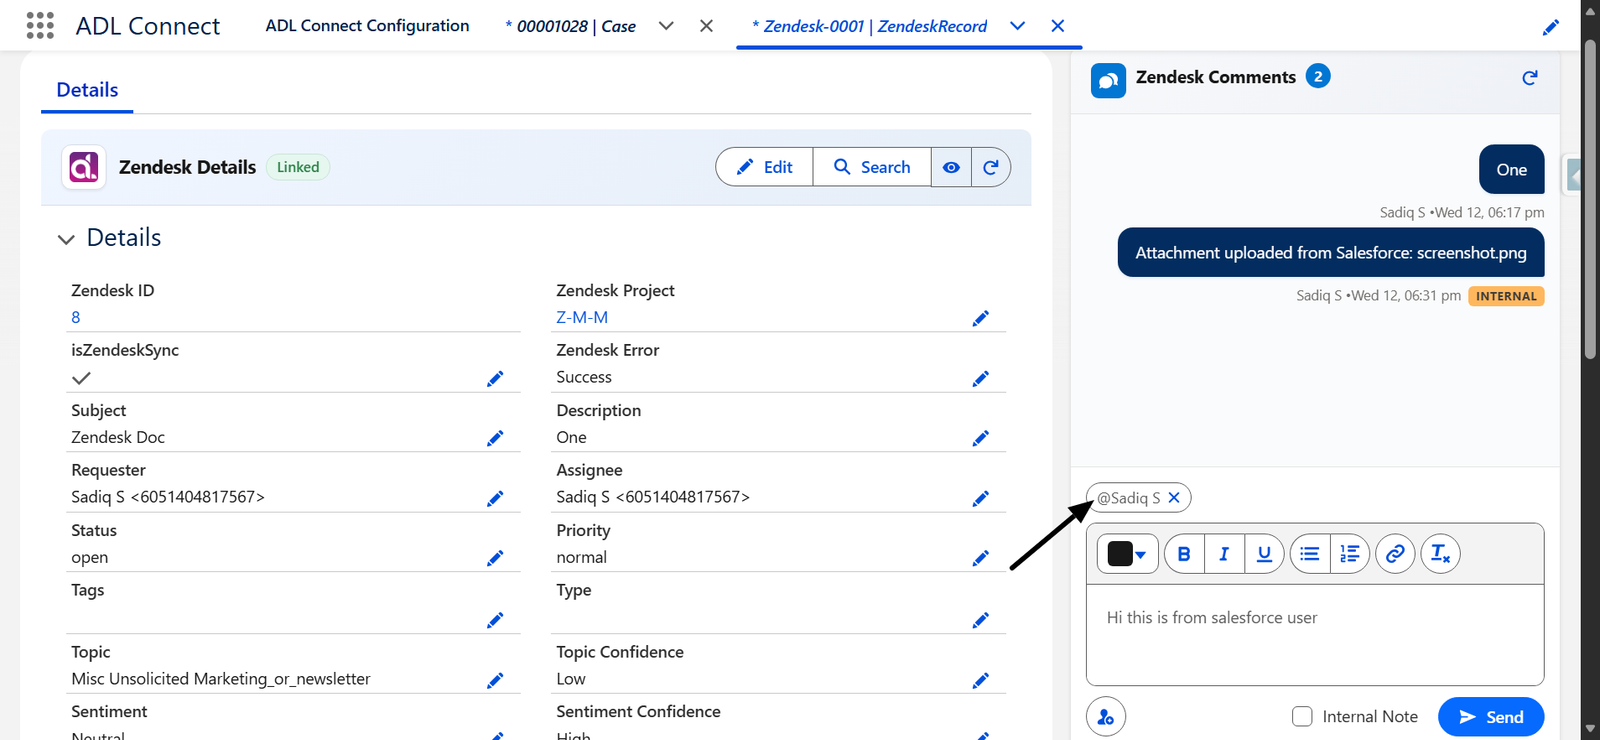
- The selected user is inserted into the comment as an @mention.
- Complete your message and click Send.
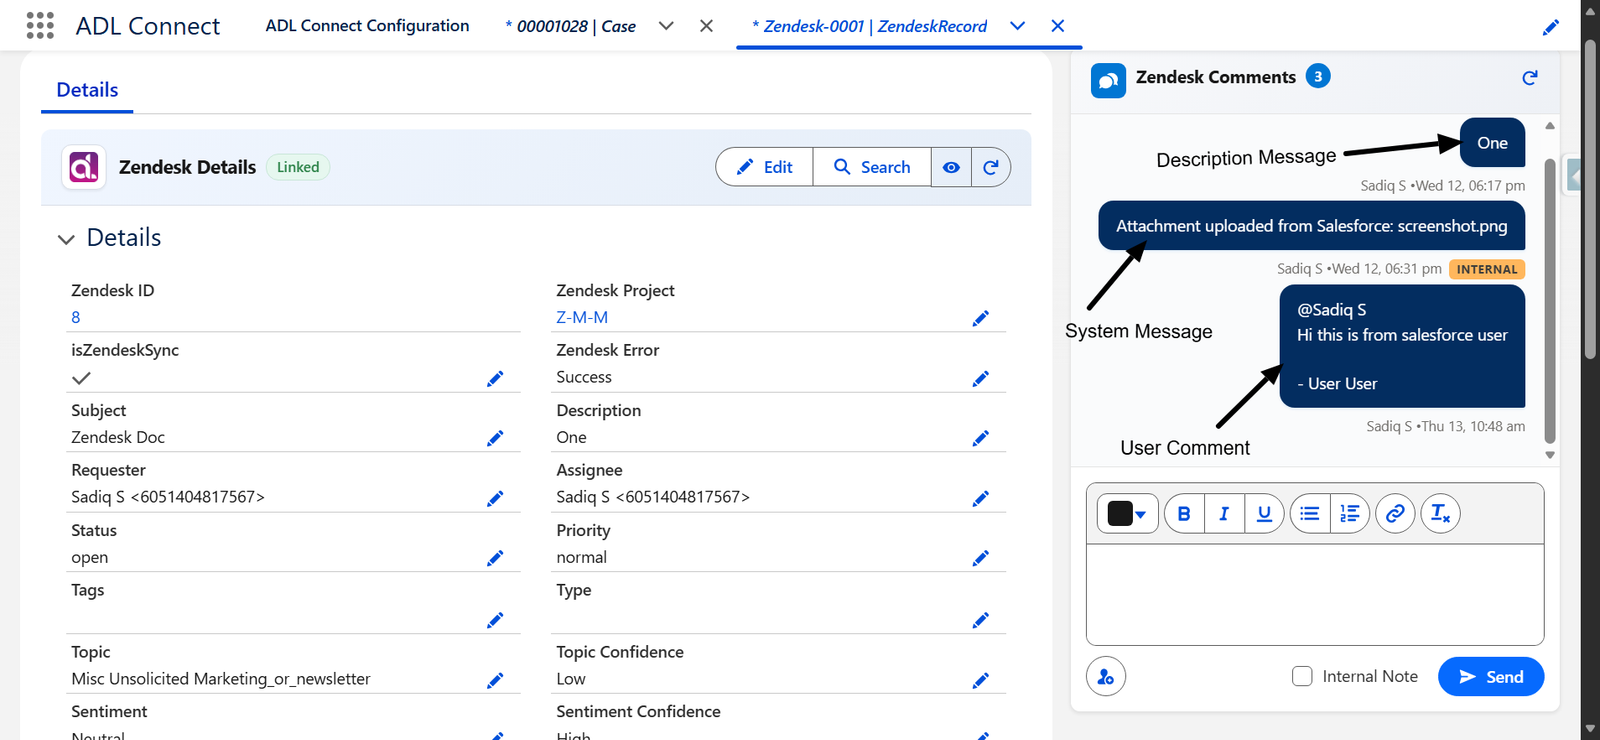
The mentioned user receives a direct notification in Zendesk, ensuring the right person is alerted for follow-up actions or approvals.
Step 3: Confirm Salesforce → Zendesk Comment Sync
- Open the corresponding Zendesk Ticket in a new browser tab.
- Navigate to the Comments section of the ticket.
- Verify that the newly added or edited comment from Salesforce is visible, including any @mentions and formatting.
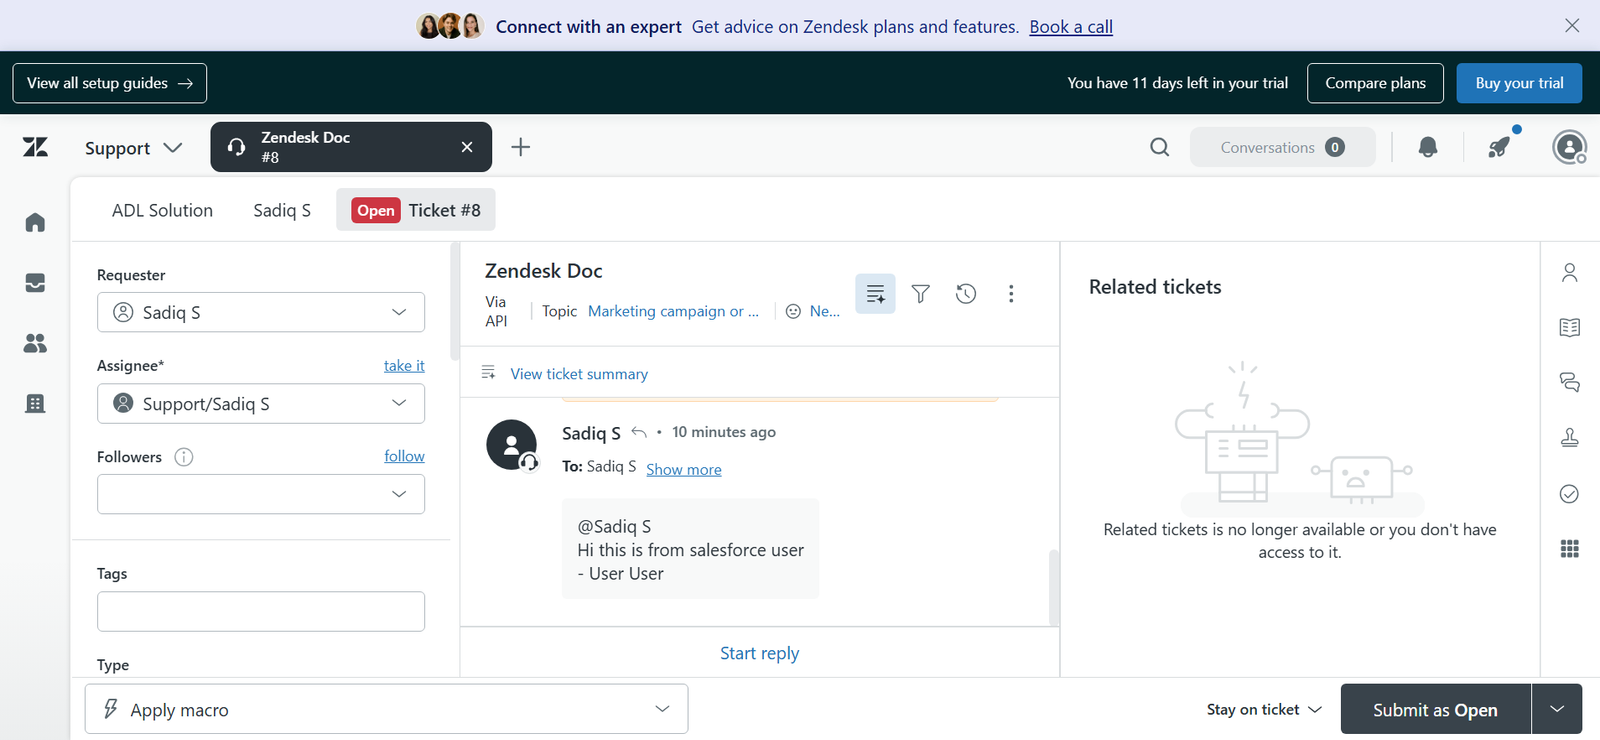
This confirms that outbound comment synchronization is working correctly.
Step 4: Add a Comment in Zendesk
- Open the Zendesk ticket linked to the Salesforce record.
- Add a new comment in the Comments section of the ticket.
- Submit the comment.
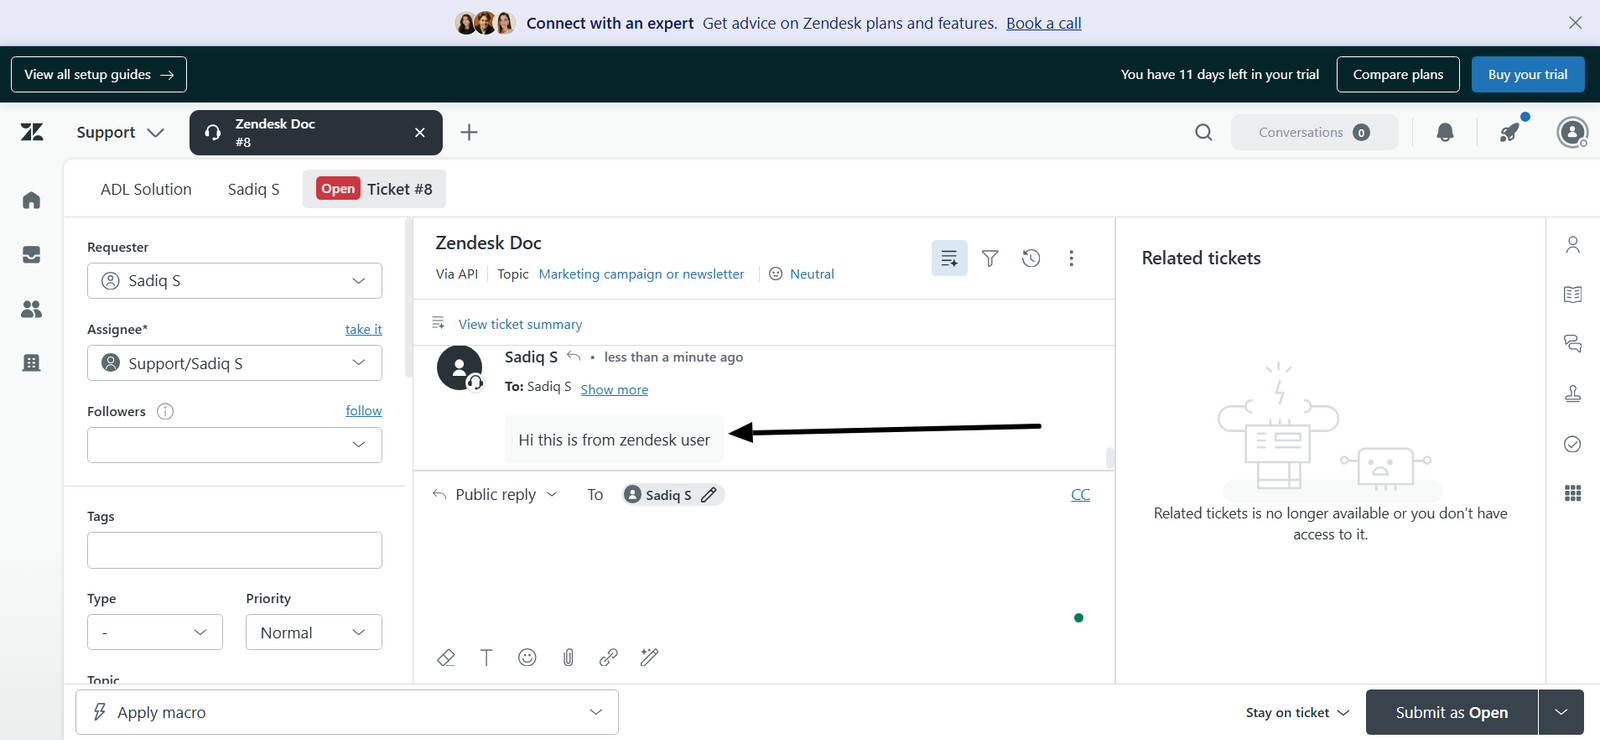
Step 5: Refresh Salesforce to View Zendesk Comments
- Return to the Salesforce record.
- Refresh the page (or click the Refresh icon on the ADL Zendesk Comments component).
- Verify that the new comment added in Zendesk appears in the component.
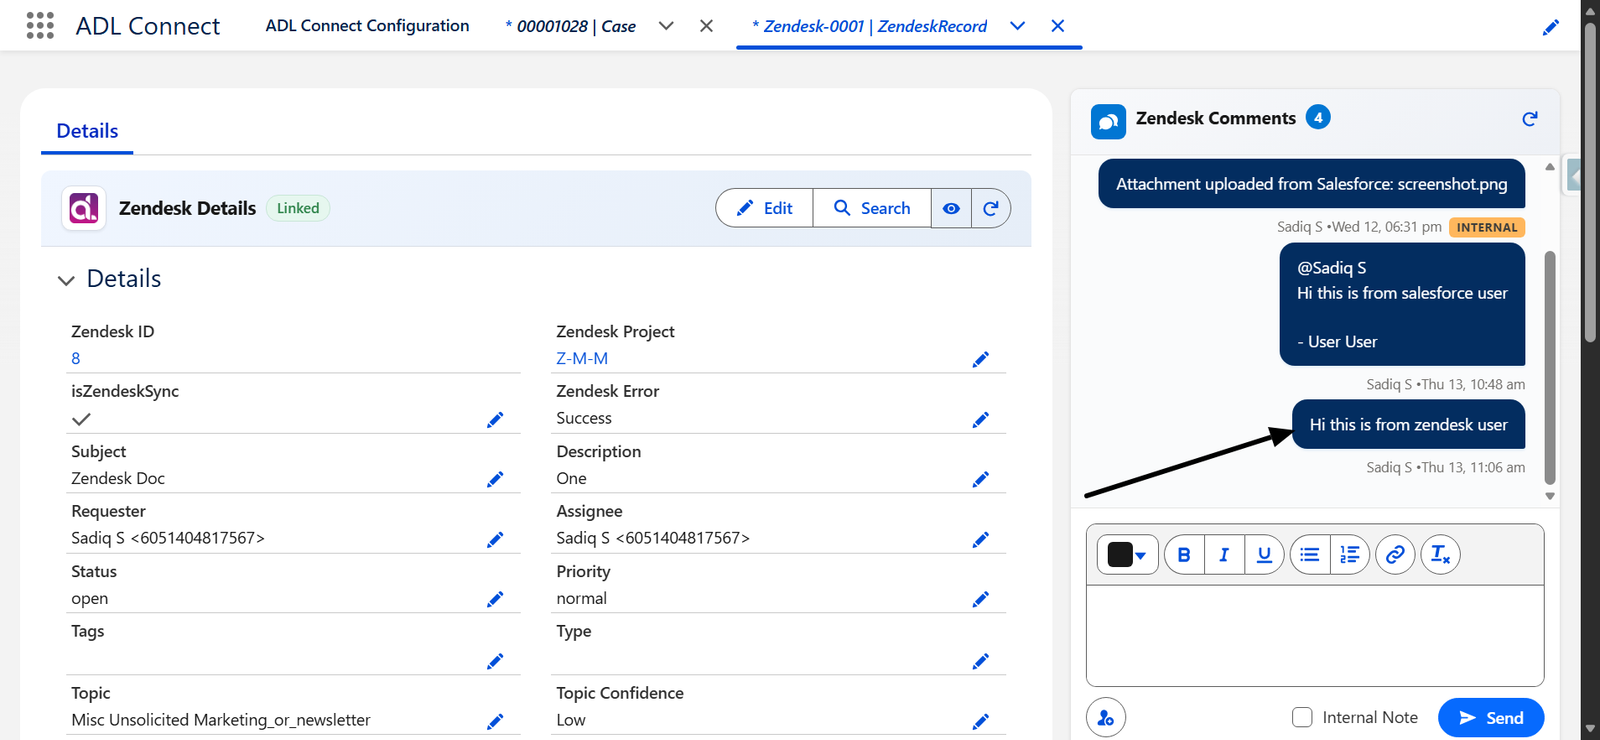
This confirms inbound comment synchronization from Zendesk to Salesforce.
Summary
By using the ADL Zendesk Comments component, Salesforce users can:
- View Zendesk comments directly within Salesforce
- Add, edit, and format comments without switching systems
- Mention specific Zendesk users to trigger targeted notifications
- Maintain synchronized communication between Salesforce and Zendesk
- Improve collaboration between customer-facing and service management teams
This functionality ensures transparent, real-time communication across platforms and eliminates context switching for users.
Creating Zendesk Attachments in Salesforce
Managing Zendesk Attachments from Salesforce
ADL Connect enables Salesforce users to view, preview, and upload Zendesk attachments directly from Salesforce records. This functionality gives customer-facing teams full visibility into Zendesk ticket context and allows them to contribute files without switching systems.
Attachments uploaded from Salesforce synchronize instantly to Zendesk, and existing Zendesk attachments are displayed within the Salesforce interface.
Configuring the Salesforce Page Layout for Zendesk Attachments
Before viewing or uploading attachments, the ADL Zendesk Attachments component must be added to the Salesforce record page.
1. Add the ADL Zendesk Attachments Component
- Open the Salesforce record linked to the Zendesk ticket (for example, a Case).
- Click Edit Page to open the Lightning App Builder.
- Scroll to Custom – Managed Components.
- Locate the ADL Zendesk Attachments component.
- Drag and drop the component into the desired area of the page layout.
- Click Save and Activate the page.
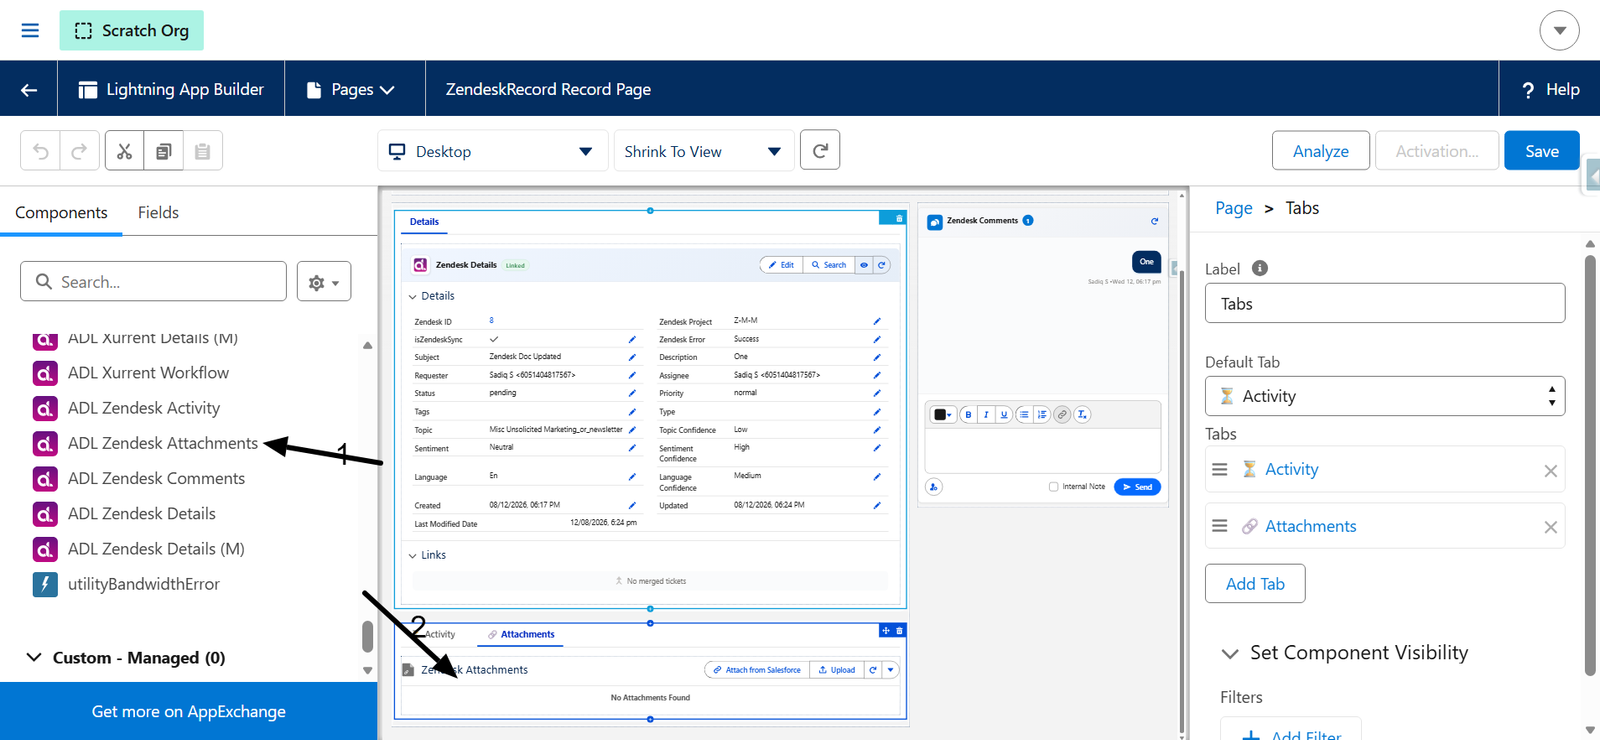
Once added, the component displays all attachments associated with the linked Zendesk ticket.
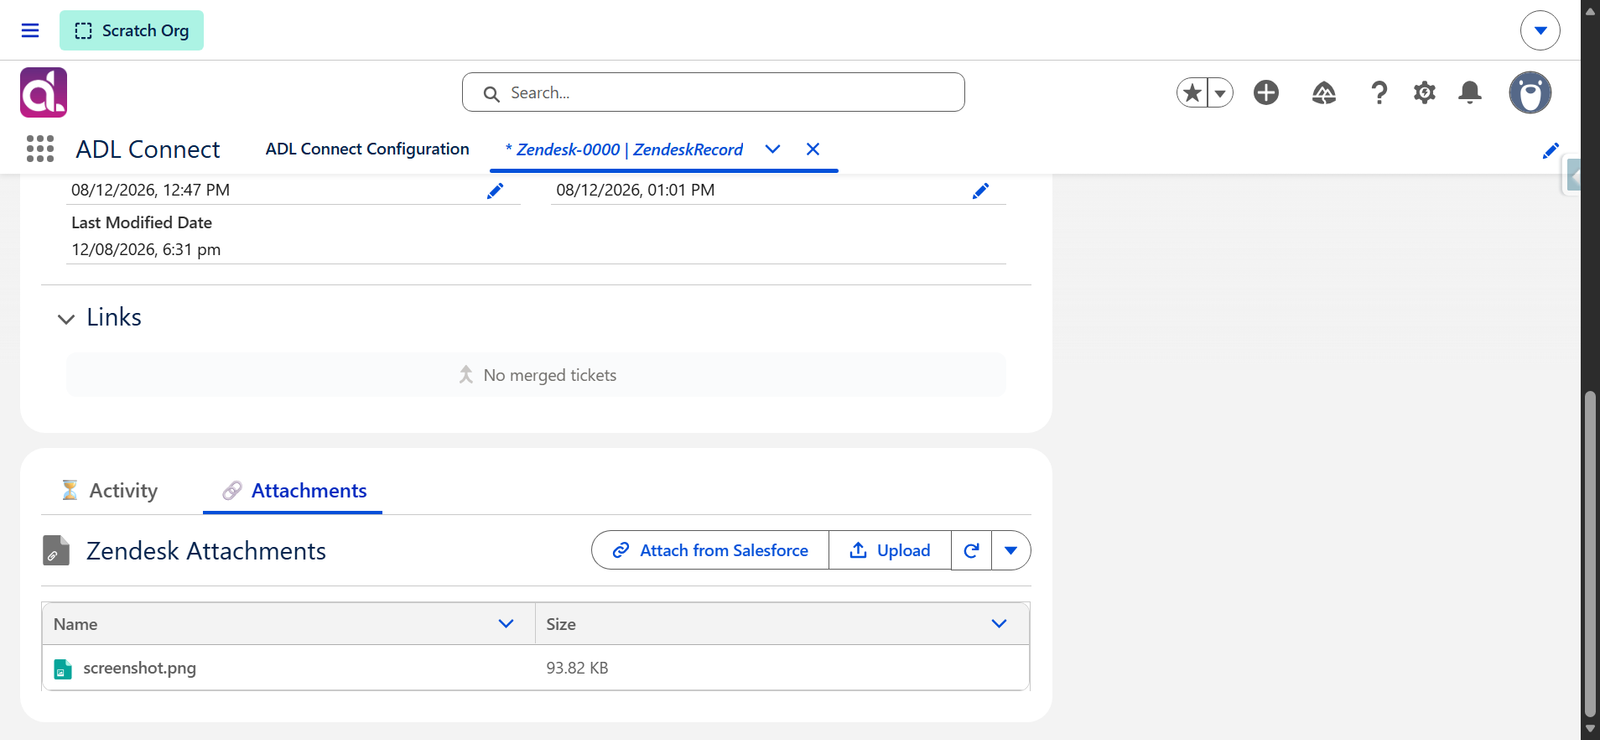
2. View or Preview Existing Zendesk Attachments
- Navigate to the updated Salesforce record.
- In the ADL Zendesk Attachments component, review the list of attachments retrieved from Zendesk.
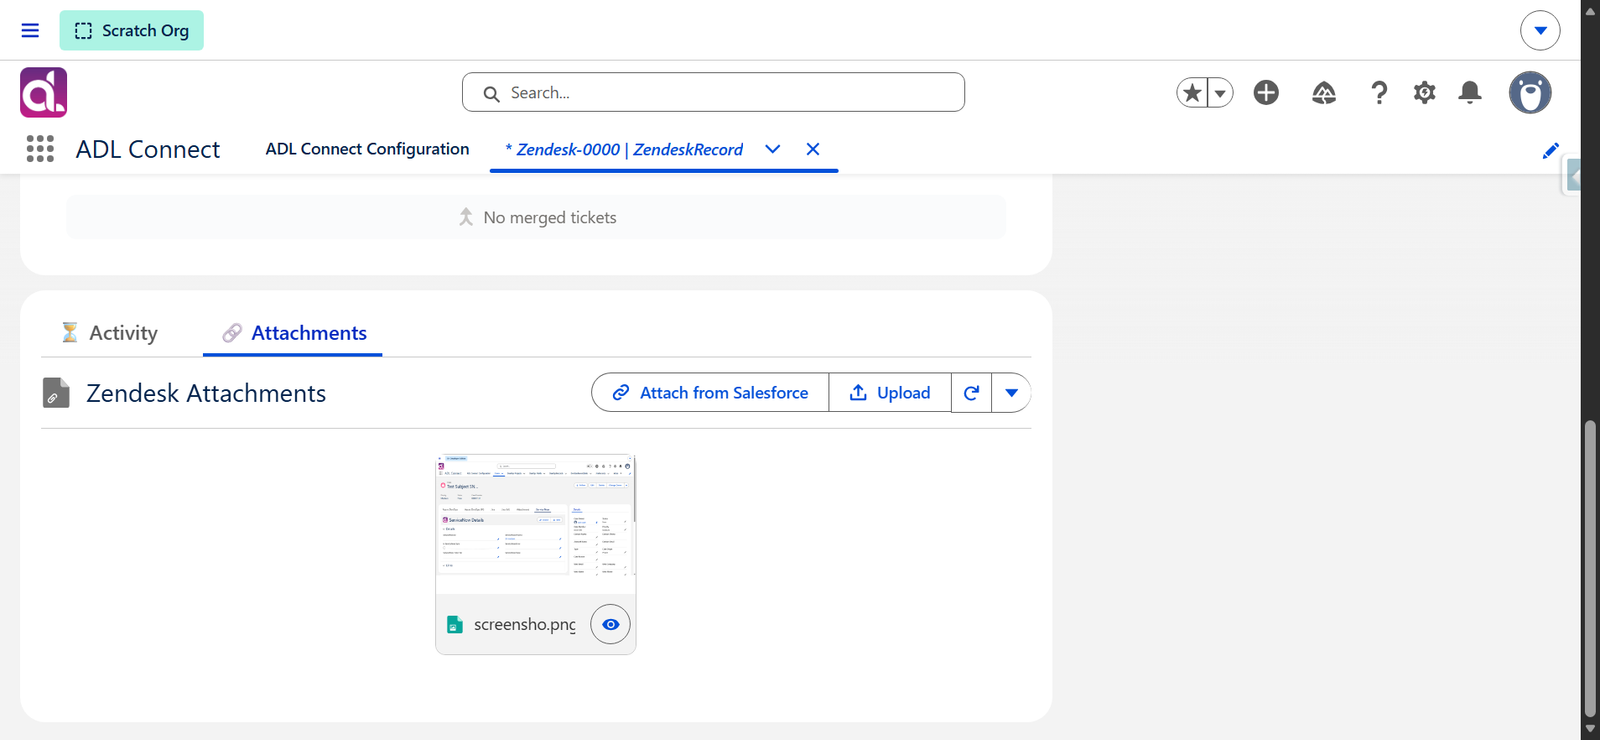
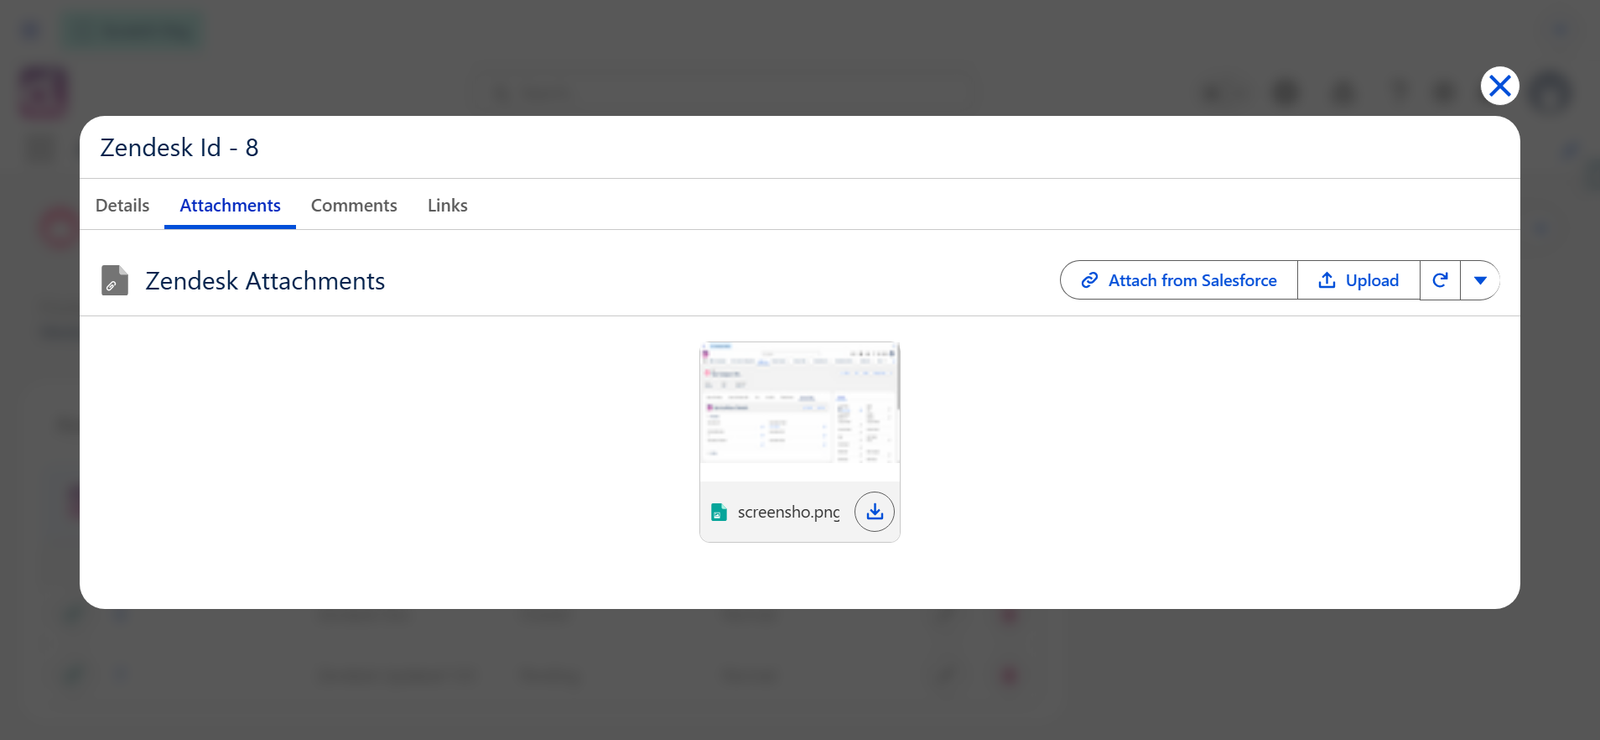
- Optionally switch the display format to Thumbnail View.
- Tile View allows image previews without downloading files.
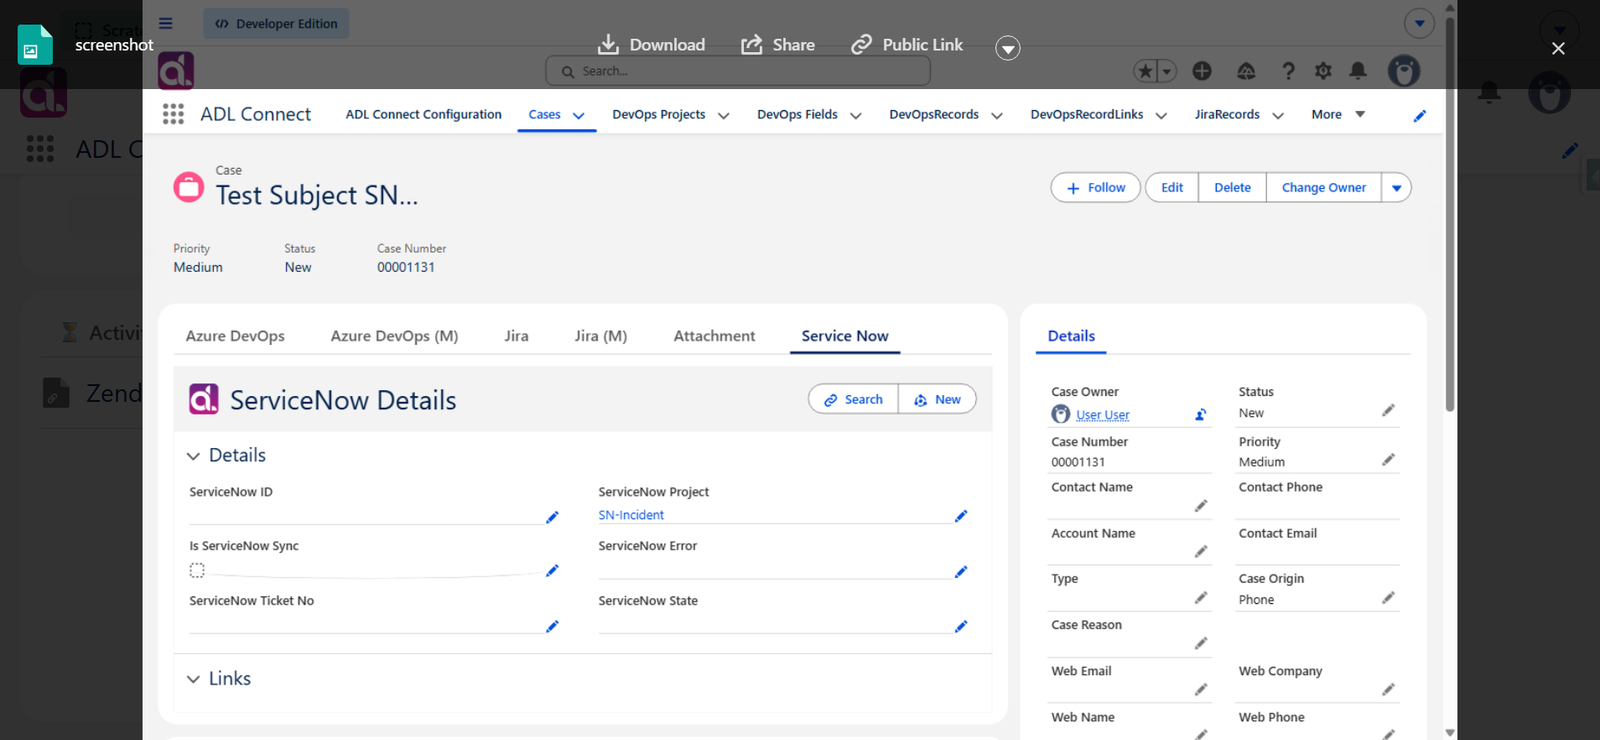
- Click any attachment to preview it or download it directly from Salesforce.
Tile View is especially useful for image-heavy files such as screenshots, diagrams, and UI mockups.
3. Upload New Attachments from Salesforce
- In the ADL Zendesk Attachments component, click Add or Upload Attachments.
- Select one or more files from your device.
- Confirm the upload.
The selected files are immediately uploaded to Zendesk and associated with the linked ticket.
4. Verify the Upload in Zendesk
- Open the corresponding Zendesk ticket.
- Navigate to the Attachments section.
- Confirm that the files uploaded from Salesforce are visible and accessible.
This verifies that Salesforce → Zendesk attachment synchronization is functioning correctly.
Summary
By using the ADL Zendesk Attachments component, Salesforce users can:
- View all Zendesk attachments directly within Salesforce
- Preview images using Thumbnail View without downloading
- Upload new files from Salesforce into Zendesk
- Maintain complete context for customer cases and support tickets
This capability significantly reduces context switching and improves collaboration between Support and Customer Service teams by keeping Salesforce as the central workspace.
Managing Linked Zendesk Tickets from Salesforce
ADL Connect displays relationships between linked Zendesk tickets directly within Salesforce. When multiple Zendesk tickets are merged or linked in Zendesk, the relationship is reflected in the Salesforce ADL Zendesk Details component under the Links section.
This allows Salesforce users to view related Zendesk tickets and understand how customer issues are connected without leaving Salesforce.
Prerequisites
Before working with linked Zendesk tickets from Salesforce, ensure that:
- Zendesk integration is configured in ADL Connect.
- The Salesforce record is linked to a Zendesk ticket.
- The ADL Zendesk Details component is available on the Case page layout.
Step 1: Merge Tickets in Zendesk
To create a linked ticket relationship through merging:
- Open the Zendesk ticket that you want to merge.
- Click the More actions (⋮) menu in the ticket header.
- Select Merge into another ticket.
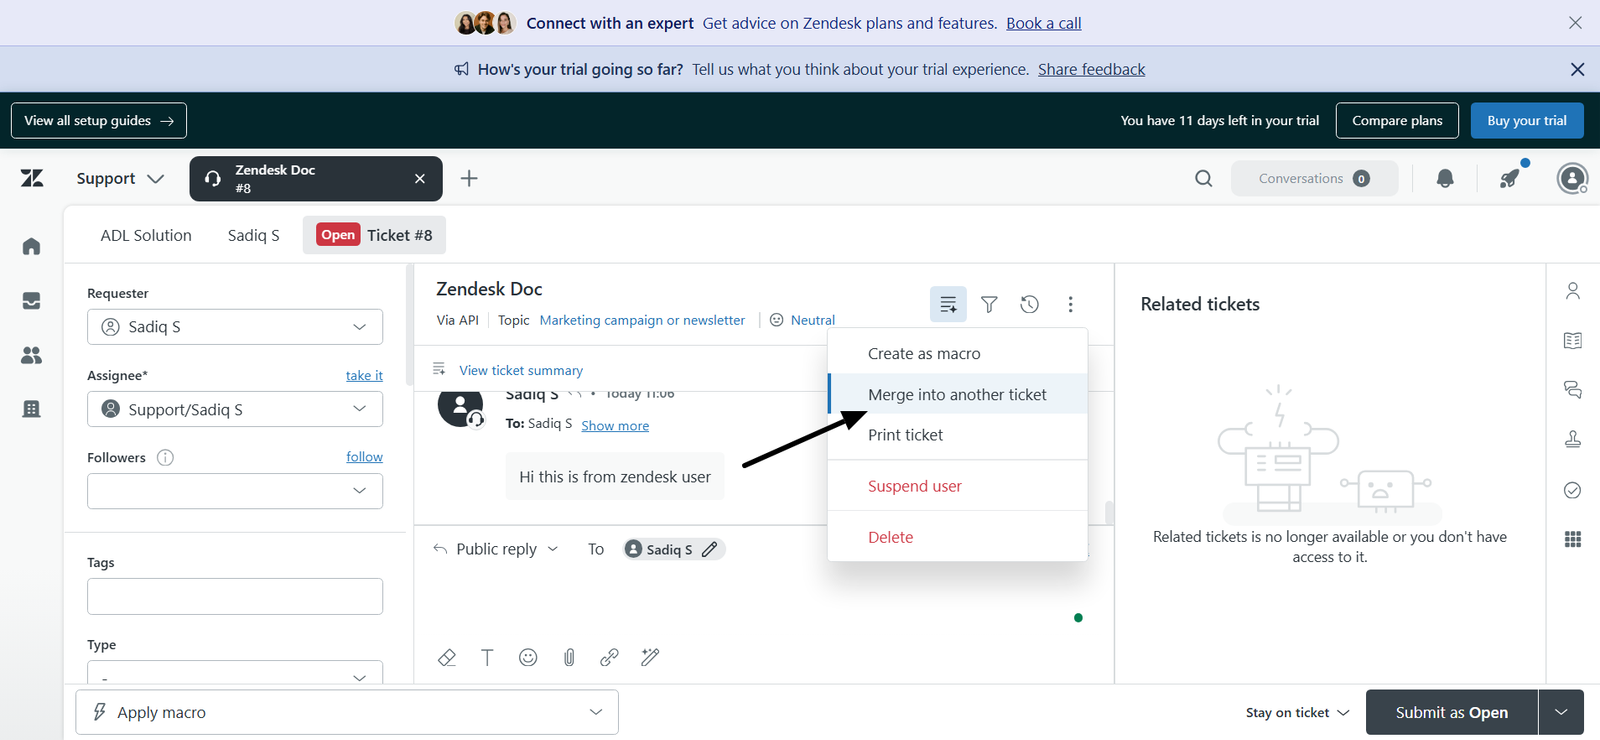
This option links the current ticket with another Zendesk ticket by merging it into the target ticket.
Step 2: Complete the Ticket Merge
- Search for the destination Zendesk ticket.
- Select the ticket to merge into.
- Confirm the merge action.
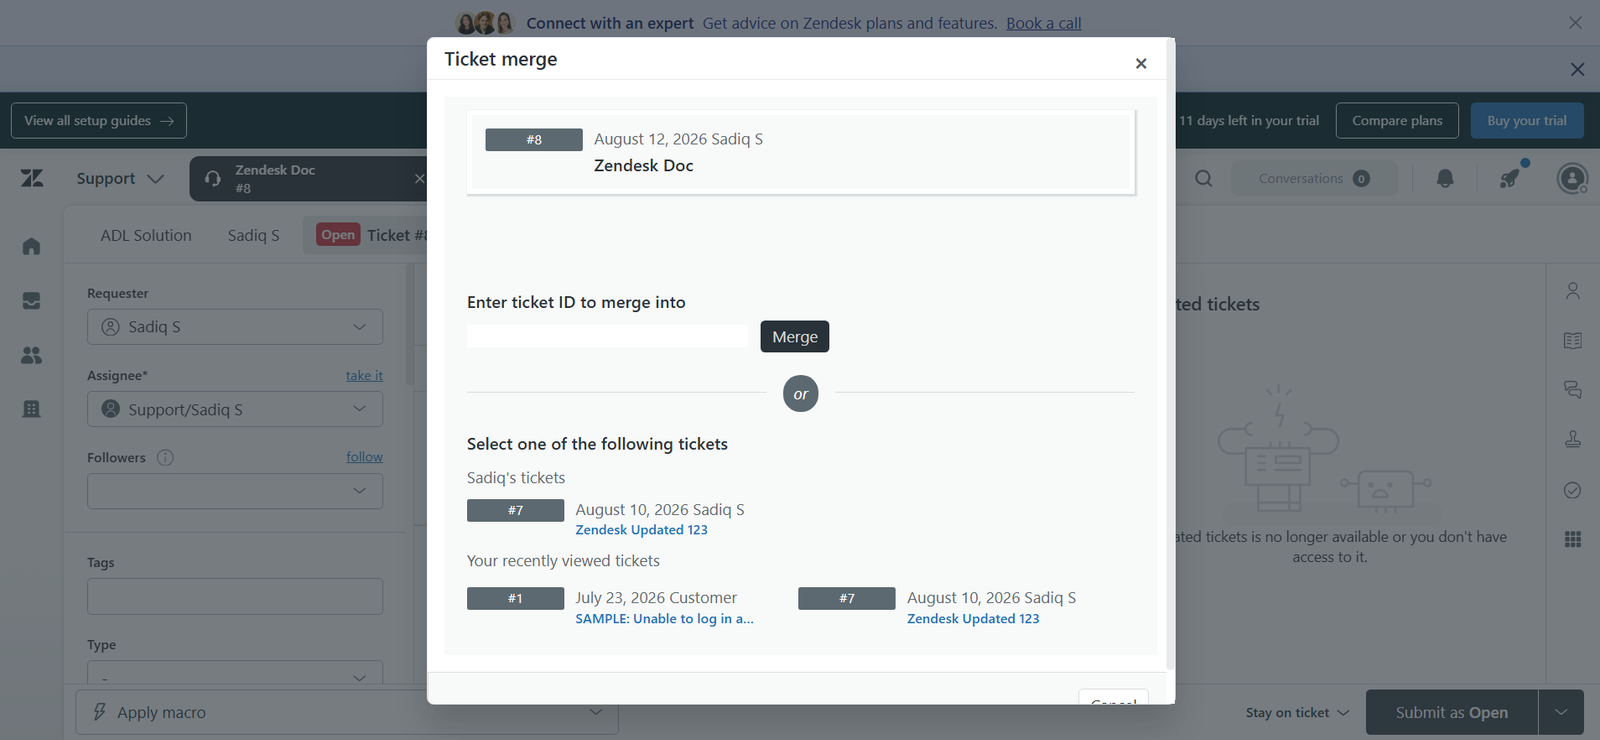
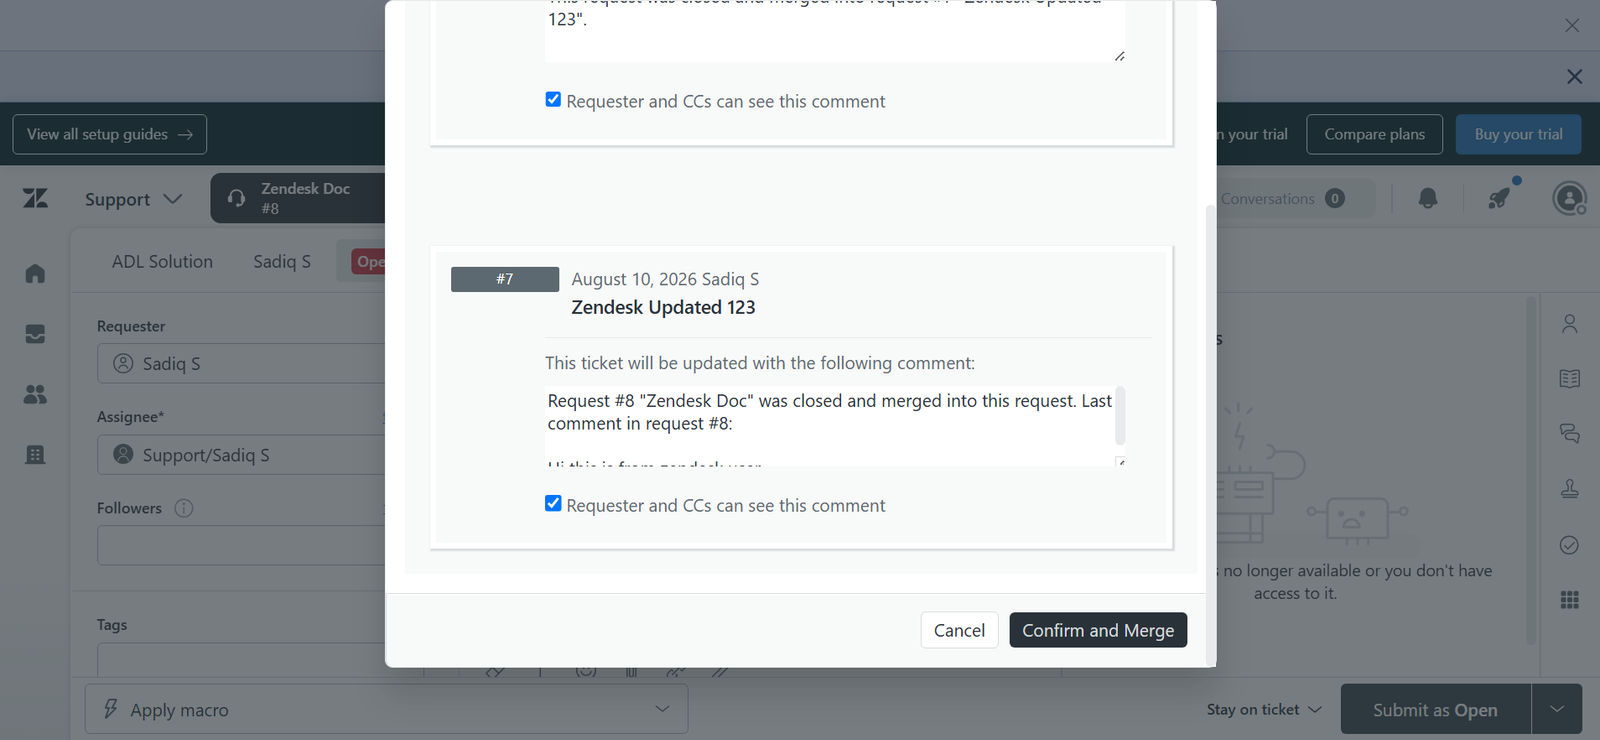
Zendesk creates a relationship between the merged ticket and the destination ticket.
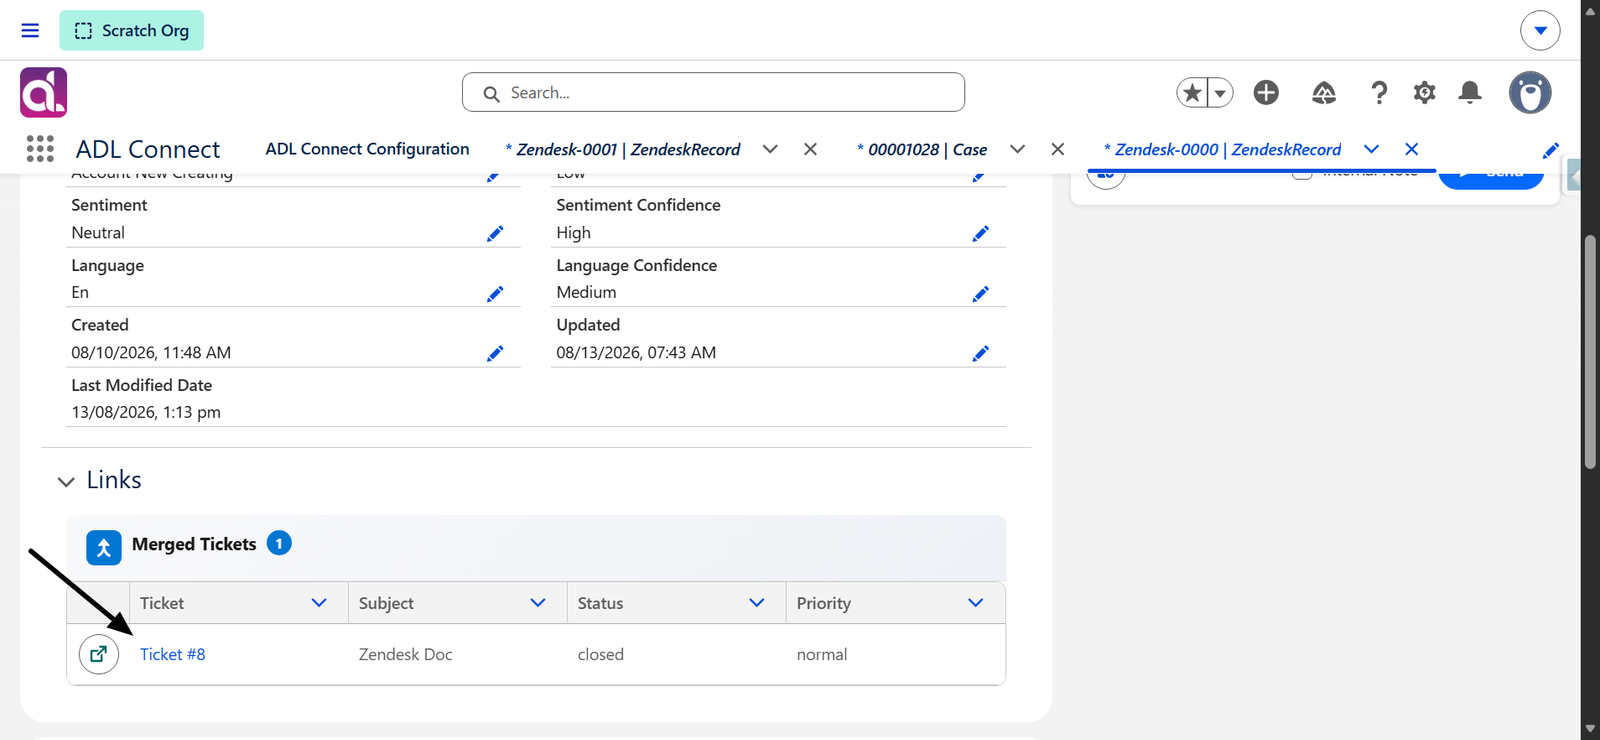
Step 3: View Linked Tickets in Salesforce
- Open the Salesforce Case linked to the Zendesk ticket.
- Refresh the ADL Zendesk Details component.
- Open the Links section.
The linked or merged Zendesk ticket is displayed, including:
- Linked Zendesk Id
- Relationship Type
- Subject
- Status
Summary
Using the Merge into another ticket option in Zendesk and the Links section in ADL Zendesk Details, Salesforce users can:
- View merged or linked Zendesk tickets.
- Track relationships between customer issues.
- Access linked ticket details directly from Salesforce.
- Maintain complete visibility across related Zendesk support requests.
Search and Link Existing Zendesk Tickets
Searching and Linking Existing Zendesk Tickets from Salesforce
ADL Connect allows Salesforce users to search for existing Zendesk tickets directly from Salesforce and link them to Salesforce records such as Cases. This capability helps prevent duplicate ticket creation, improves traceability, and automatically brings Zendesk ticket context—such as comments, attachments, and ticket status details—into Salesforce.
Searching and Linking an Existing Zendesk Ticket
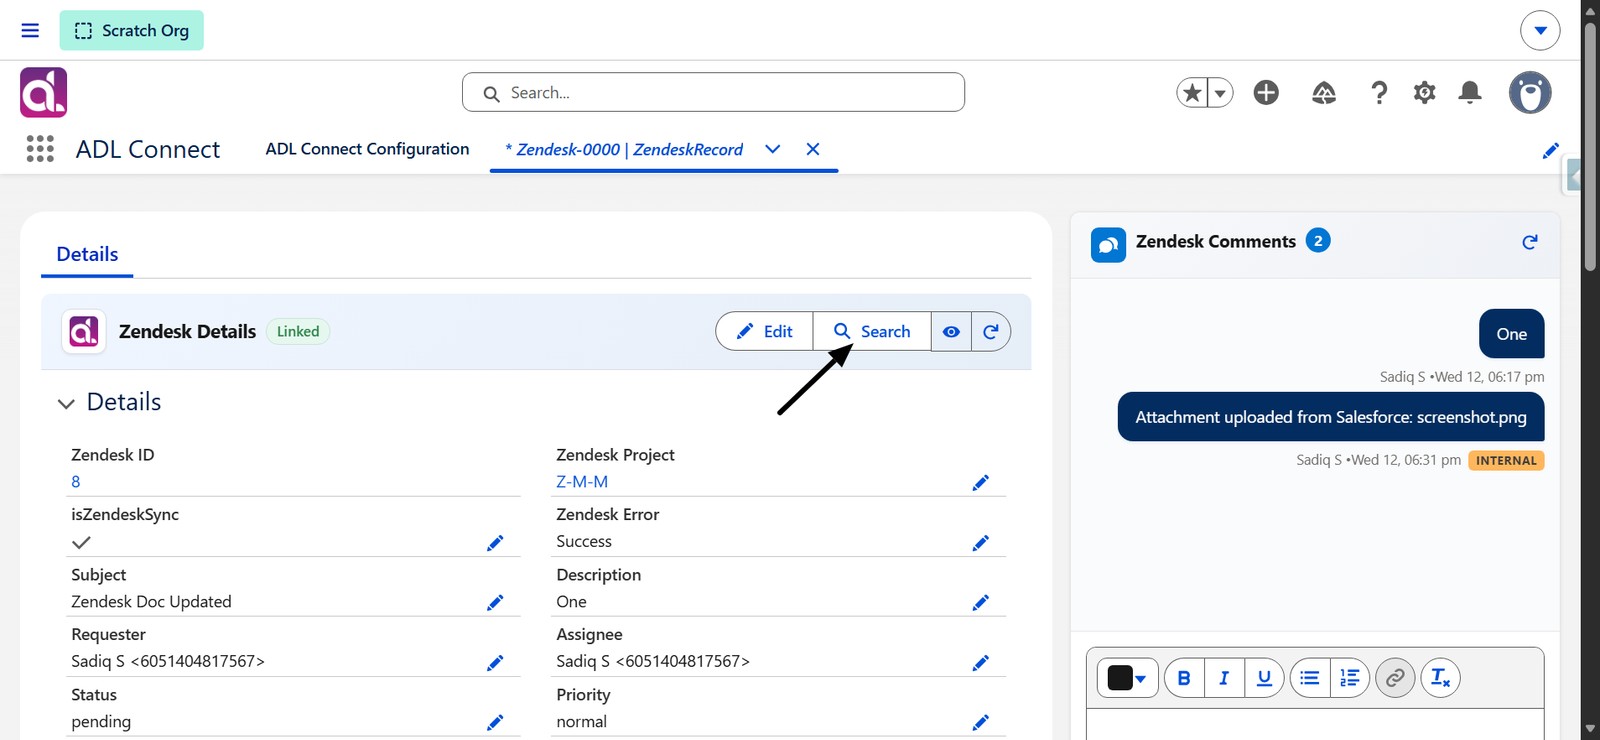
1. Initiate a Zendesk Ticket Search
- Open the Salesforce record where ADL Connect is enabled (for example, a Case).
- In the ADL Zendesk Details component, click Search.
This opens the Zendesk ticket search interface embedded within Salesforce.
2. Enter a Search Keyword
- In the search field, enter a keyword related to the Zendesk ticket you want to locate.
- Keywords may include:
- Ticket subject
- Description content
- Zendesk ticket ID
- Other searchable fields
- Review the list of Zendesk tickets returned by the search.
Search results are retrieved directly from Zendesk, ensuring the latest ticket data is displayed.
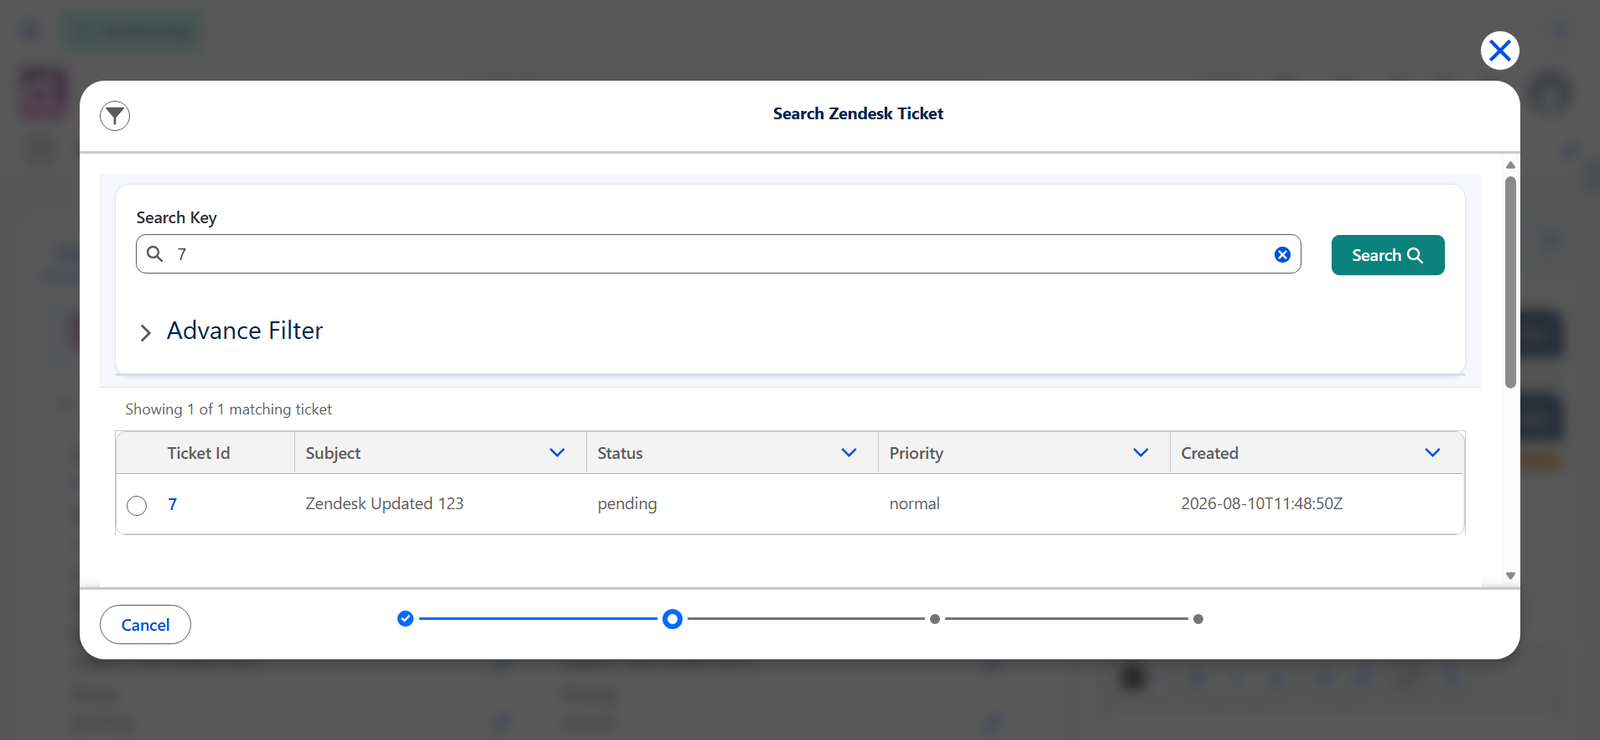
3. Select the Zendesk Ticket to Link
- From the search results, select the Zendesk ticket to associate with the current Salesforce record.
- ADL Connect displays a preview of mapped fields.
- Mapped fields are automatically populated based on the configured Field Mapping.
- The preview allows users to confirm that the correct Zendesk ticket is being linked before saving.
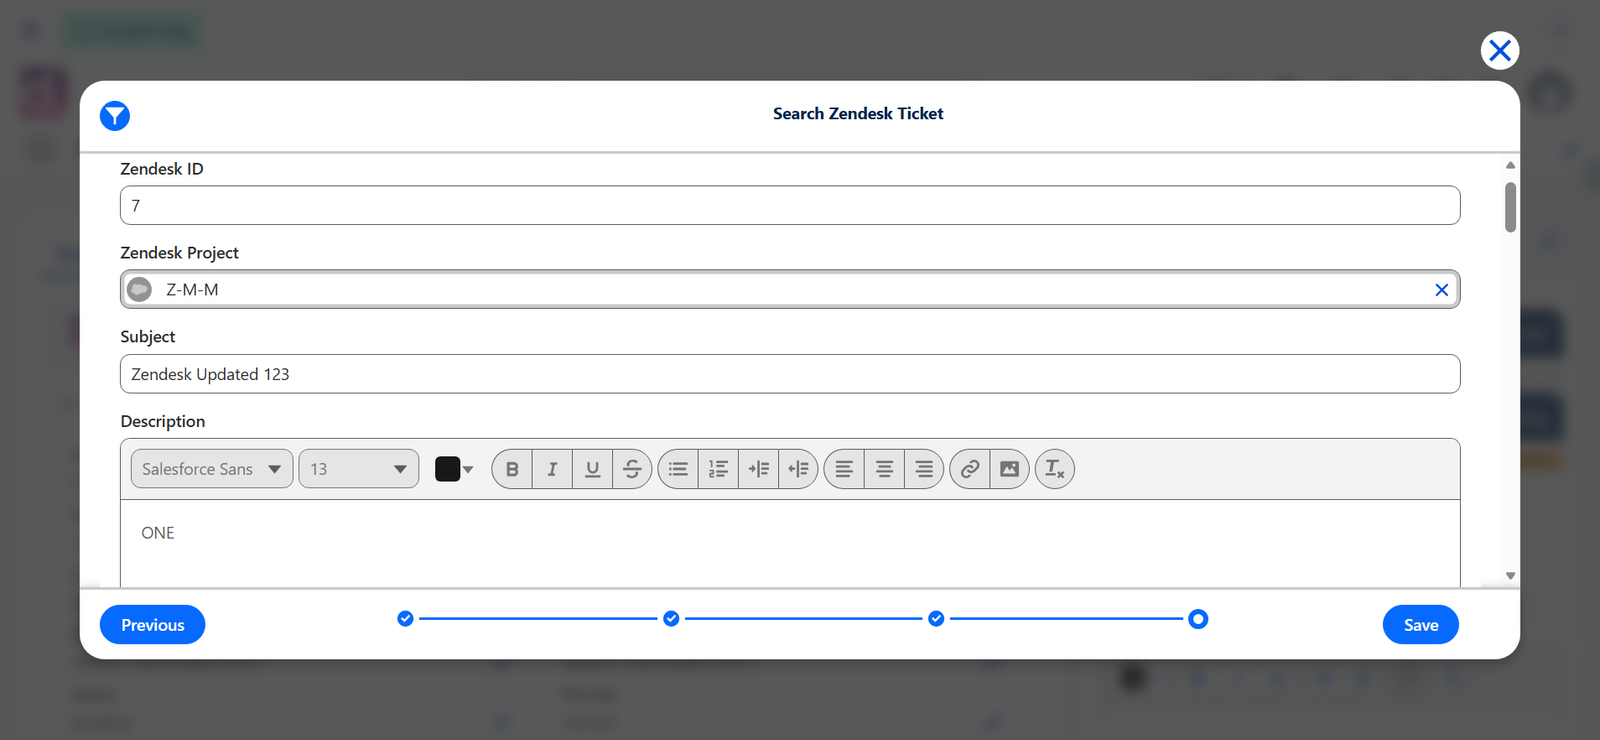
4. Save the Link
- Click Save to complete the linking process.
- The selected Zendesk ticket is now associated with the Salesforce record.
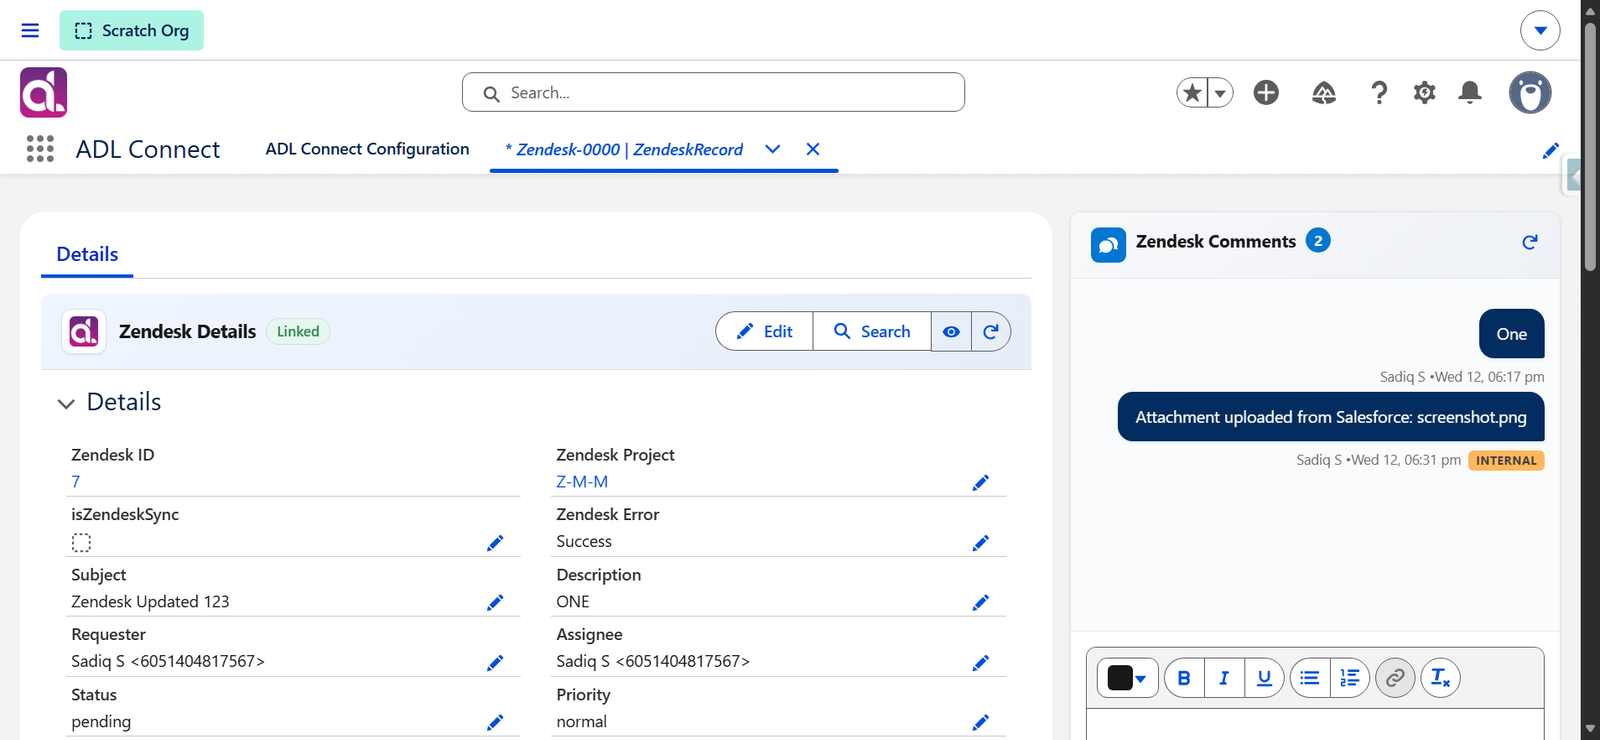
This establishes a direct, persistent relationship between the Salesforce record and the existing Zendesk ticket.
Automatic Retrieval of Zendesk Details
After the Zendesk ticket is linked, ADL Connect automatically retrieves:
- Zendesk comments
- Attachments
- Ticket status and other mapped fields
These details appear immediately within the ADL Zendesk components on the Salesforce record page, giving Salesforce users full visibility into Zendesk activity without leaving Salesforce.
Summary
Using the Search and Link feature, Salesforce users can:
- Search Zendesk tickets directly from Salesforce
- Avoid creating duplicate Zendesk tickets
- Link the correct Zendesk ticket to a Case or other Salesforce record
- Automatically retrieve existing comments, attachments, and status details into Salesforce
This functionality provides a unified workflow and improves collaboration between Support, Customer Success, and Operations teams by keeping all relevant ticket information accessible within Salesforce.
Managing Linked Zendesk Tickets via the Pop-up Modal
In Many-to-Many connector mappings, a single Salesforce record can be linked to multiple Zendesk tickets. To help Salesforce users manage each linked ticket individually without leaving Salesforce, ADL Connect provides a Zendesk Ticket Pop-up Modal. This modal allows users to view ticket details, manage attachments, post comments, and inspect linked tickets — all from within the Salesforce interface.
Prerequisites
Before working with the Zendesk Ticket Pop-up Modal, ensure that:
- Zendesk integration is configured in ADL Connect.
- A Many-to-Many connector mapping exists between Salesforce and Zendesk.
- The ADL Zendesk Details (M) component has been added to the Case page layout.
- One or more Zendesk tickets are linked to the Salesforce record.
- Users have the required Salesforce and Zendesk permissions.
Step 1: Open the Zendesk Ticket Pop-up Modal
- Navigate to the Salesforce record where the ADL Zendesk Details (M) component is available.
- In the list of linked Zendesk tickets, locate the ticket you want to interact with (for example, Ticket #8).
- Click the open (arrow) icon next to the Zendesk Id column.
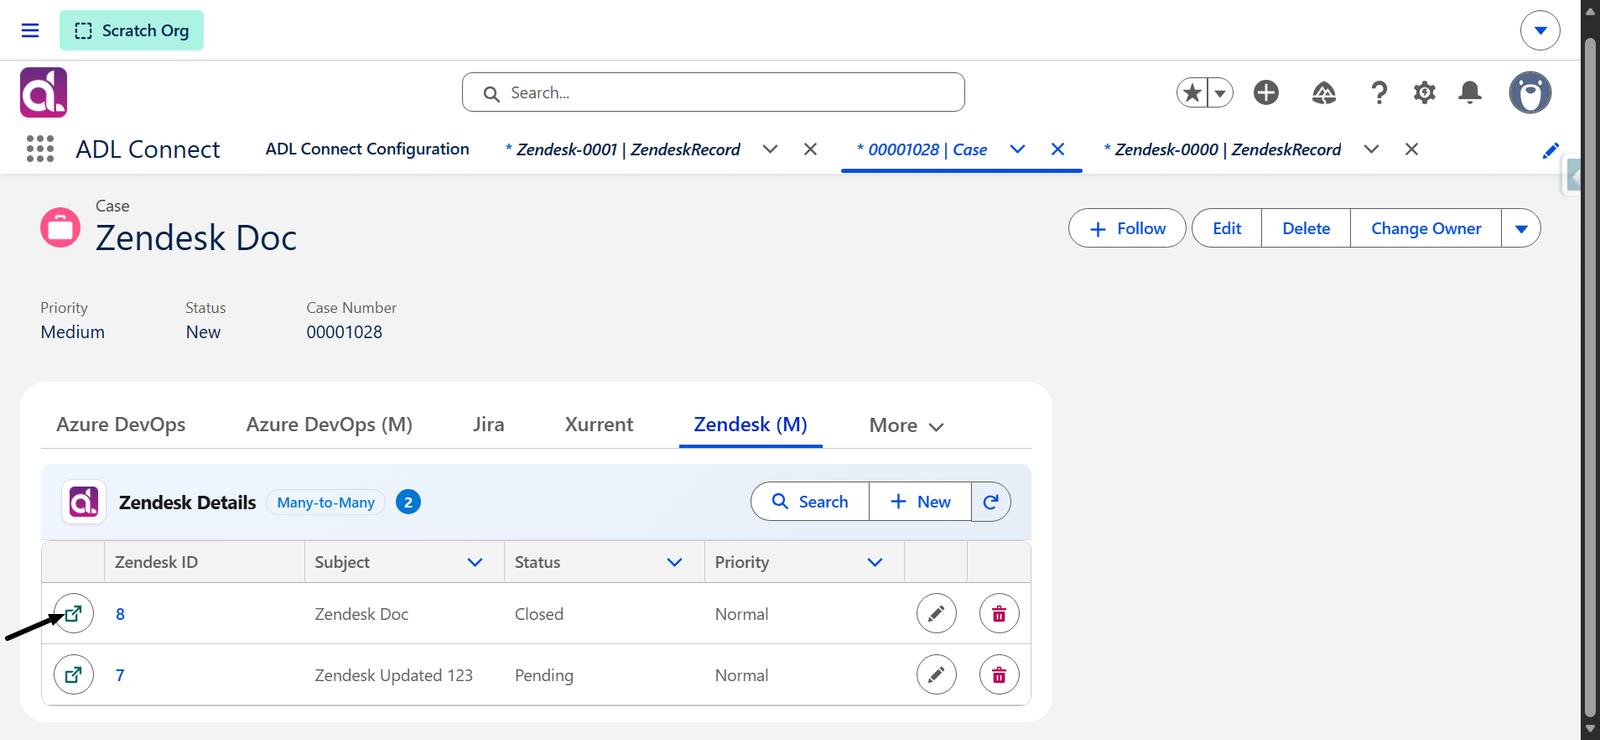
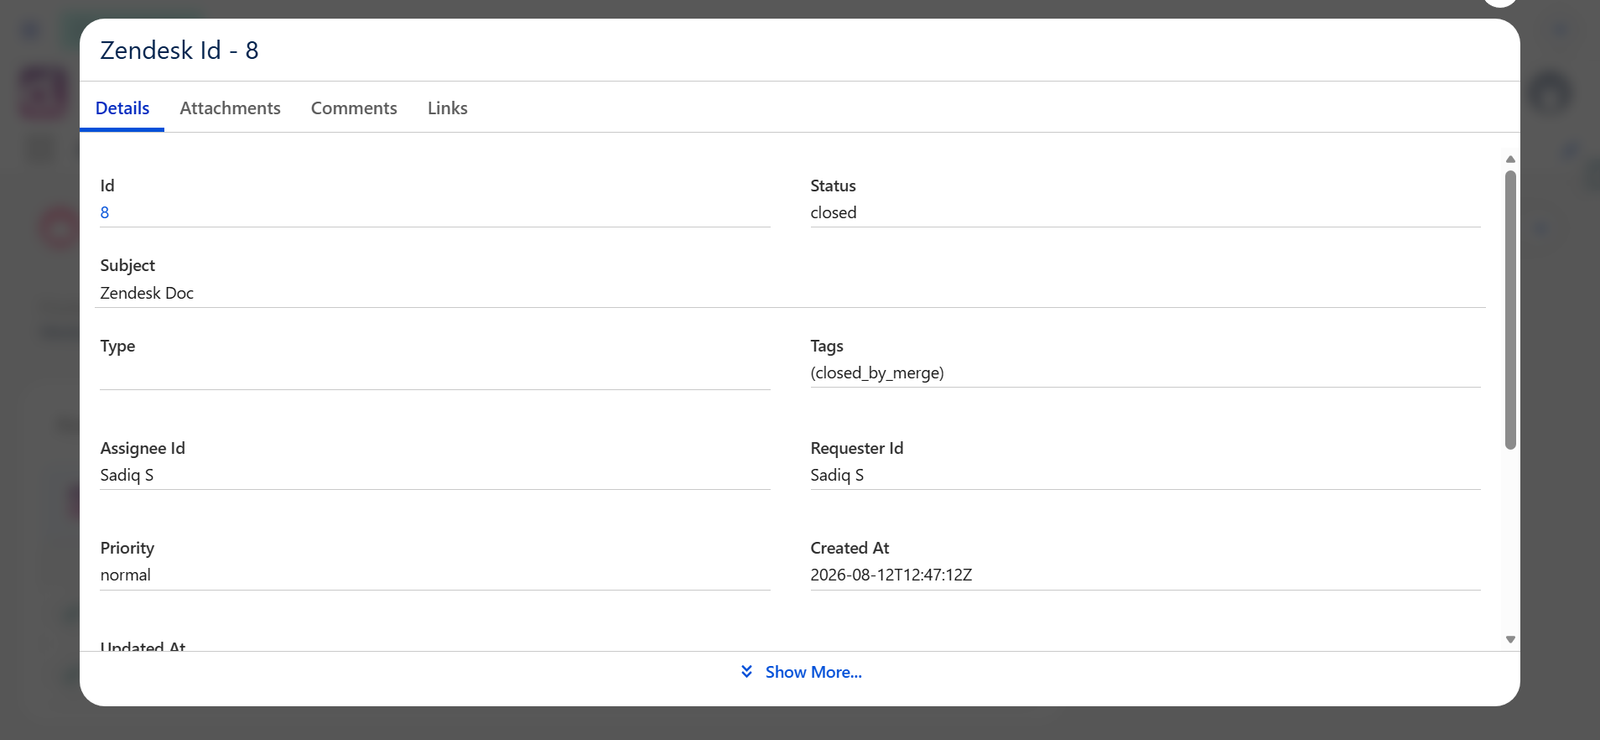
A pop-up modal opens directly within Salesforce, displaying the details of the selected Zendesk ticket. The modal title displays the Zendesk Id of the selected ticket (for example, Zendesk Id - 8).
The modal is organized into four tabs:
- Details
- Attachments
- Comments
- Links
Step 2: View Ticket Details
The Details tab is displayed by default and shows the core information for the selected Zendesk ticket:
- Id – The Zendesk ticket number (clickable link to the ticket in Zendesk).
- Subject – The subject of the ticket.
- Status – Current ticket status (for example, Open).
- Priority – Ticket priority.
- Type – Ticket type.
- Assignee – The assigned Zendesk agent.
- Requester – The user who created the ticket.
- Group – The Zendesk group assigned to the ticket.
- Brand – The Zendesk brand associated with the ticket.
- Created At – Timestamp when the ticket was created.
Click Show More... at the bottom of the Details tab to expand and view additional fields for the ticket.
Step 3: Manage Attachments
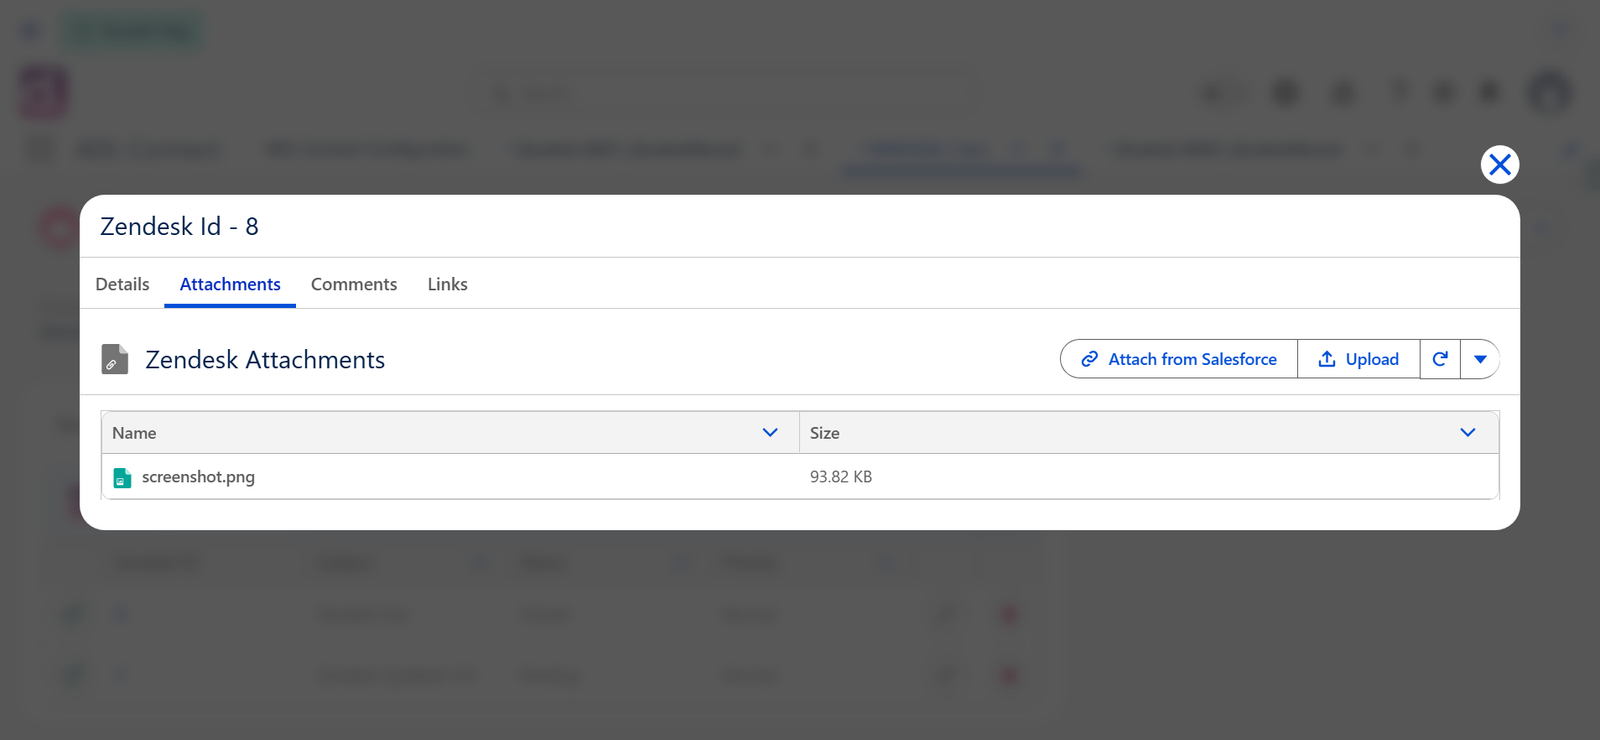
Switch to the Attachments tab to view and manage attachments associated with the linked Zendesk ticket.
The Zendesk Attachments panel displays:
- Name – The file name of each attachment.
- Size – The file size of each attachment.
Available actions:
- Attach from Salesforce – Attach existing Salesforce files directly to the Zendesk ticket.
- Upload – Upload a new file from your device to the Zendesk ticket.
- Refresh – Reload the attachments list to fetch the latest data from Zendesk.
Click Thumbnail view to preview the image without downloading it, or download the file directly from Salesforce.
Step 4: View and Post Comments
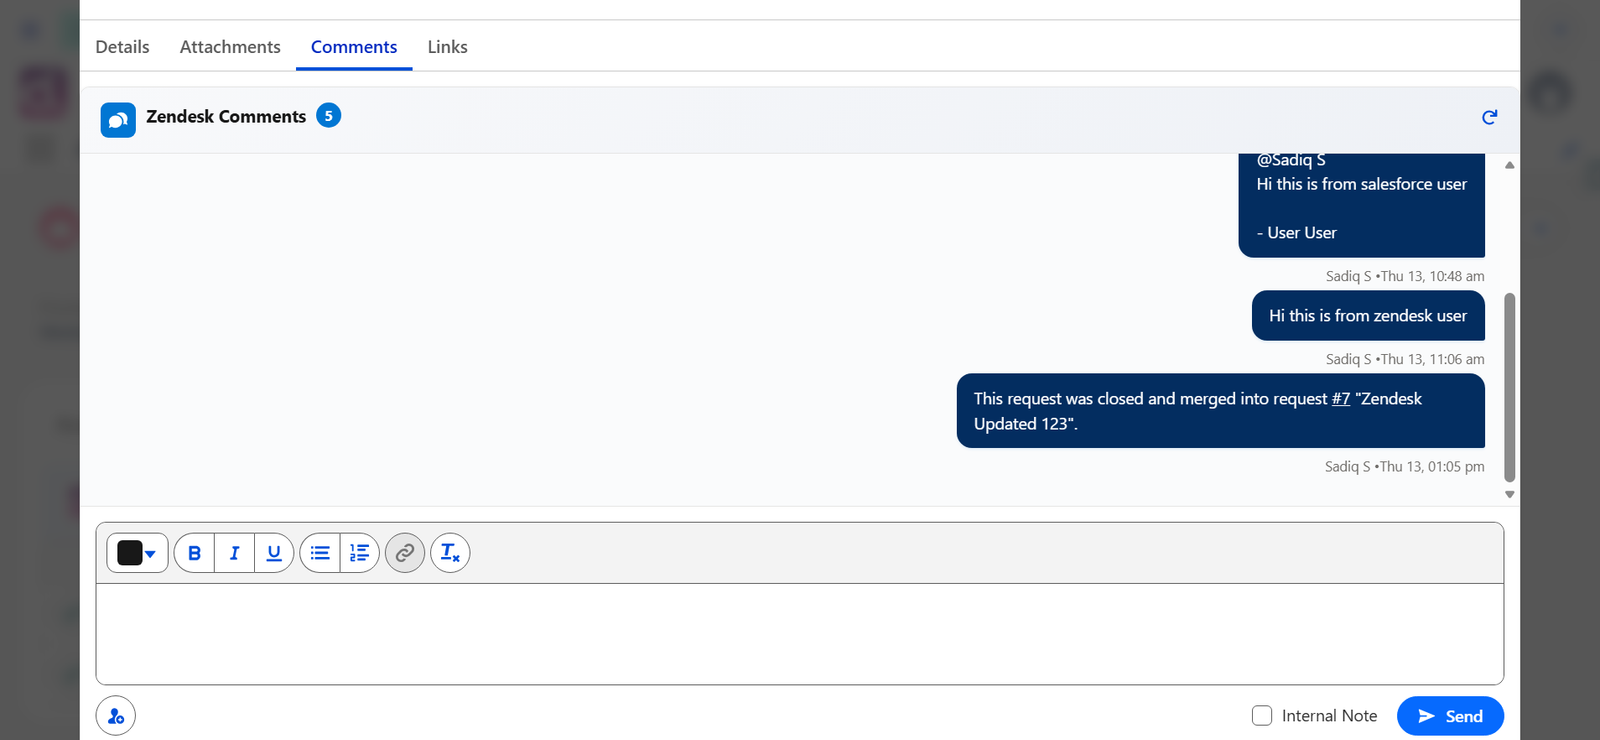
Switch to the Comments tab to view the comment history for the linked Zendesk ticket and to post new comments.
The Zendesk Comments panel displays:
- The complete comment history for the ticket, including public replies, internal notes, and system-generated messages.
- Each comment shows the author name, timestamp, and content.
- The total number of comments is shown next to the panel title (for example, Zendesk Comments (5)).
To post a new comment:
- Enter your message in the text editor at the bottom of the tab.
- Use the rich-text toolbar to format the comment.
- Choose Public Reply or Internal Note.
- Click Send to post the comment.
The comment is instantly added to the linked Zendesk ticket and becomes visible in Zendesk.
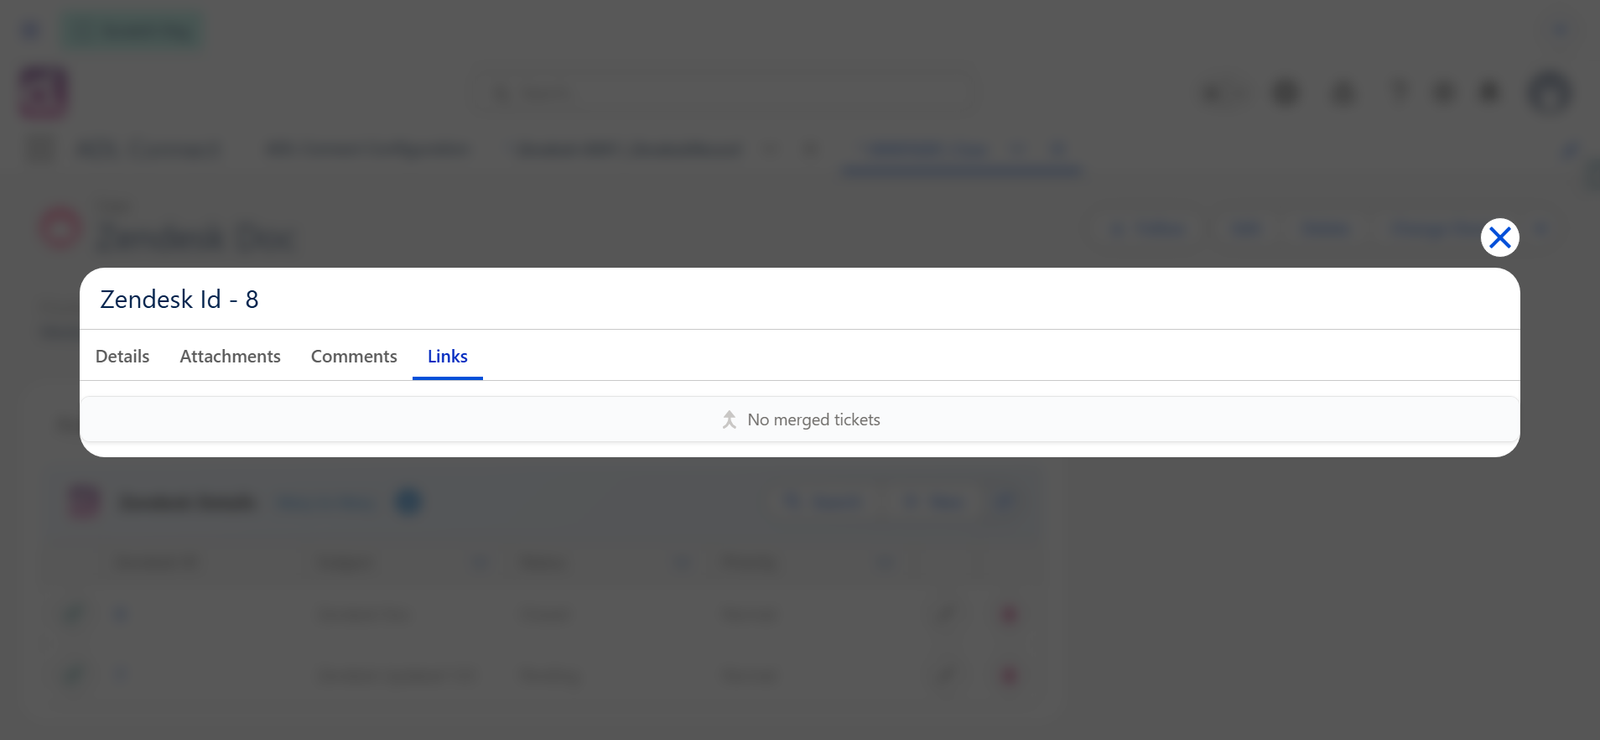
Step 5: View Related Links
Switch to the Links tab to view any related, duplicate, parent, child, or merged Zendesk tickets connected to the current linked ticket.
- If related tickets exist, the Links tab displays the linked ticket numbers, subjects, and their relationship type (for example, Related, Duplicate, Parent, Child, or Merged).
- If no related tickets exist, the message No linked tickets are displayed.
This tab helps users trace ticket relationships across multiple Zendesk tickets without leaving Salesforce.
Step 6: Close the Modal
- Click the X in the top-right corner of the modal to close it and return to the Salesforce record.
Any updates made within the modal (posted comments or uploaded attachments) are already saved to Zendesk — no additional confirmation is required.
Summary
Using the Zendesk Ticket Pop-up Modal, Salesforce users can:
- Individually inspect and manage each Zendesk ticket in a Many-to-Many mapping.
- View core ticket details without navigating away from Salesforce.
- Upload and manage attachments for each linked ticket.
- Read and post public replies and internal notes.
- Trace related, duplicate, parent, child, and merged tickets through the Links tab.
- Maintain full control over multiple linked Zendesk tickets from a single Salesforce record.
This capability provides a focused, ticket-specific view within Many-to-Many mappings, improving productivity for teams that manage several parallel Zendesk tickets tied to a single Salesforce Case.
Frequently Asked Questions (FAQ)
General Overview
Q1: What is ADL Connect and what problem does it solve?
A:
ADL Connect is a bidirectional integration tool that synchronizes Salesforce records with Zendesk tickets. It eliminates duplicate data entry, improves collaboration between customer support and business teams, and provides real-time visibility into ticket progress without requiring users to switch systems.
Q2: Which Zendesk editions does ADL Connect support?
A:
ADL Connect supports Zendesk Support on Zendesk Cloud, including commonly used editions such as Suite Team, Suite Growth, Suite Professional, and Suite Enterprise.
Q3: Can I try ADL Connect before purchasing a license?
A:
Yes. ADL Connect offers a free 30-day trial via the Salesforce AppExchange, allowing you to evaluate all features before purchasing.
Setup & Configuration
Q4: Do I need admin permissions to configure ADL Connect?
A:
Yes.
- Salesforce: System Administrator permissions are required to install the package, configure Lightning pages, and manage field-level security.
- Zendesk: Administrator permissions are required to generate API tokens and configure ticket fields and webhooks if used.
Q5: Why do I need a custom Zendesk ticket field for Salesforce record IDs?
A:
ADL Connect requires a custom text field in Zendesk to store the Salesforce record ID. This enables the connector to:
- Link Zendesk tickets back to Salesforce records
- Maintain reliable bidirectional synchronization
- Prevent duplicate or broken ticket relationships
Without this field, linking and synchronization will not function correctly.
Q6: How do I authenticate Salesforce and Zendesk?
A:
Authentication is performed using:
- Zendesk email address
- Zendesk API token
- Zendesk subdomain
The API token is generated in Zendesk Admin Center and entered into the ADL Connect Authentication Console.
Q7: What Salesforce objects can be synced with Zendesk tickets?
A:
ADL Connect supports:
- Standard objects (e.g., Case, Opportunity, Account)
- Custom objects created in your Salesforce org
Any compatible Salesforce field can be mapped to a Zendesk field, provided the data types are supported.
Q8: What is a Project Mapping and why is it required?
A:
A Project Mapping defines:
- Which Salesforce object maps to Zendesk tickets
- Which Zendesk ticket type or form is used
- Which Zendesk custom field stores the Salesforce record ID
It is the foundation for field mappings and synchronization logic.
Synchronization Behavior
Q9: What sync directions are supported?
A:
ADL Connect supports:
- Salesforce → Zendesk (Outbound)
- Zendesk → Salesforce (Inbound)
- Bidirectional synchronization
Sync direction is configurable at the field level.
Q10: How often does data synchronization occur?
A:
Synchronization is near real-time:
- Outbound sync occurs immediately when records are saved in Salesforce
- Inbound sync occurs when Zendesk sends updates through the configured integration endpoint
Q11: Can I choose which fields sync between Salesforce and Zendesk?
A:
Yes. Field-level mapping allows you to control:
- Which Salesforce field maps to which Zendesk field
- The sync direction
- Whether the field is required, optional, or read-only
Q12: Are comments and attachments synchronized?
A:
Yes.
- Ticket comments synchronize between Salesforce and Zendesk
- Attachments can be viewed, uploaded, and downloaded directly from Salesforce
Q13: How does ADL Connect prevent accidental data overwrites?
A:
Each field mapping specifies a sync direction. This allows you to define which system is the source of truth for each field, preventing unintended overwrites.
Usage Questions
Q14: Can Salesforce users create Zendesk tickets without Zendesk licenses?
A:
Yes. Salesforce users do not require Zendesk agent licenses to create or update Zendesk tickets through ADL Connect. Zendesk licensing affects visibility and permissions within Zendesk only.
Q15: Can I edit Zendesk tickets directly from Salesforce?
A:
Yes. Using the ADL Zendesk Details component, users can update:
- Status
- Subject
- Priority
- Assignee
- Any mapped fields
All updates synchronize to Zendesk in real time.
Q16: Can I link an existing Zendesk ticket instead of creating a new one?
A:
Yes. The Search & Link feature allows users to:
- Search Zendesk tickets by keyword
- Select an existing ticket
- Link it to a Salesforce record
- Automatically retrieve comments and attachments
Q17: Can multiple Salesforce records link to the same Zendesk ticket?
A:
This depends on configuration. By default, ADL Connect enforces a one-to-one relationship, but advanced configurations can support one-to-many scenarios.
Troubleshooting
Q18: I can’t see some Salesforce fields in the Zendesk Details component. What should I check?
A:
Verify that:
- The field is added to the page layout
- The field is included on the Lightning Record Page
- Field-Level Security allows visibility
- The field is included in Project Mapping and Field Mapping
Q19: Inbound synchronization is not working. What should I check first?
A:
Verify the following:
- The integration endpoint is configured correctly
- The Zendesk subdomain is correct
- API token authentication is valid
- Inbound rules are configured correctly
- The field mappings are active and saved
Q20: Why are Zendesk comments not appearing in Salesforce?
A:
Common causes include:
- API token authentication failure
- Missing inbound permissions
- ADL Zendesk Comments component not added to the page
- Incorrect project or field mapping
Q21: Why does the Zendesk Ticket ID not appear after ticket creation?
A:
Check whether:
- API token authentication is valid
- Project Mapping is correctly configured
- The Salesforce record is saved before ticket creation
- The Zendesk custom field for Salesforce ID exists and is mapped
Q22: Attachments are not appearing in Salesforce. What should I do?
A:
Ensure that:
- ADL Zendesk Attachments component is added to the page
- Salesforce users have access to the attachment-related fields
- Zendesk permissions allow attachment access via API
Security & Access
Q23: How secure is Salesforce–Zendesk authentication?
A:
Authentication uses API tokens and HTTPS endpoints. No Zendesk passwords are stored in Salesforce. Tokens can be revoked at any time from Zendesk Admin Center.
Q24: Does ADL Connect expose sensitive Zendesk data?
A:
No, when configured correctly. Ensure that:
- Only required permissions are granted
- Object and field access is minimized
- Sharing rules restrict sensitive records
ADL Connect only accesses fields required for synchronization.
Q25: Can I restrict who can create Zendesk tickets from Salesforce?
A:
Yes. Access can be controlled using:
- Profiles
- Permission sets
- Lightning page visibility rules
Licensing & Maintenance
Q26: Do all Salesforce users require a license to use ADL Connect?
A:
Only users who interact with ADL Connect components require licenses. Administrators configuring the integration also require licenses.
Q27: What happens if my license expires?
A:
Synchronization and ticket creation are disabled until the license is renewed. Existing configurations and integrated data are preserved.
Q28: How often are updates released?
A:
Updates are delivered periodically through the Salesforce AppExchange. Administrators are notified when new versions are available.