
ServiceNow Knowledge Base
Step-by-step guides for installing, configuring, and using ADL Connect — the bidirectional Salesforce ↔ ServiceNow integration.
Prefer to watch? Follow the full setup video
A short walkthrough of connecting Salesforce and ServiceNow with ADL Connect — from install to your first synced records.
Salesforce ↔ ServiceNow
Full connector setup, start to finish
- 01 Install ADL ConnectAdd the app from Salesforce AppExchange in a couple of clicks.
- 02 Connect ServiceNowAuthenticate your Salesforce org and ServiceNow account securely.
- 03 Map fields both waysMatch objects, fields & picklists so data lines up perfectly.
- 04 Go live with syncSwitch on real-time, two-way sync and watch records update instantly.
Introduction to ADL Connect
ADL Connect – Salesforce – ServiceNow Integration Overview
ADL Connect is a powerful, bidirectional integration tool that connects Salesforce with ServiceNow to create a unified workflow across Support, Sales, and Engineering teams. Available on the Salesforce AppExchange, this connector enables seamless synchronization of ServiceNow incidents, comments, attachments, and status updates directly within Salesforce.
By consolidating cross-system activities, ADL Connect eliminates the need for manual updates, improves response times, and significantly reduces context switching between applications.
Through its intuitive configuration interface and secure authentication model, ADL Connect allows organizations to centralize issue management while maintaining data accuracy and consistency across both platforms.
Purpose
The primary objective of ADL Connect is to provide a frictionless bridge between Salesforce users and ServiceNow users, ensuring that customer issues, development tasks, and product enhancements move efficiently through their lifecycle.
This integration is particularly beneficial for:
Salesforce Administrators
- Require a configurable, scalable, and secure integration to support internal teams.
Developers
- Need consistent and accurate ServiceNow incident visibility tied to Salesforce cases or internal records.
Project Managers and Product Owners
- Benefit from streamlined communication and reduced duplication of work across systems.
Support and Operations Teams
- Can create, link, and track ServiceNow incidents directly from Salesforce without switching tools.
ADL Connect ensures that both customer-facing teams and engineering teams operate with a single source of truth, ultimately improving collaboration and accelerating issue resolution.
What This Article Covers
This introductory article provides a high-level understanding of ADL Connect and what users can expect from the integration. The following topics are covered:
1. Core Features of ADL Connect
An overview of the essential capabilities, including:
- Creating and updating ServiceNow issues directly from Salesforce
- Bidirectional synchronization of:
- Fields
- Comments
- Attachments
- Direct search and linking of existing ServiceNow incidents
- Secure authentication using ServiceNow API tokens
- Configurable field and object mapping to align Salesforce records with ServiceNow Tables.
These features ensure smooth operational workflows and reliable data synchronisation across both systems.
2. Installation and Initial Setup
A brief overview of the setup process, including:
- Installing ADL Connect from the Salesforce AppExchange
- Authenticating Salesforce and ServiceNow using secure API tokens
- Performing initial project mapping and data model configuration
This establishes the foundation required to successfully activate and use the integration.
3. How ServiceNow and Salesforce Data Sync Works
An explanation of the bidirectional synchronisation model, covering:
- How outbound synchronisation pushes Salesforce updates into ServiceNow
- How inbound synchronisation retrieves ServiceNow updates into Salesforce
- The role of:
- Field mapping
- Record ID mapping
- Sync rules and conditions
- Handling of comments and attachments across both platforms
This section helps users understand the expected behaviour of the connector once configured.
4. Key Benefits for Operational Teams
A summary of the practical advantages organisations gain by using ADL Connect:
- Reduced manual data entry and administrative overhead
- Improved visibility into engineering progress for customer-facing teams
- Faster issue resolution through centralized communication
- Enhanced collaboration between Sales, Support, and Development teams
- Increased data consistency, traceability, and auditability
These benefits lead to stronger cross-functional alignment and improved service delivery outcomes.
Installation and Connection Setup
Installation and Connection Setup
To begin using ADL Connect, the first step is to install the package from the Salesforce AppExchange and complete the initial connection configuration. This setup establishes a secure communication channel between Salesforce and Jira, enabling all subsequent synchronization activities.
1. Install the ADL Connect Package
Navigate to the Salesforce AppExchange and locate the ADL Connect listing. Link
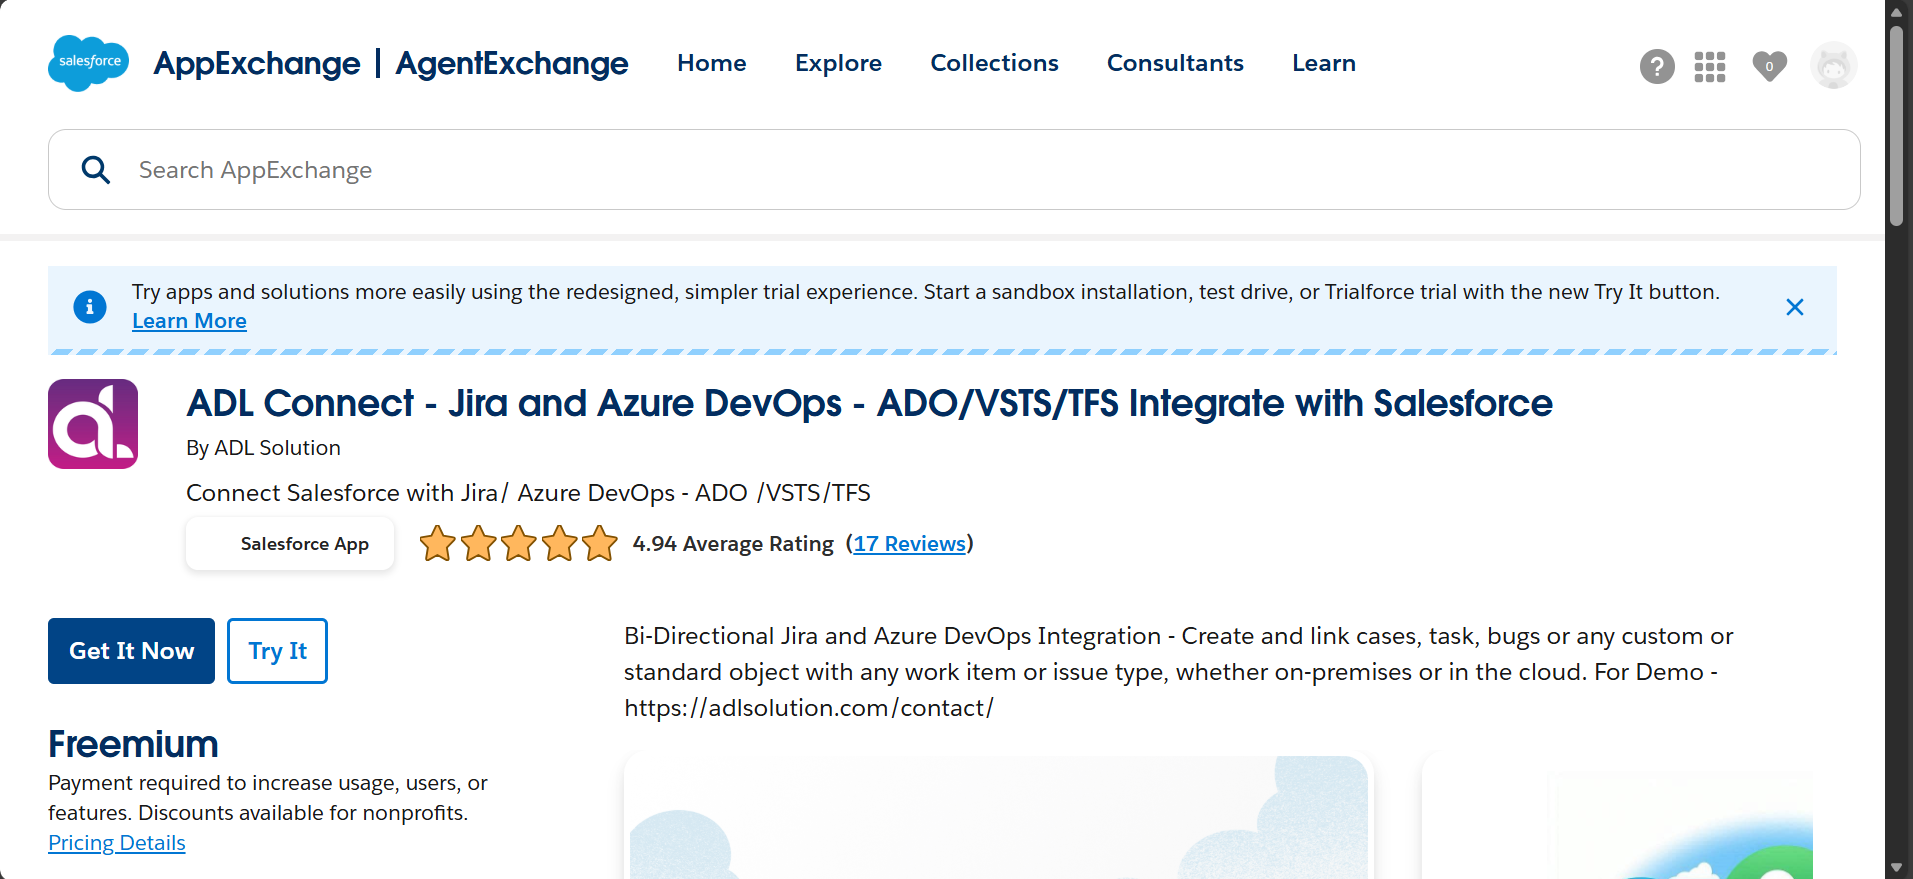
During installation, choose the target environment:
- Get It Now --> Install in Production
- Try It --> Install in Sandbox
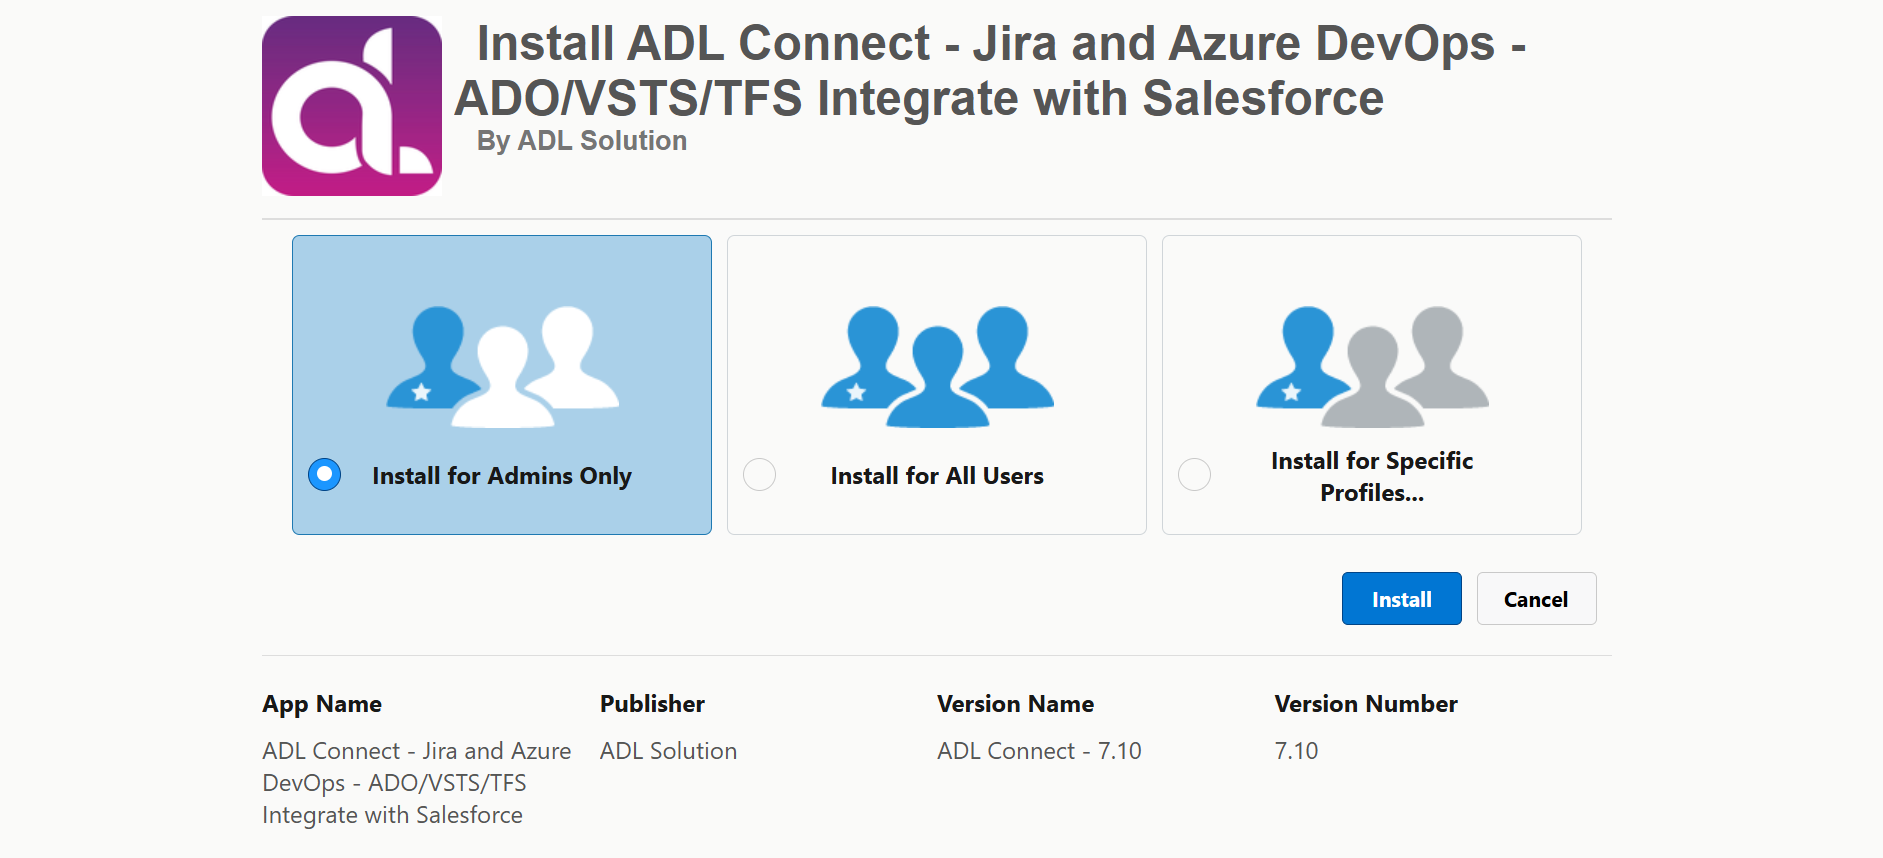
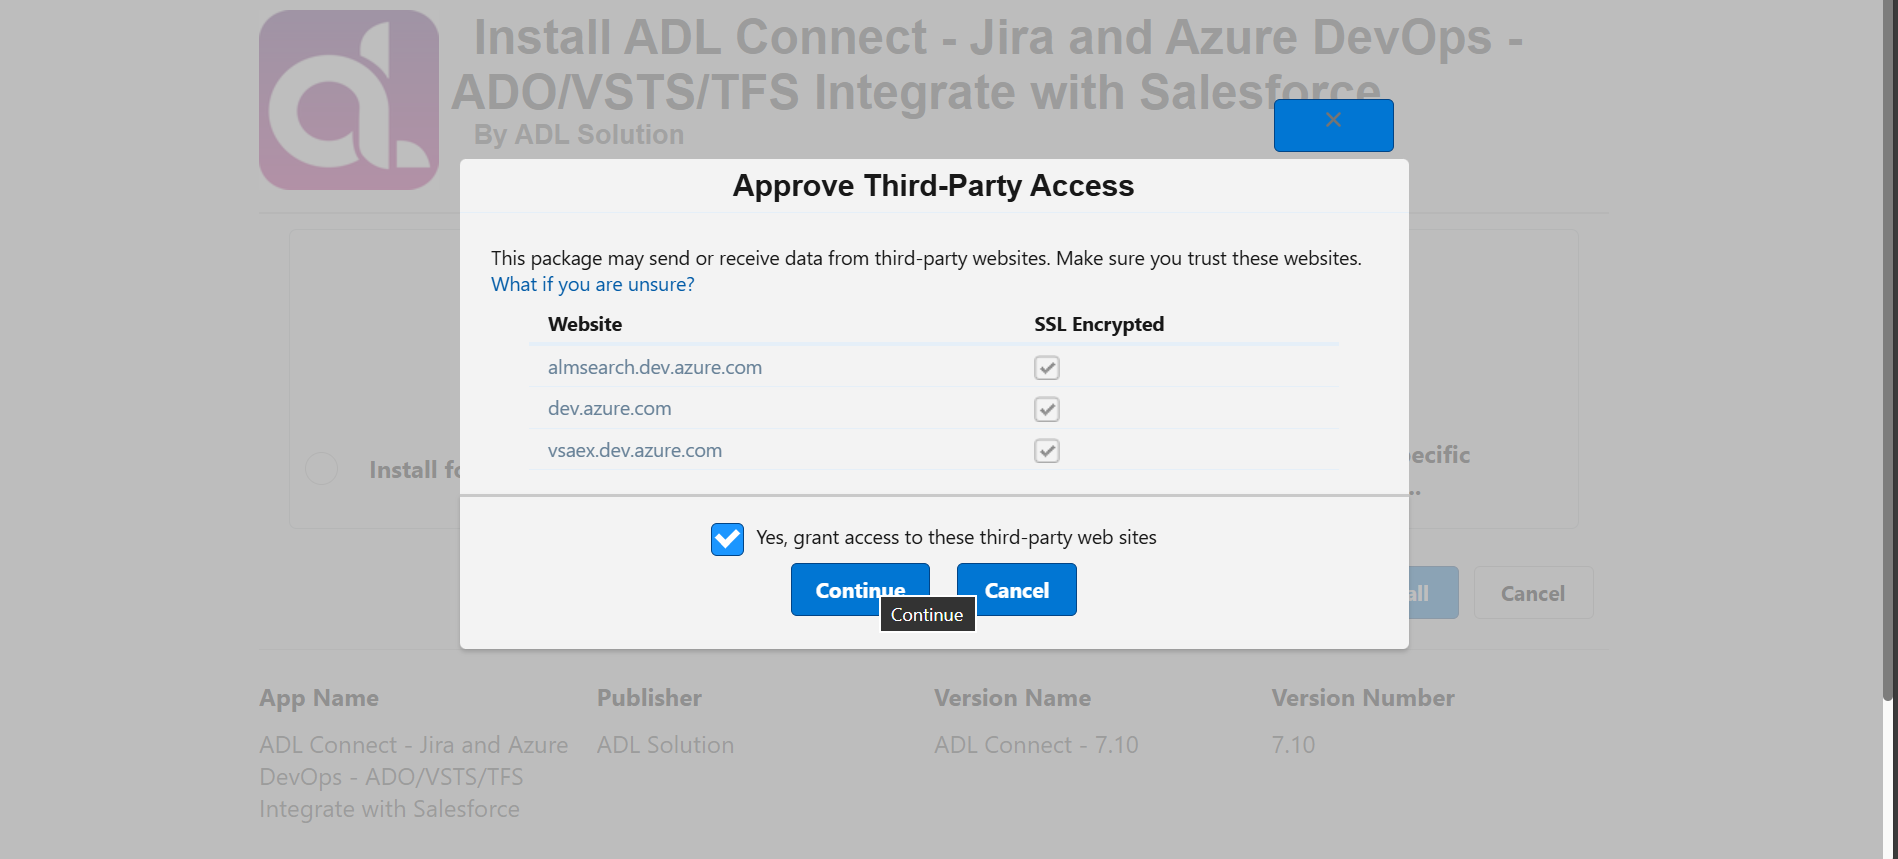
Review and approve the required permissions requested by the package.
Select the installation scope:
- Install for Administrators only, or
- Install for All Users, based on organisational requirements.
Note: (If you require only specific users to create or modify Jira work items, select ‘Install for Administrators only’. You can then grant outbound permission to specific users once after installation)
Once the installation is complete, ADL Connect will be available in the Salesforce App Launcher and ready for configuration. (Please wait until you receive the confirmation email. ET: 5-6 Min)
2. Launch the Configuration Console
After installation, open the ADL Connect Setup Console from the Salesforce App Launcher.
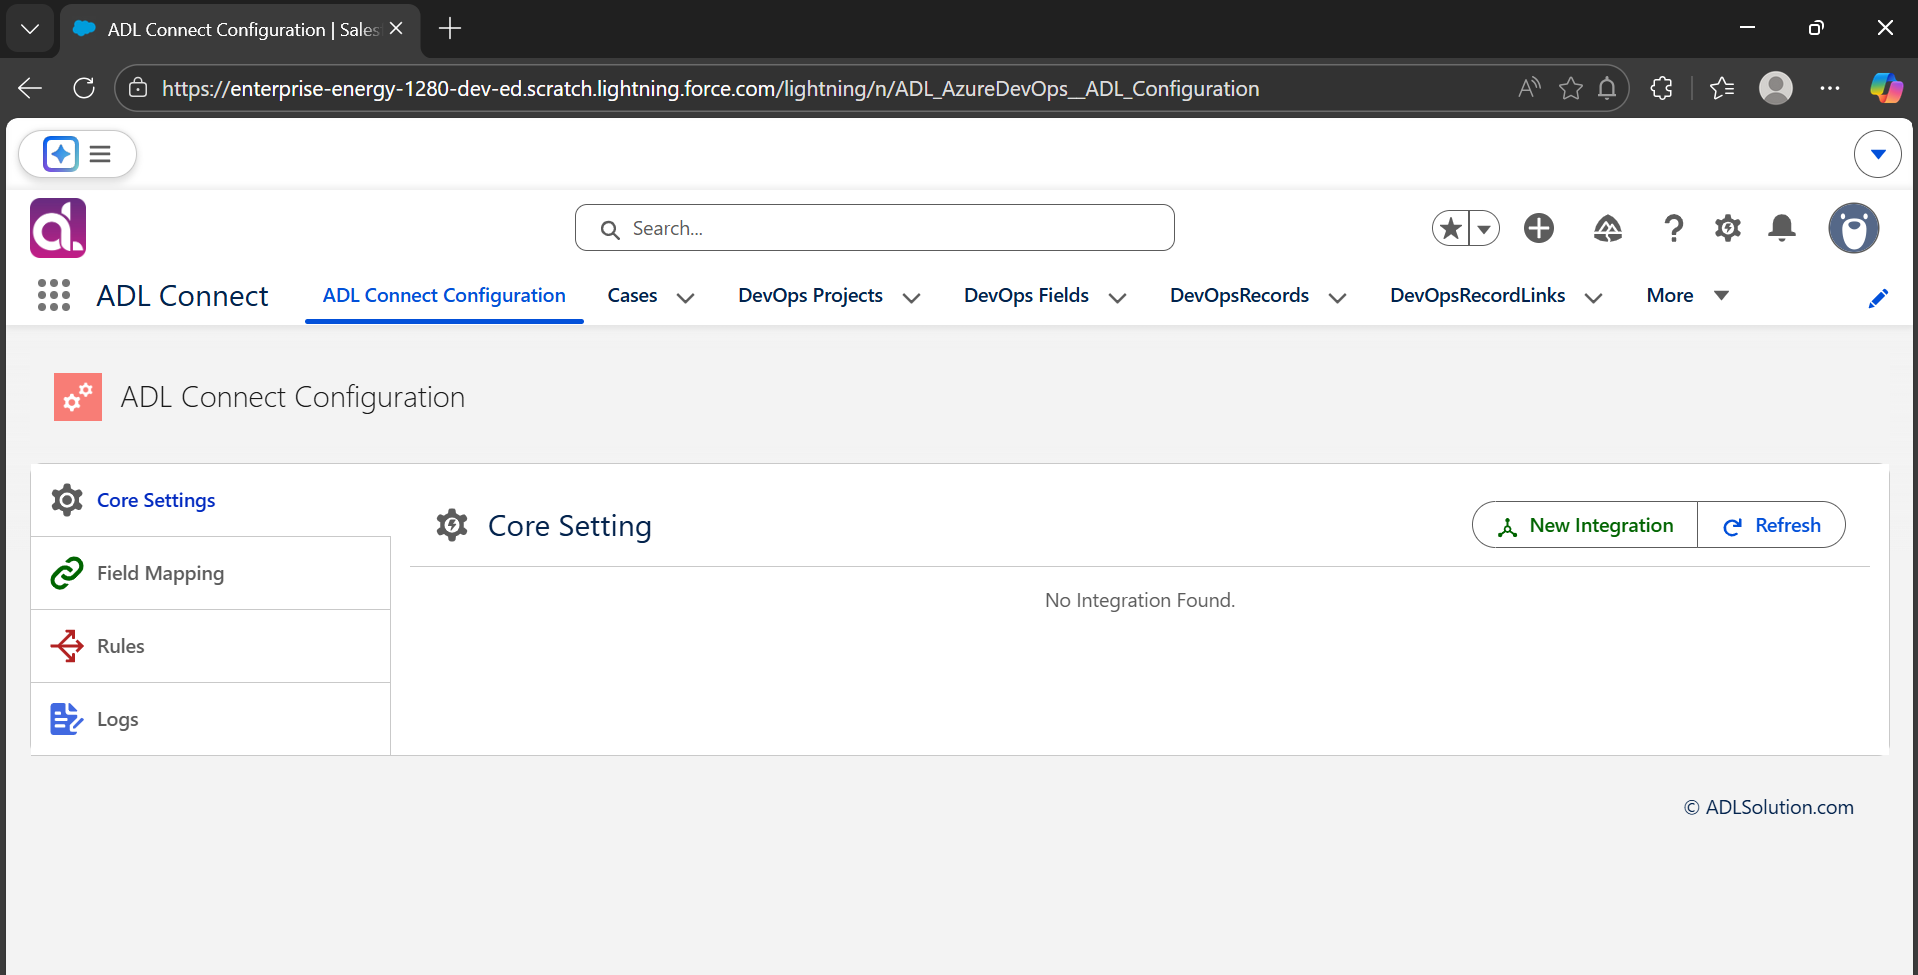
The configuration console serves as the central workspace for managing the integration, including:
- Providing Salesforce and Jira authentication details
- Configuring Jira project and Salesforce object mappings
- Defining field mapping rules
- Managing inbound and outbound synchronization settings
The console is designed to simplify both initial setup and ongoing maintenance, ensuring consistent and reliable synchronization between Salesforce and Jira.
Installation and Connection Setup
To begin using ADL Connect, the first step is to install the package from the Salesforce AppExchange and complete the initial connection configuration. This setup establishes a secure communication channel between Salesforce and Jira, enabling all subsequent synchronization activities.
1. Install the ADL Connect Package
Navigate to the Salesforce AppExchange and locate the ADL Connect listing. Link
During installation, choose the target environment:
- Get It Now --> Install in Production
- Try It --> Install in Sandbox
Review and approve the required permissions requested by the package.
Select the installation scope:
- Install for Administrators only, or
- Install for All Users, based on organisational requirements.
Note: (If you require only specific users to create or modify Jira work items, select ‘Install for Administrators only’. You can then grant outbound permission to specific users once after installation)
Once the installation is complete, ADL Connect will be available in the Salesforce App Launcher and ready for configuration. (Please wait until you receive the confirmation email. ET: 5-6 Min)
2. Launch the Configuration Console
After installation, open the ADL Connect Setup Console from the Salesforce App Launcher.
The configuration console serves as the central workspace for managing the integration, including:
- Providing Salesforce and Jira authentication details
- Configuring Jira project and Salesforce object mappings
- Defining field mapping rules
- Managing inbound and outbound synchronization settings
The console is designed to simplify both initial setup and ongoing maintenance, ensuring consistent and reliable synchronization between Salesforce and Jira.
Save the Instance's Password for ServiceNow Account
1. Steps to Save the Instance's Password
Step 1: Navigate to ServiceNow
Open your web browser and go to the ServiceNow Developer or Admin portal.
Sign in using your authorized credentials.
Step 2: Access Instance Management
Once logged in, locate and click the Manage Instance option available on the dashboard or the navigation panel.
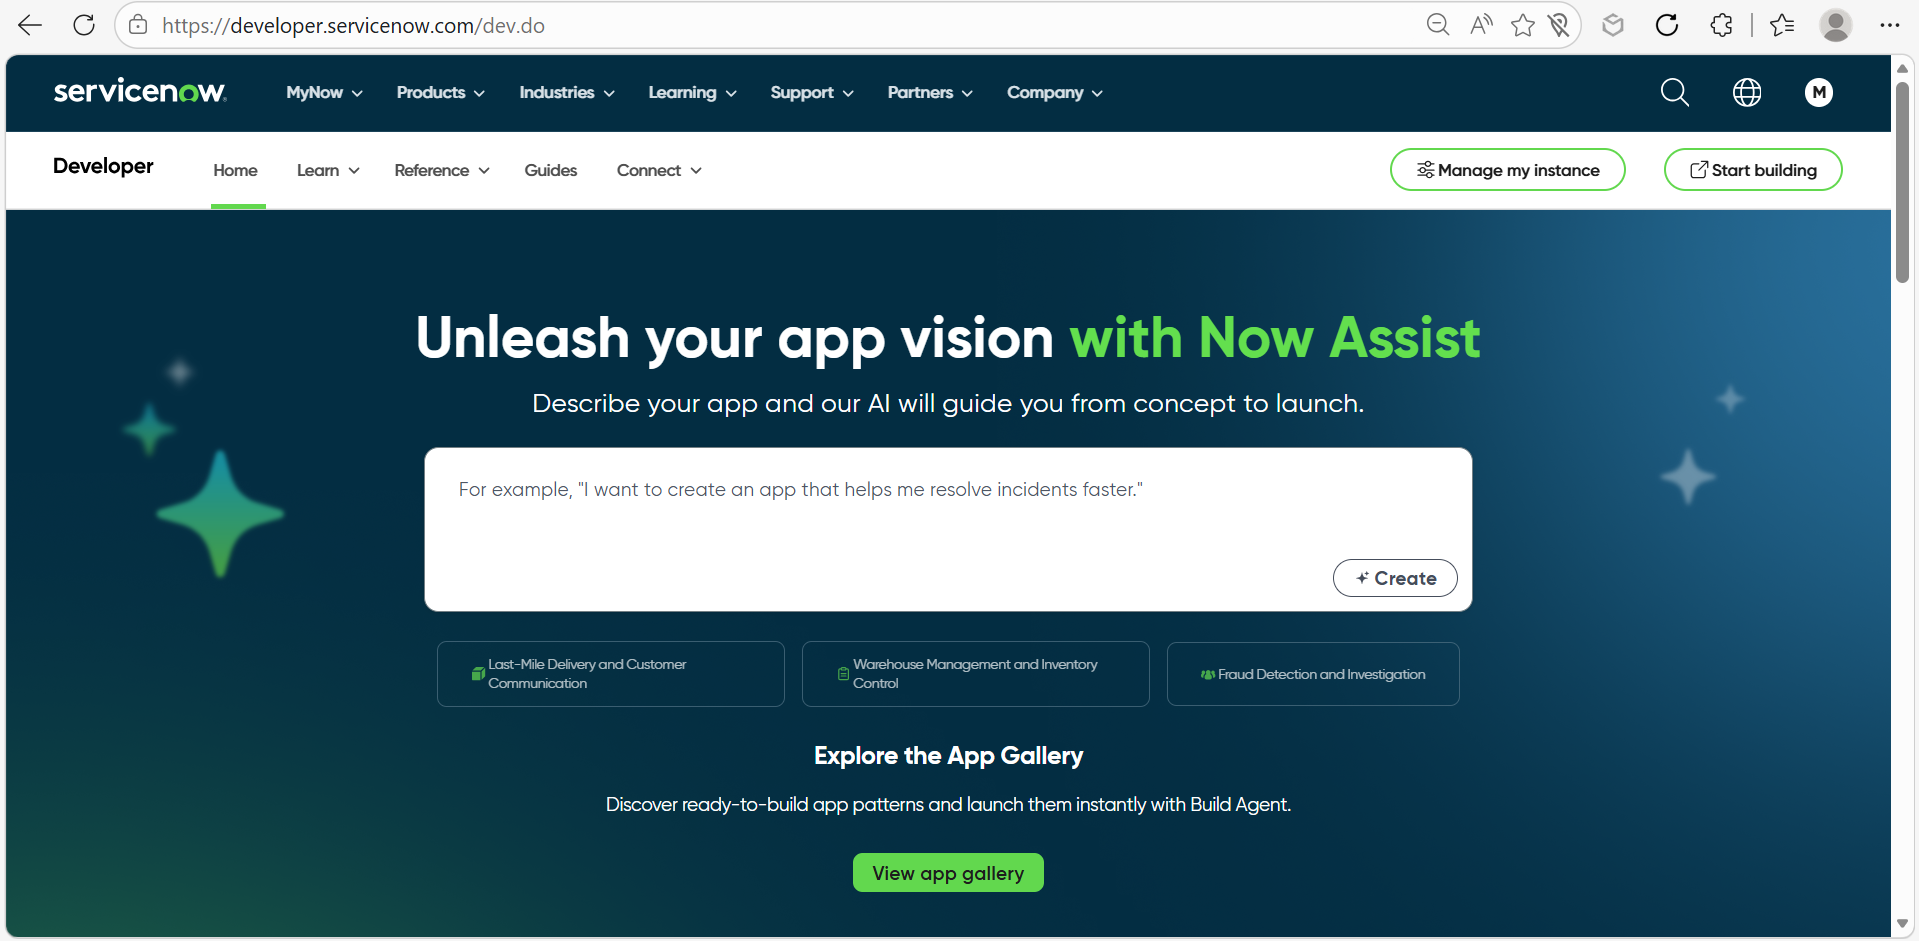
Step 3: Select Your Instance
From the list of available instances (Production, UAT, Dev, or Sandbox), select the instance for which you need to retrieve the credentials.
Step 4: View Instance Credentials
Inside the Instance Details page, locate the Username and Password fields assigned to the instance.
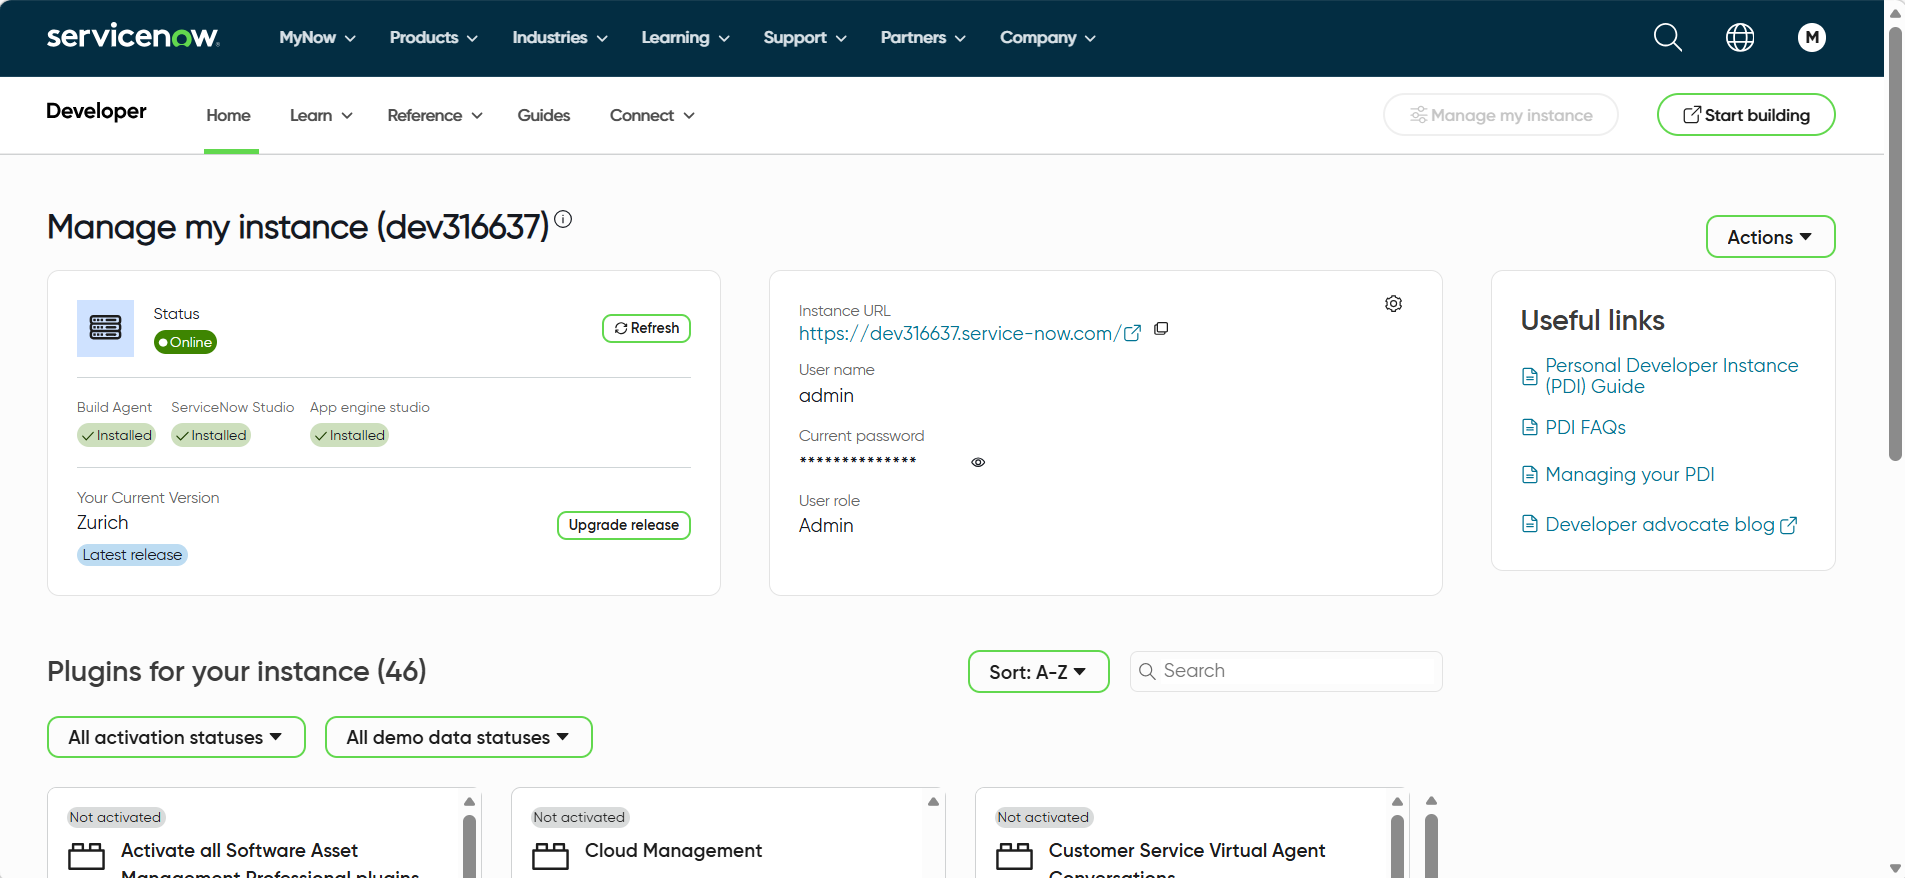
Step 5: Reveal the Password
Click the Show Password or Reveal icon next to the password field to make the password visible.
Step 6: Copy Credentials
Use the Copy icon next to the Username and Password fields to copy the credentials to your clipboard.
Step 7: Store Credentials Securely
Paste the copied credentials only into approved and secure storage locations, such as an enterprise password vault.
Step 8: Close the Page
After copying, close the instance details page to ensure the credentials are no longer displayed on screen.
2. Notes
- Do not share the credentials through email, chat, or unapproved storage locations.
- Ensure the password is handled according to the organization's security policies.
1. Steps to Save the Instance's Password
Step 1: Navigate to ServiceNow
Open your web browser and go to the ServiceNow Developer or Admin portal.
Sign in using your authorized credentials.
Step 2: Access Instance Management
Once logged in, locate and click the Manage Instance option available on the dashboard or the navigation panel.
Step 3: Select Your Instance
From the list of available instances (Production, UAT, Dev, or Sandbox), select the instance for which you need to retrieve the credentials.
Step 4: View Instance Credentials
Inside the Instance Details page, locate the Username and Password fields assigned to the instance.
Step 5: Reveal the Password
Click the Show Password or Reveal icon next to the password field to make the password visible.
Step 6: Copy Credentials
Use the Copy icon next to the Username and Password fields to copy the credentials to your clipboard.
Step 7: Store Credentials Securely
Paste the copied credentials only into approved and secure storage locations, such as an enterprise password vault.
Step 8: Close the Page
After copying, close the instance details page to ensure the credentials are no longer displayed on screen.
2. Notes
- Do not share the credentials through email, chat, or unapproved storage locations.
- Ensure the password is handled according to the organization's security policies.
Setup OAuth2.0
This section is password protected
Enter the password to view “Setup OAuth2.0”.
Incorrect password. Please try again.
Don’t know the password? Contact us and we’ll help you out.
Configure Project Mapping
Project Mapping Configuration (Salesforce ↔ ServiceNow)
Project mapping establishes the relationship between Salesforce objects and ServiceNow Tables. This configuration defines which Salesforce records create or link to which ServiceNow Tables and ensures that data flows correctly between both systems.
As part of this setup, a custom ServiceNow field must be configured to store the Salesforce Record ID, enabling reliable cross-system linkage and bidirectional synchronization.
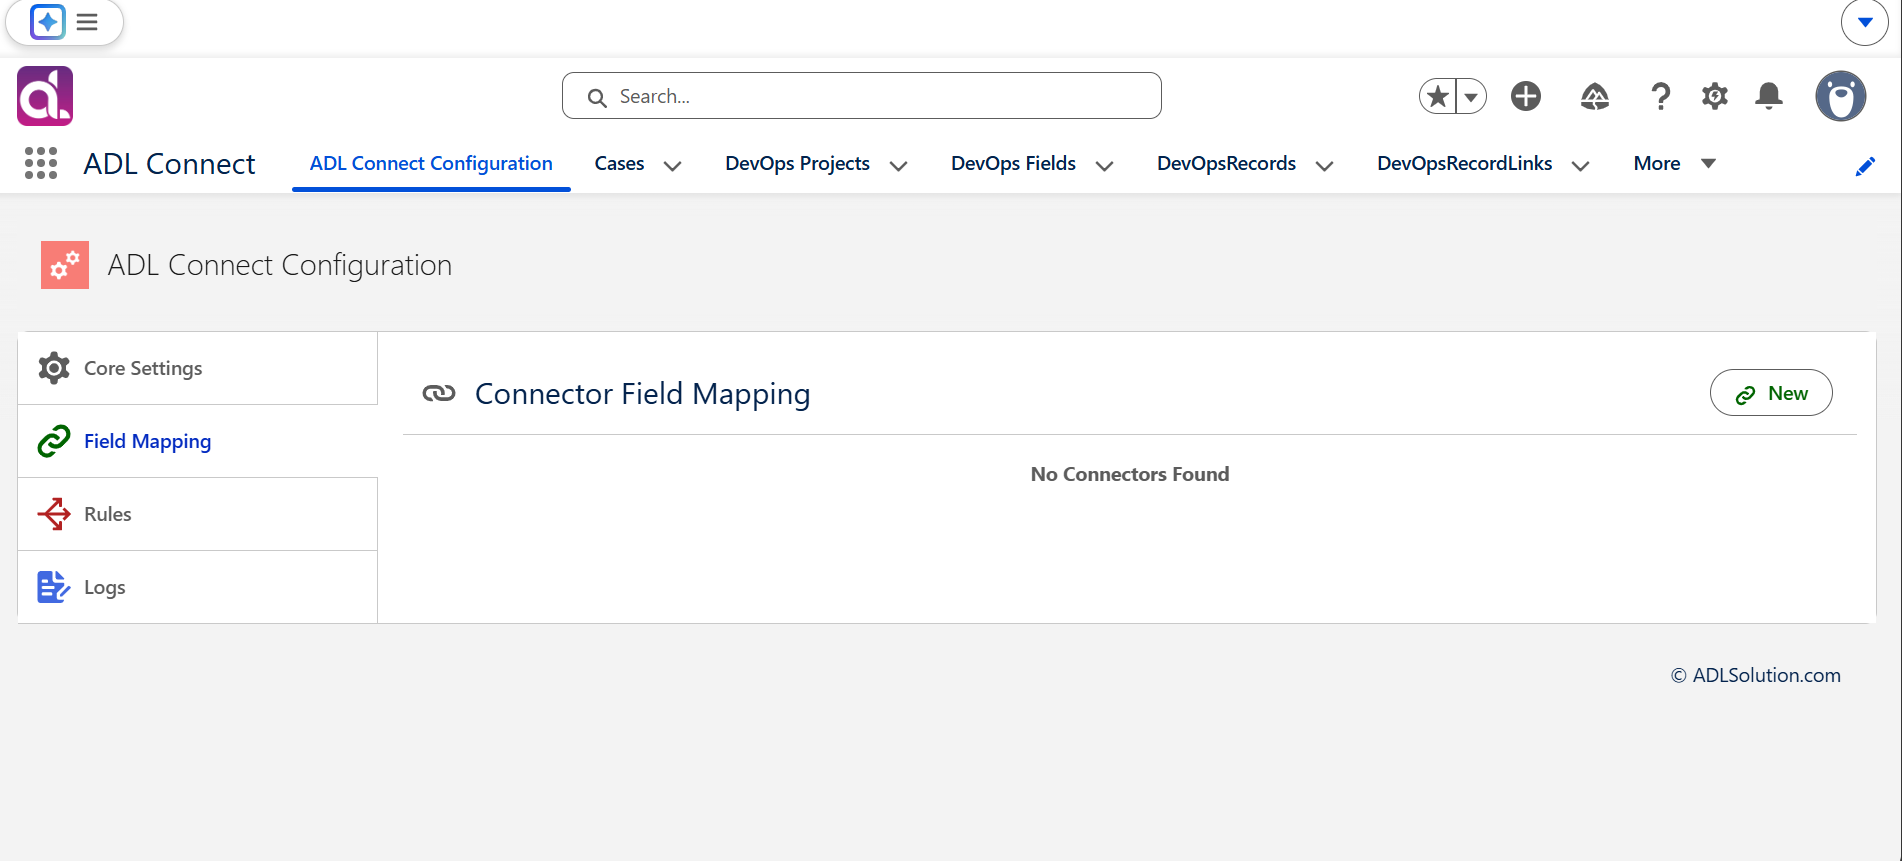
Step 1: Create a New Project Mapping
- In ADL Connect, navigate to the Field Mappings section.
- Click New Project Mapping or New Mapping.
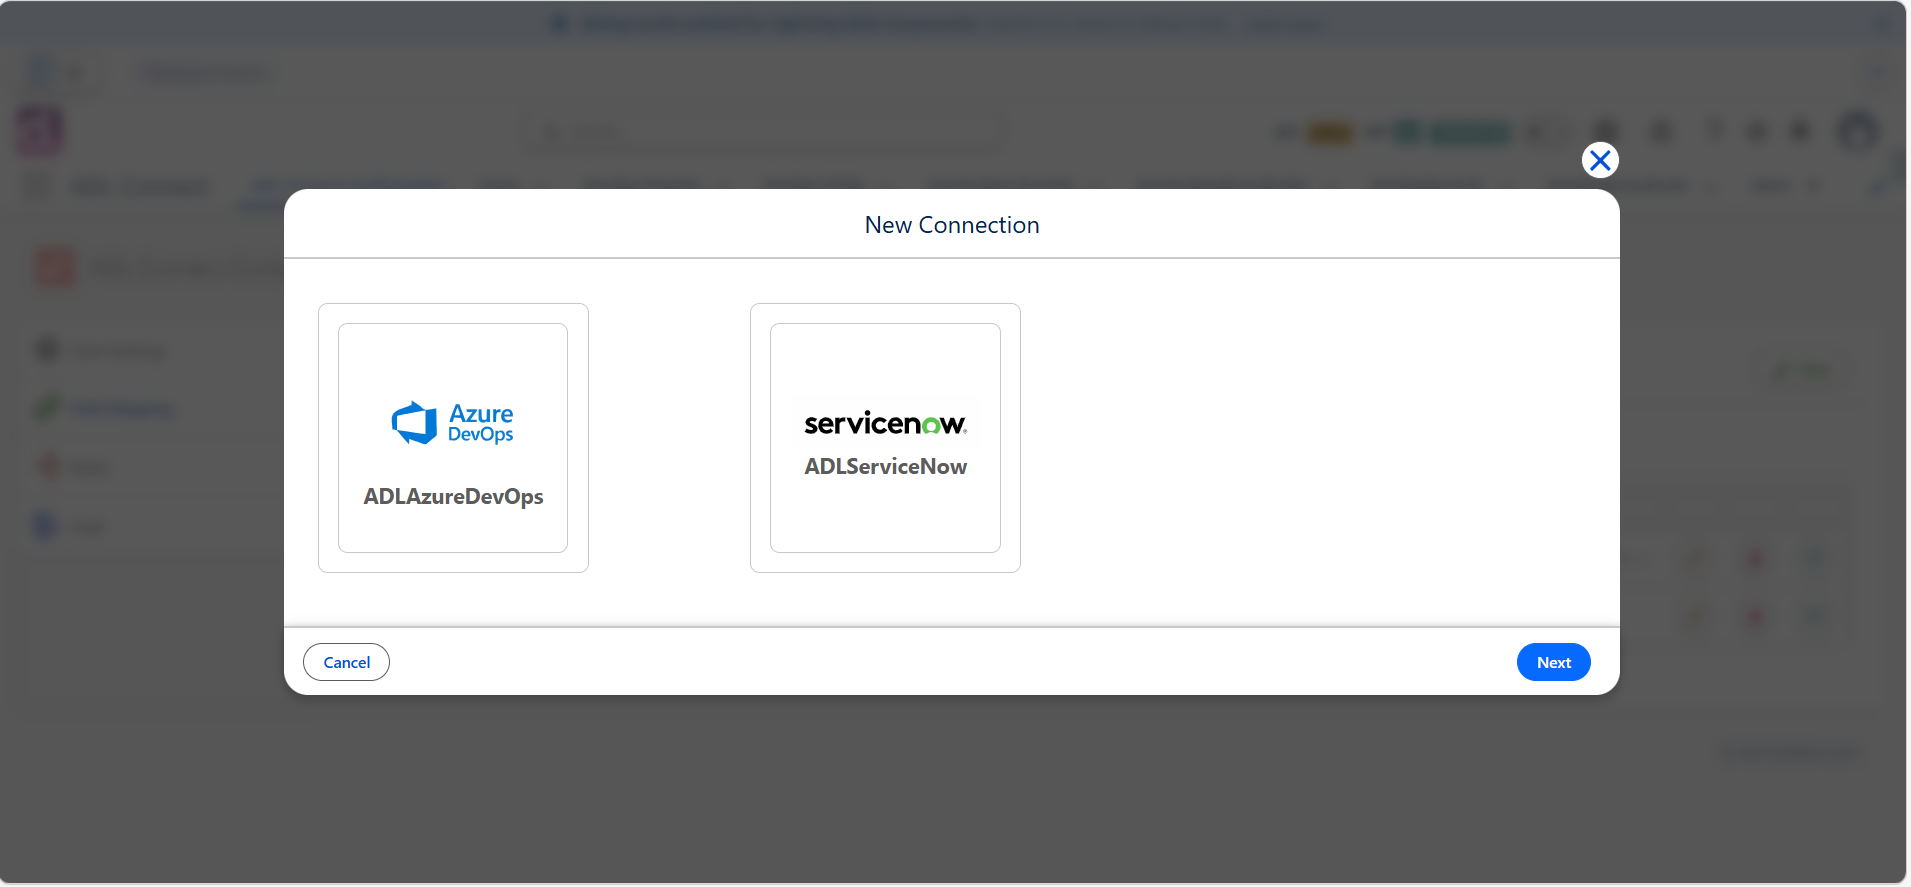
- Select the appropriate Integration App from the dropdown. (This identifies the ServiceNow environment associated with the mapping)
Step 2: Select the ServiceNow Project
- In the ServiceNow Project field, select the ServiceNow project you want to integrate with Salesforce.
- Enter a Project Mapping Name to clearly label the connection.
- Examples:
- Support Cases to ServiceNow Bugs
- Opportunities to ServiceNow Incidents
 This name becomes the reference point for all synchronization rules and field mappings related to this integration.
Step 3: Choose the Salesforce Object
- From the Salesforce Object dropdown, select the object whose records should synchronize with ServiceNow.
- This can be a standard object (e.g., Case, Opportunity)
- Or a custom object
- This selection determines:
- Where ServiceNow incidents are created from
- Which Salesforce records can be linked to ServiceNow.
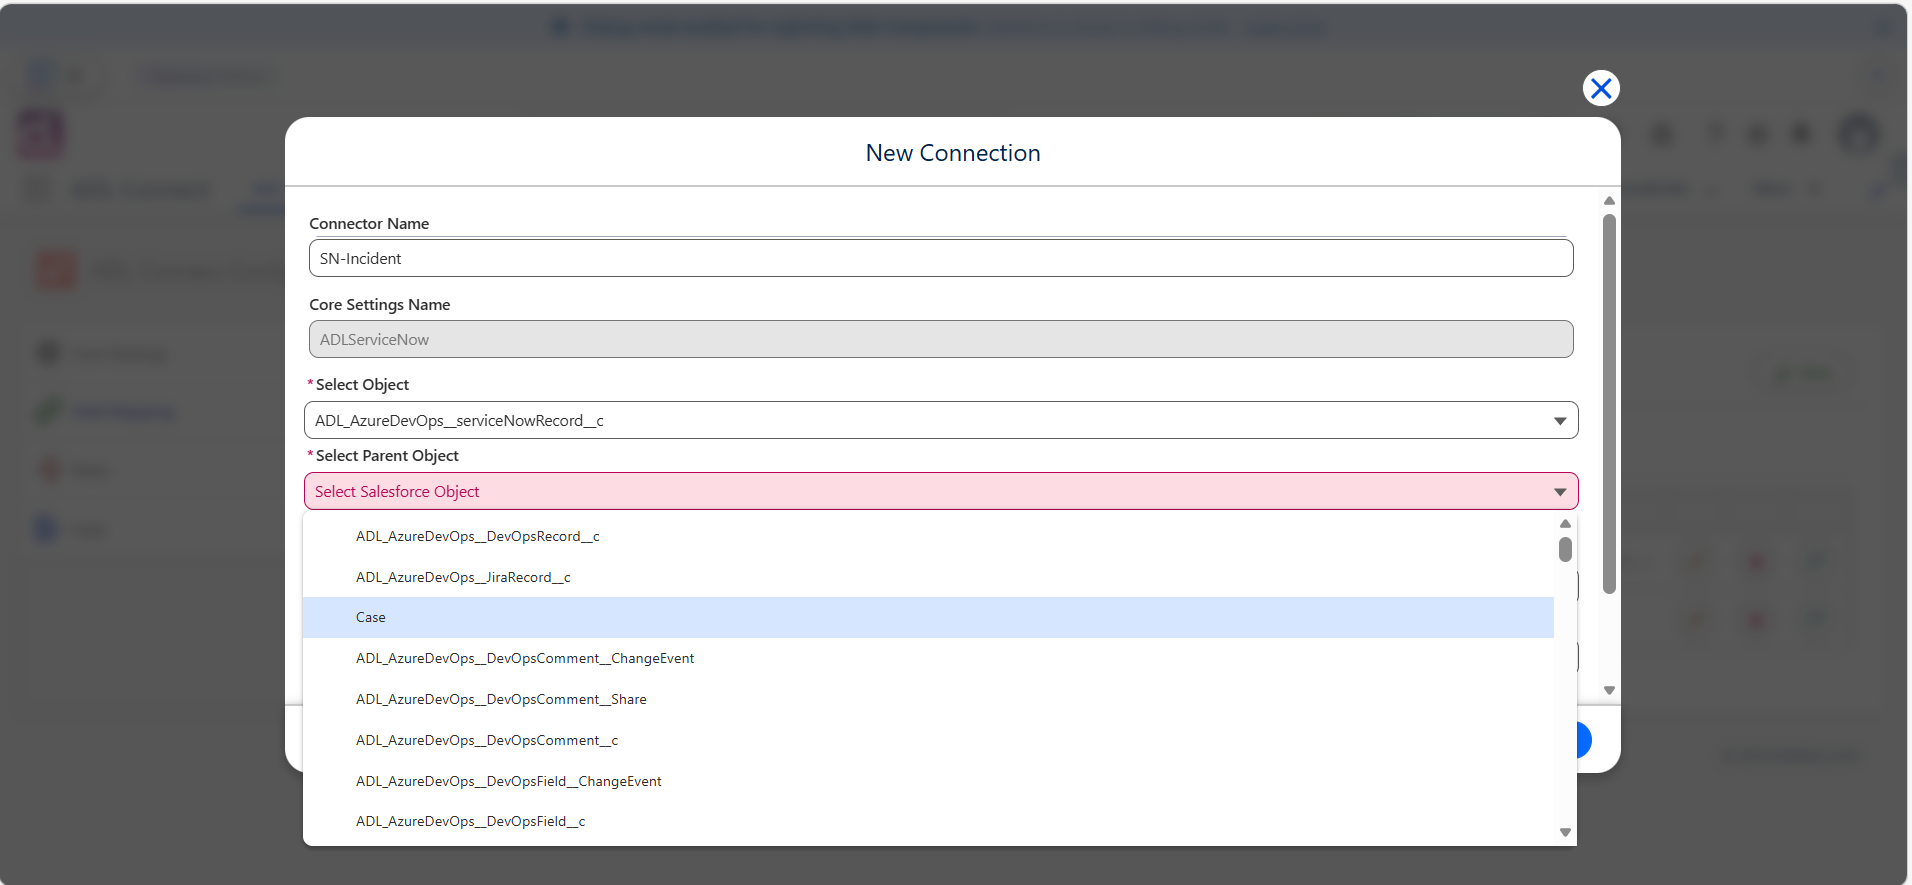
Step 4: Select the ServiceNow Table
- In the ServiceNow Table dropdown, select the Table to be created in ServiceNow.
- Common examples include:
- Incident
- Task
- Audit Table
- Configuration Item (CI) Table
- CustomTables
- This ensures that ServiceNow Incidents created from Salesforce follow the correct workflow and structure.
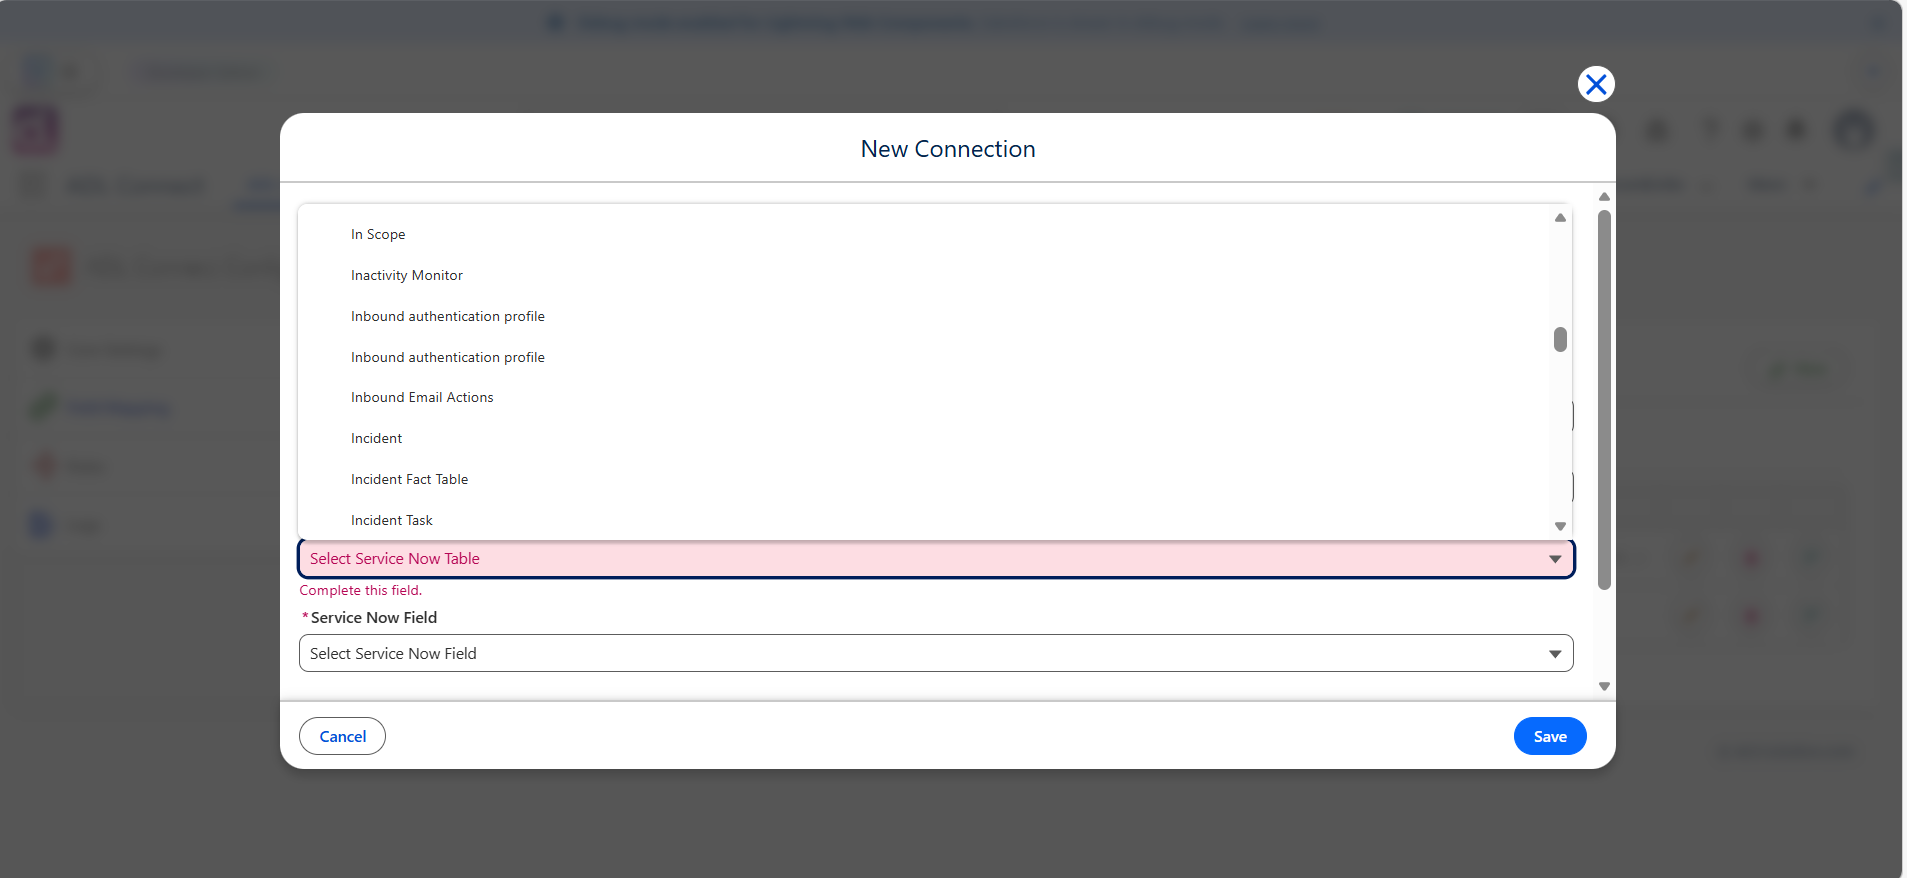
Step 5: Select or Create the ServiceNow Field to Store Salesforce Record ID
To maintain a persistent link between Salesforce records and ServiceNow Incidents, ServiceNow must store the Salesforce Record ID in a dedicated custom field.
Option A: Select an Existing Custom Field
- Open the Salesforce Record ID Mapping Field dropdown.
- If a suitable ServiceNow custom field already exists, select it.
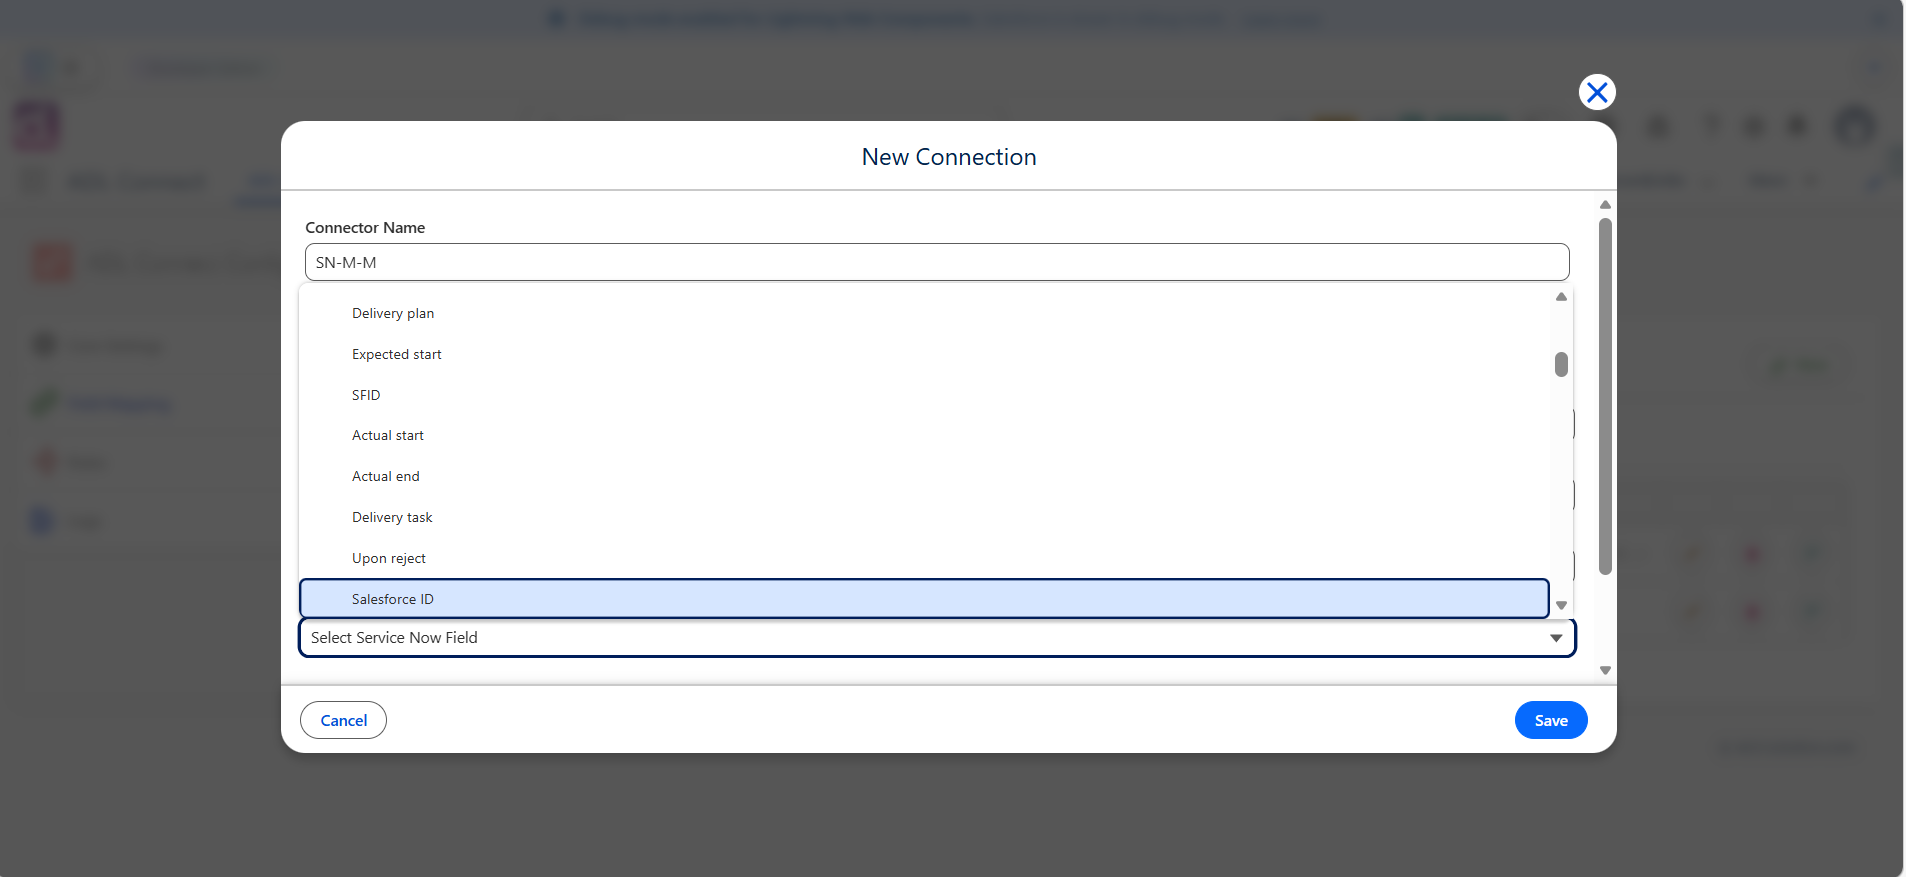
Option B: Create a New ServiceNow Custom Field (Recommended)
If no appropriate field exists, create one using the steps below.
Step 6: Create the Required ServiceNow Custom Field (String)
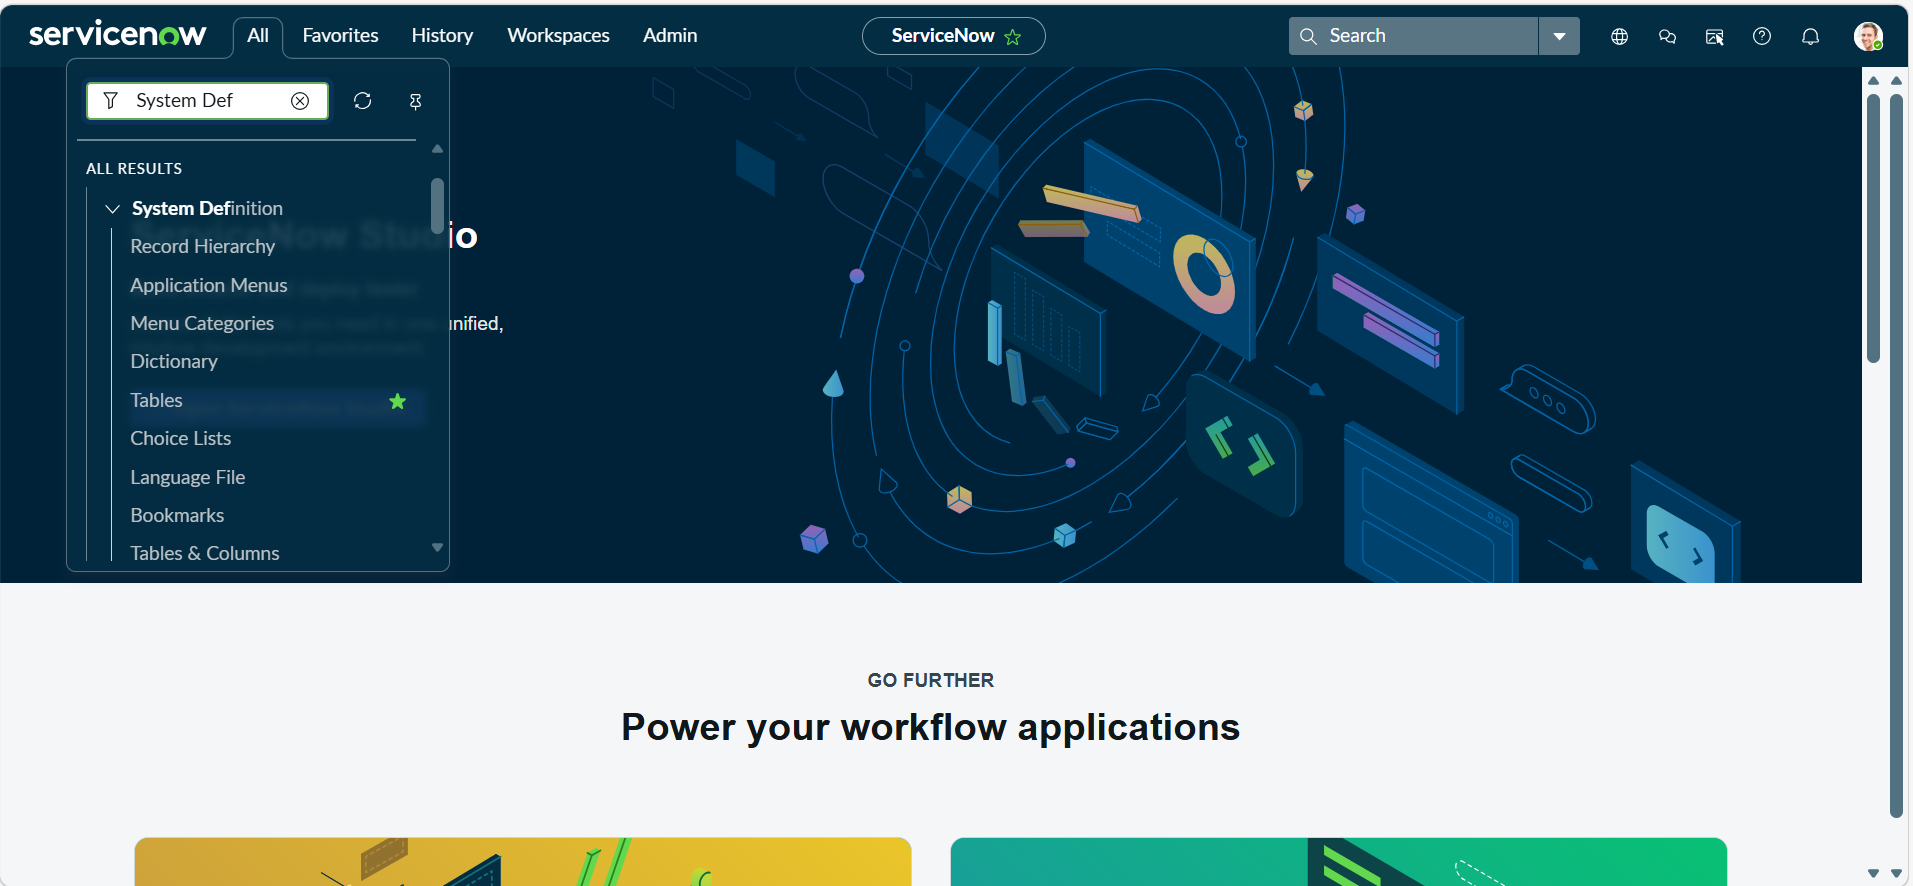
A. Navigate to the Table
- Log in to ServiceNow.
- In the left navigation filter, type "Tables".
- Click System Definition → Tables.
- Open the table where you want to add the field:
- For Incident → search and click Incident [incident]
- For any custom table → open that table record
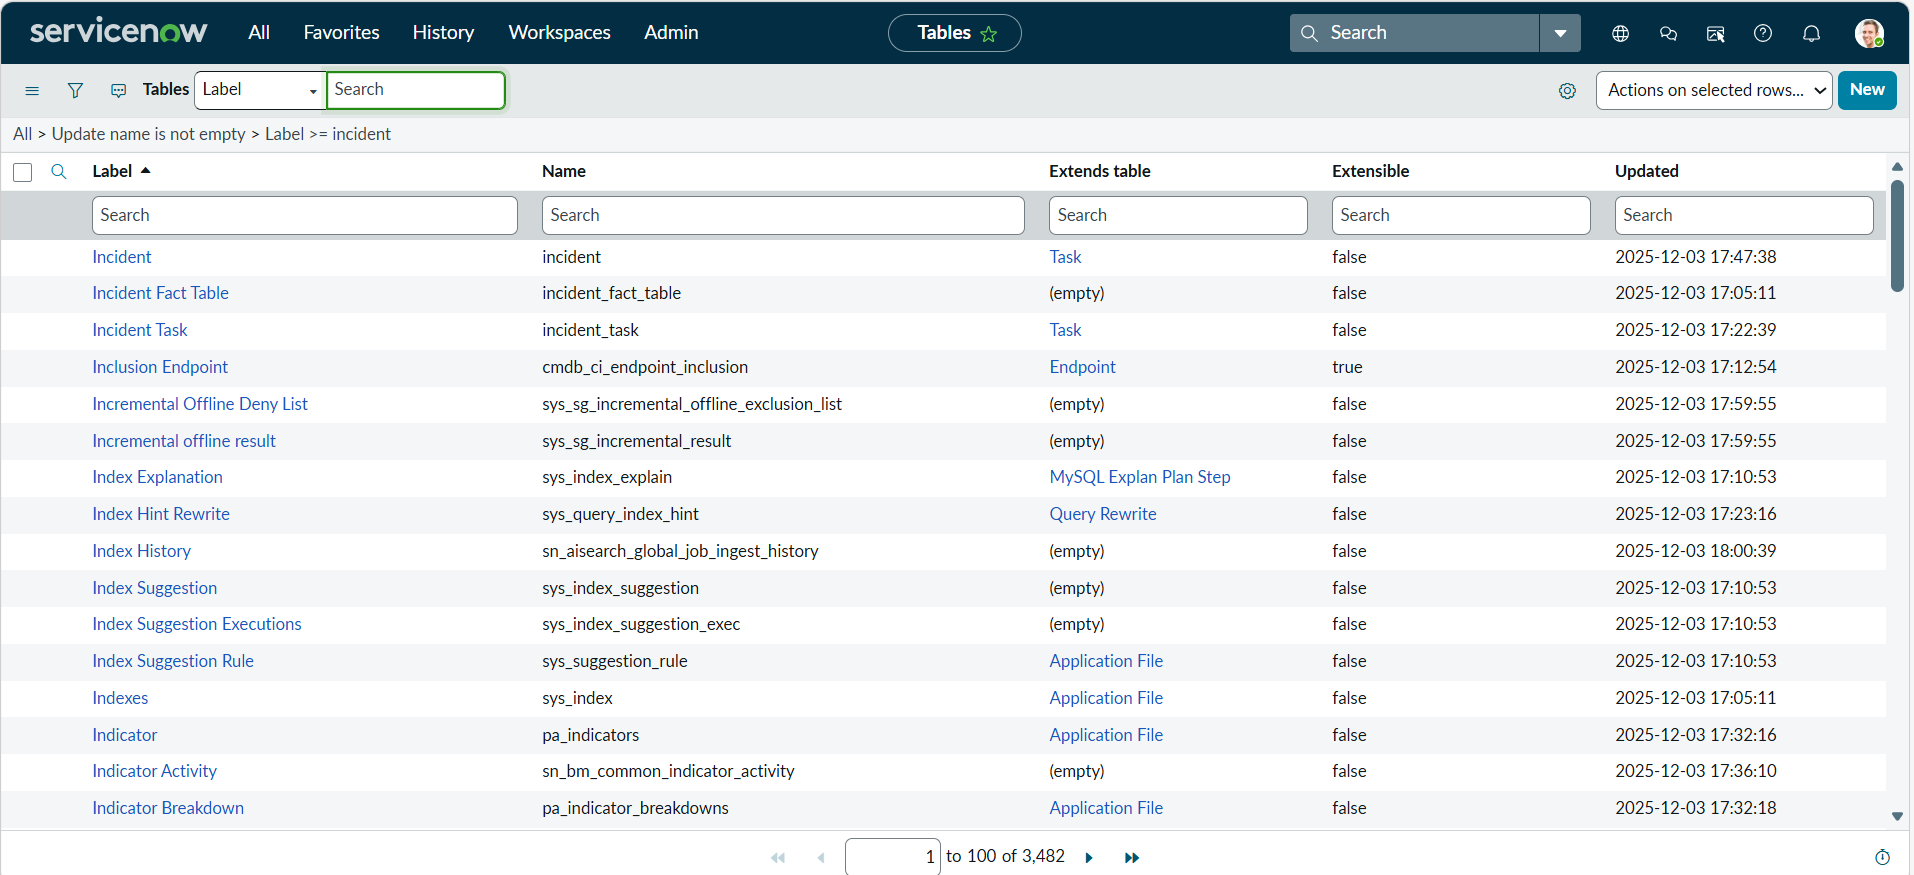
B. Open the Table Structure and Define the Field Details
- Inside the table record, scroll down to the Columns related list.
- Click New to create a new field.
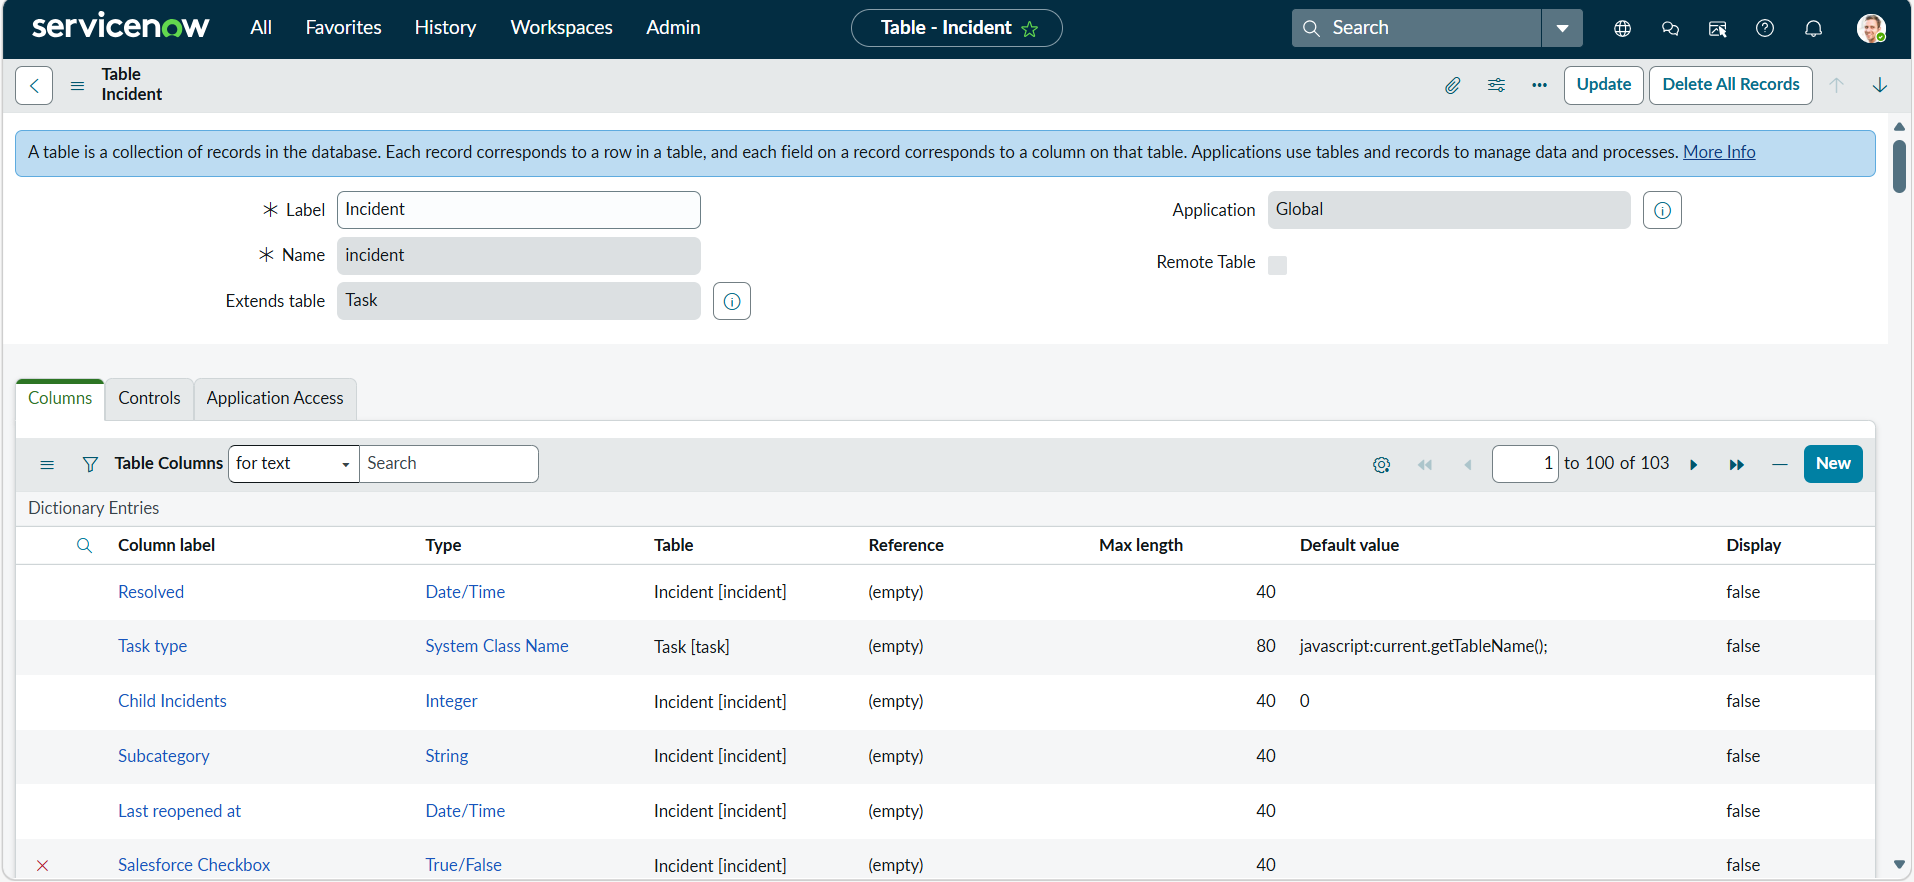
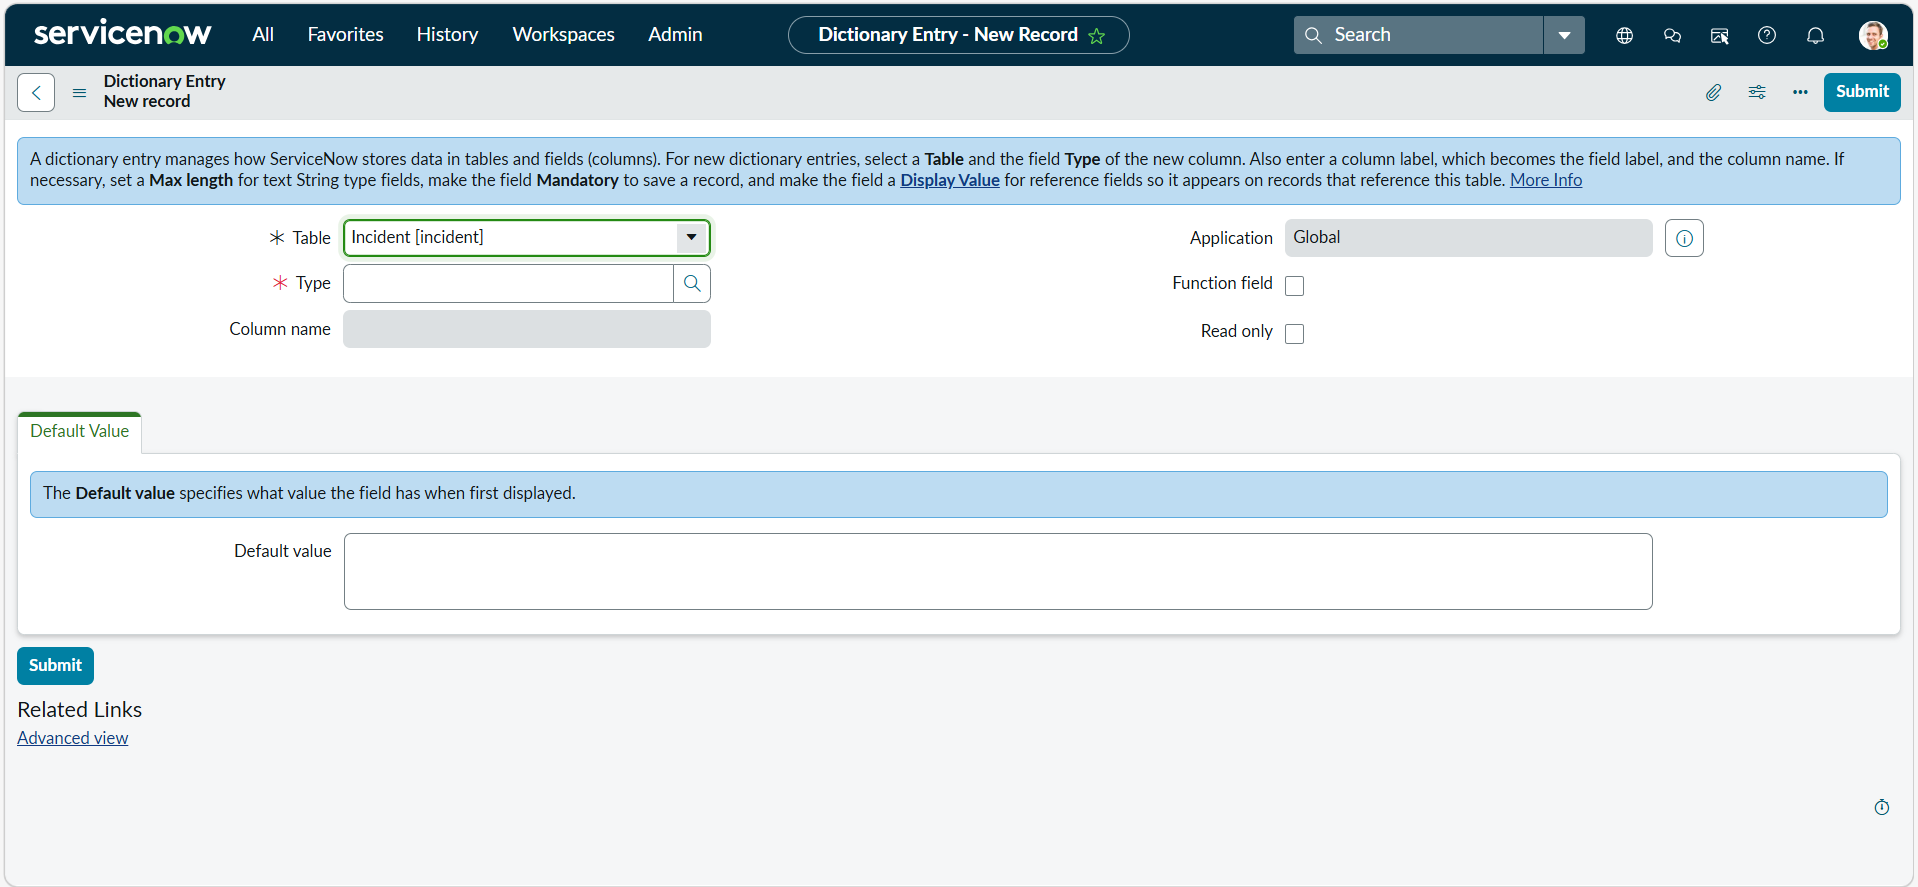
- Fill the form as follows:
- Column Label: (your field name, e.g., SFID)
- Column Name: auto‑generated
- Type: Select String
- Max Length: enter a value (e.g., 30)
- Salesforce Record IDs are stored as strings, making this field type mandatory.
- Enter a Field Name, such as:
- SFID
- Salesforce Record ID
- SF_Link_ID
- (Optional) Add a description, for example:
- Stores the Salesforce record ID for integration purposes.
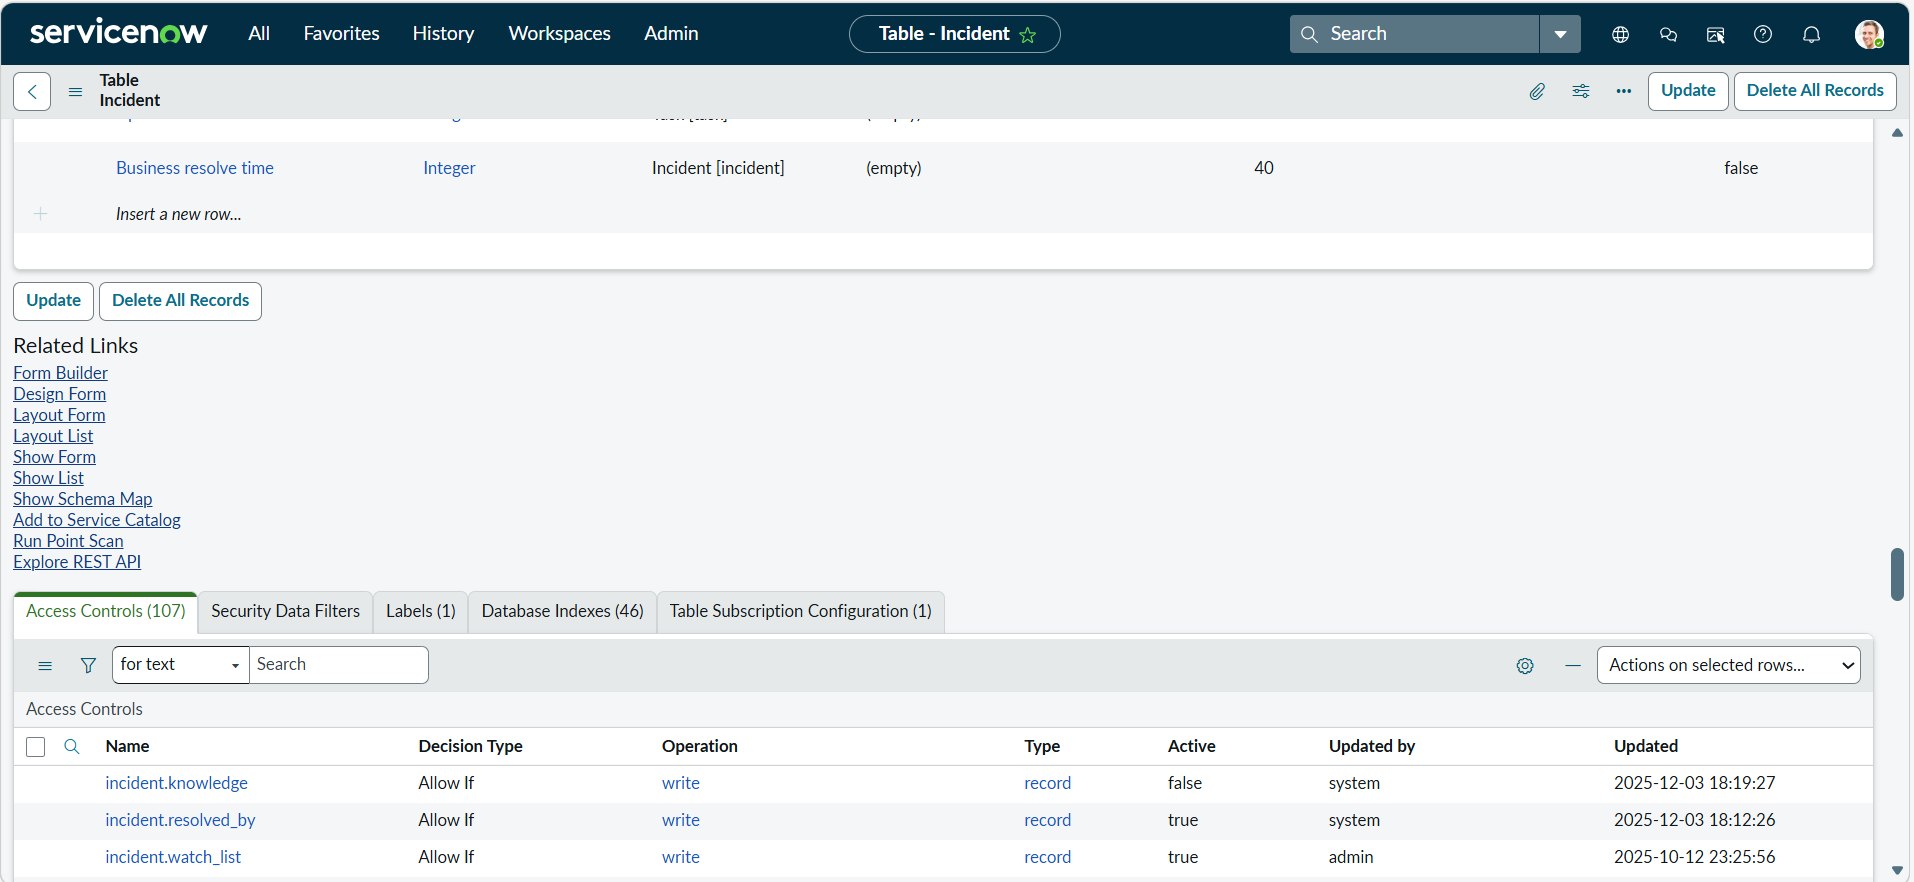
C. Save the Field
- Click Save or Submit.
- The new string field is now added to the table.
D. Add Field to the Form (if needed)
- Navigate to the Incident form.
- Right‑click the header → choose Configure → Form Layout.
- Move your new field from Available to Selected.
- Click Save.
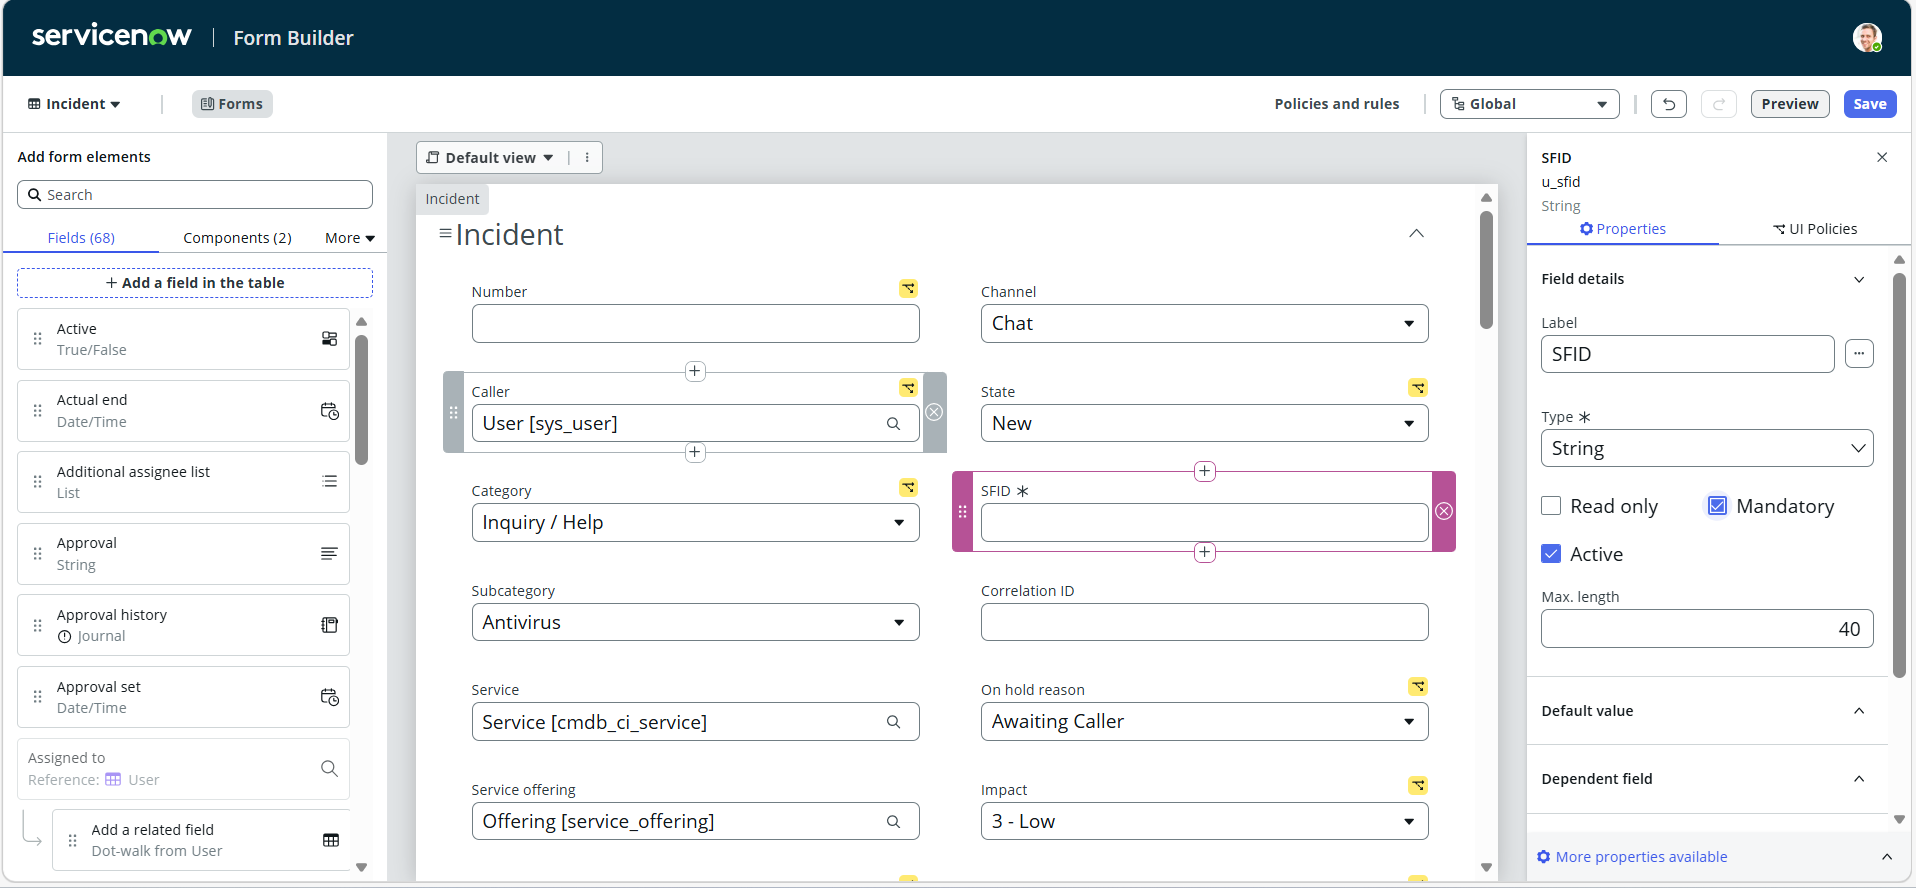
Step 7: Return to Salesforce and Complete the Mapping
- Navigate back to Salesforce and refresh the ADL Connect configuration page.
- In the Salesforce Record ID Field dropdown, select the newly created ServiceNow custom field.
- Verify that all other mapping details are correct:
- Salesforce Object
- ServiceNow Project
- ServiceNow Table
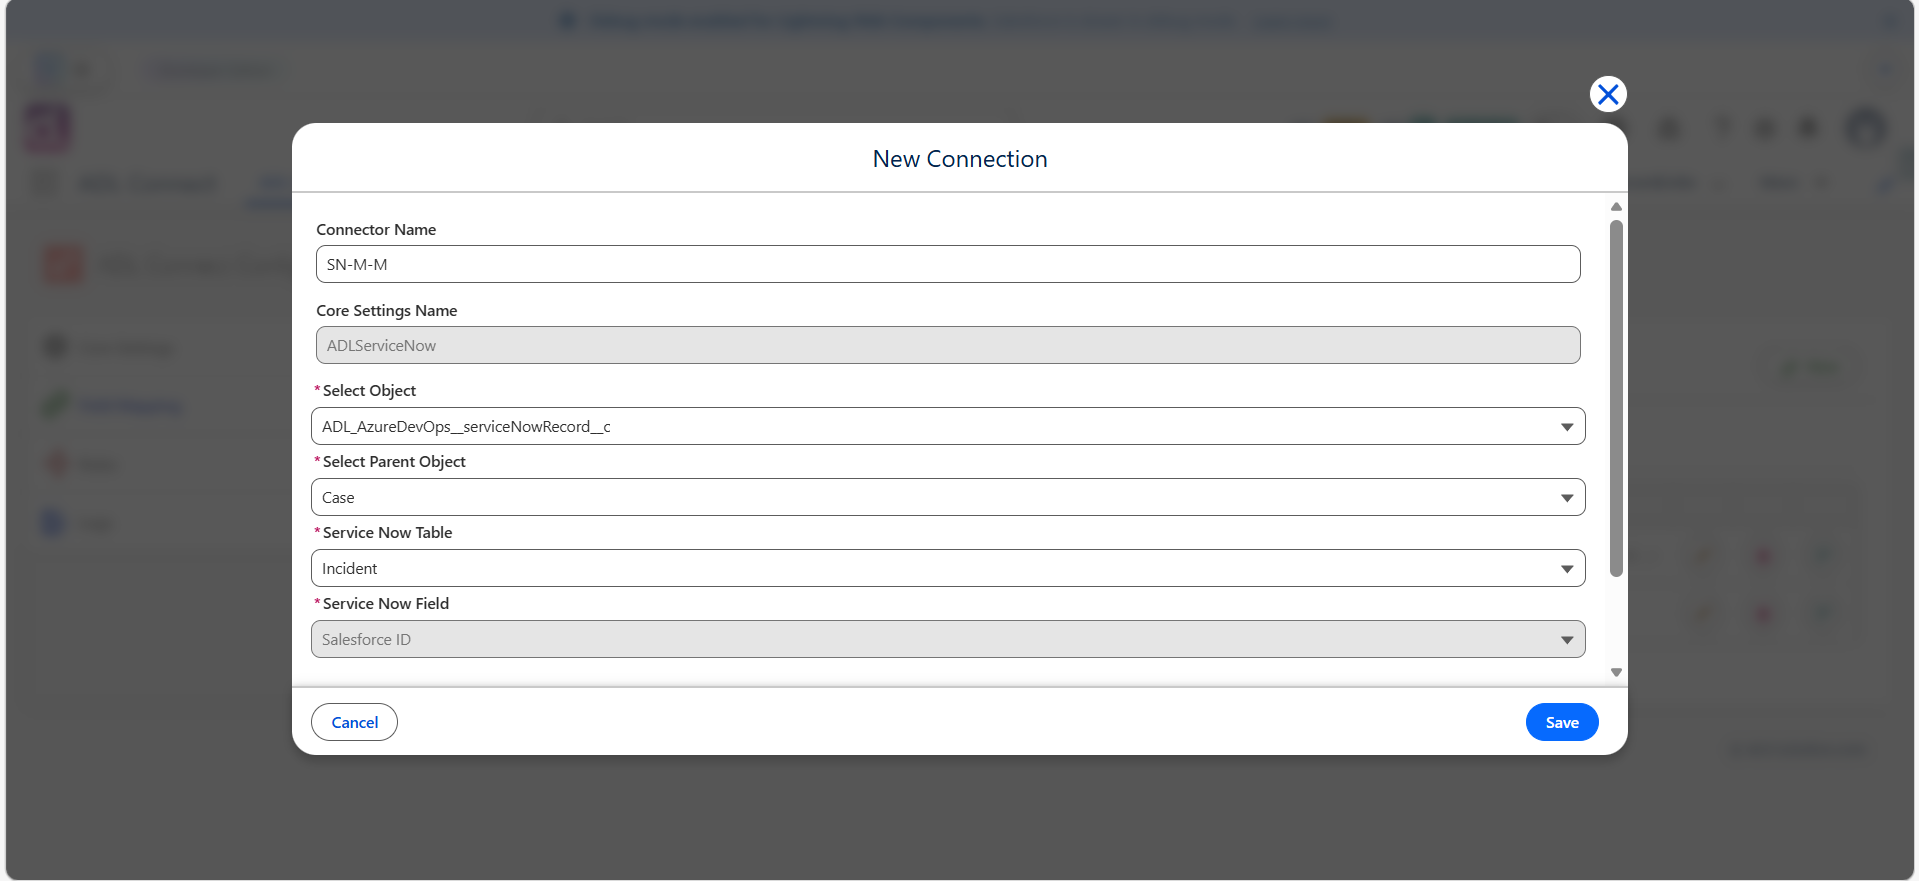
Step 8: Save the Project Mapping
- Click Save to finalize the configuration.
- The project mapping is now active and ready for use.
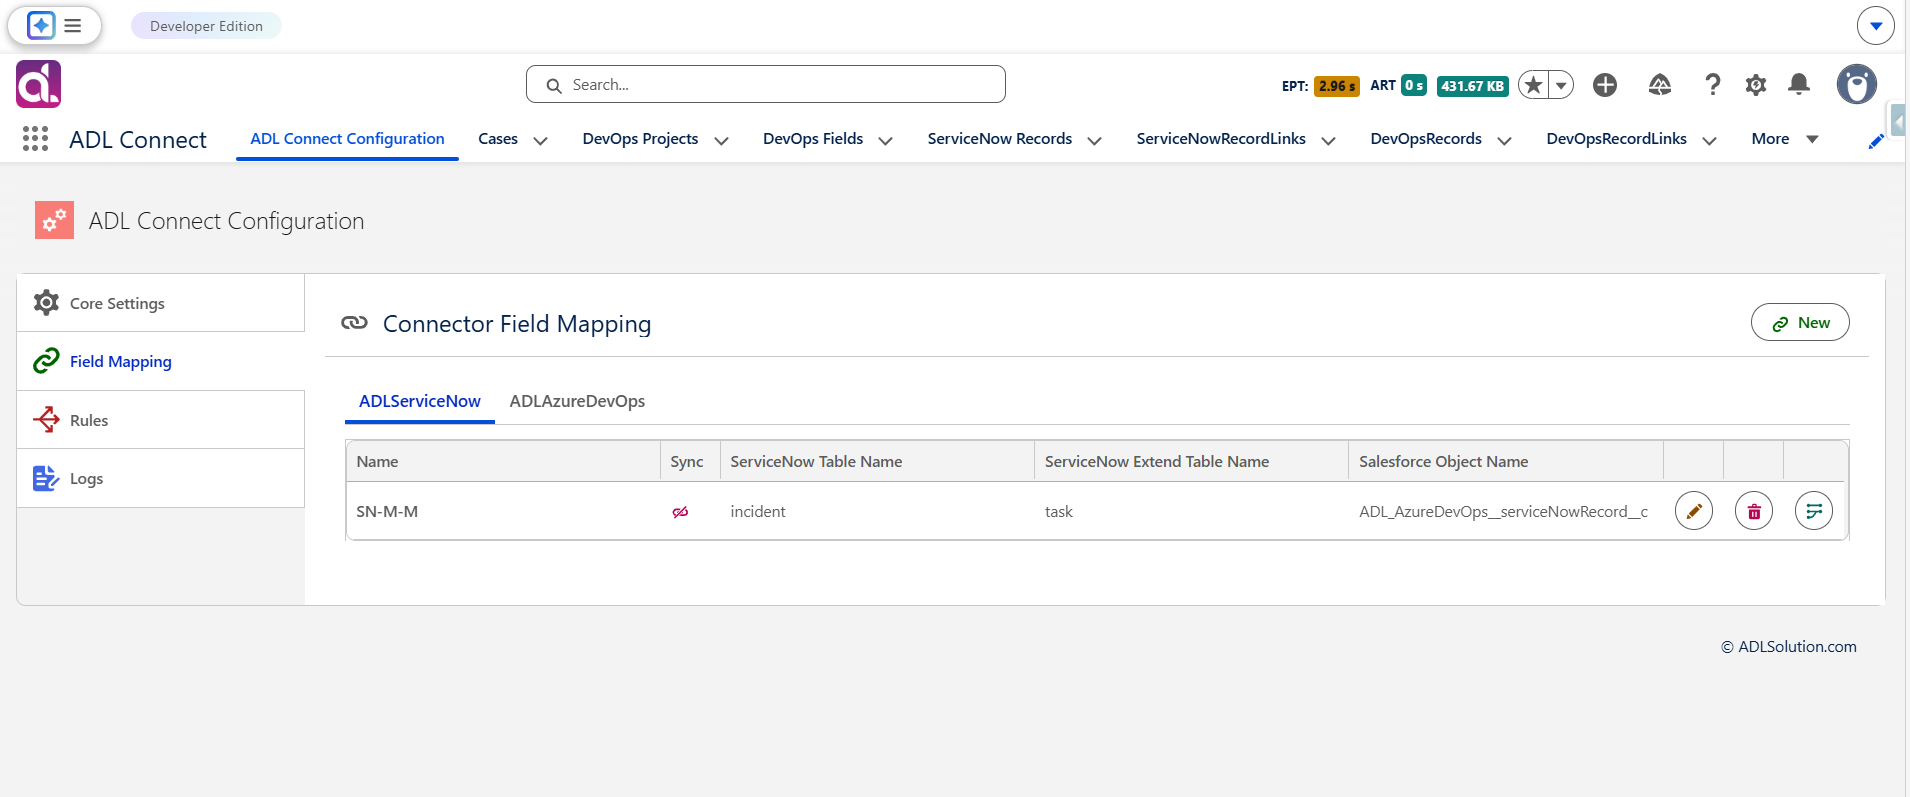
Result
Your project mapping is now successfully established. This configuration:
- Links a Salesforce object to a ServiceNow Table and
- Ensures every ServiceNow Incident created via ADL Connect maintains a reference to its originating Salesforce record
- Forms the foundation for:
- Field mappings
- Synchronization rules
- Issue creation and update workflows
Project Mapping Configuration (Salesforce ↔ ServiceNow)
Project mapping establishes the relationship between Salesforce objects and ServiceNow Tables. This configuration defines which Salesforce records create or link to which ServiceNow Tables and ensures that data flows correctly between both systems.
As part of this setup, a custom ServiceNow field must be configured to store the Salesforce Record ID, enabling reliable cross-system linkage and bidirectional synchronization.
Step 1: Create a New Project Mapping
- In ADL Connect, navigate to the Field Mappings section.
- Click New Project Mapping or New Mapping.
- Select the appropriate Integration App from the dropdown. (This identifies the ServiceNow environment associated with the mapping)
Step 2: Select the ServiceNow Project
- In the ServiceNow Project field, select the ServiceNow project you want to integrate with Salesforce.
- Enter a Project Mapping Name to clearly label the connection.
- Examples:
- Support Cases to ServiceNow Bugs
- Opportunities to ServiceNow Incidents
This name becomes the reference point for all synchronization rules and field mappings related to this integration.
Step 3: Choose the Salesforce Object
- From the Salesforce Object dropdown, select the object whose records should synchronize with ServiceNow.
- This can be a standard object (e.g., Case, Opportunity)
- Or a custom object
- This selection determines:
- Where ServiceNow incidents are created from
- Which Salesforce records can be linked to ServiceNow.
Step 4: Select the ServiceNow Table
- In the ServiceNow Table dropdown, select the Table to be created in ServiceNow.
- Common examples include:
- Incident
- Task
- Audit Table
- Configuration Item (CI) Table
- CustomTables
- This ensures that ServiceNow Incidents created from Salesforce follow the correct workflow and structure.
Step 5: Select or Create the ServiceNow Field to Store Salesforce Record ID
To maintain a persistent link between Salesforce records and ServiceNow Incidents, ServiceNow must store the Salesforce Record ID in a dedicated custom field.
Option A: Select an Existing Custom Field
- Open the Salesforce Record ID Mapping Field dropdown.
- If a suitable ServiceNow custom field already exists, select it.
Option B: Create a New ServiceNow Custom Field (Recommended)
If no appropriate field exists, create one using the steps below.
Step 6: Create the Required ServiceNow Custom Field (String)
A. Navigate to the Table
- Log in to ServiceNow.
- In the left navigation filter, type "Tables".
- Click System Definition → Tables.
- Open the table where you want to add the field:
- For Incident → search and click Incident [incident]
- For any custom table → open that table record
B. Open the Table Structure and Define the Field Details
- Inside the table record, scroll down to the Columns related list.
- Click New to create a new field.
- Fill the form as follows:
- Column Label: (your field name, e.g., SFID)
- Column Name: auto‑generated
- Type: Select String
- Max Length: enter a value (e.g., 30)
- Salesforce Record IDs are stored as strings, making this field type mandatory.
- Enter a Field Name, such as:
- SFID
- Salesforce Record ID
- SF_Link_ID
- (Optional) Add a description, for example:
- Stores the Salesforce record ID for integration purposes.
C. Save the Field
- Click Save or Submit.
- The new string field is now added to the table.
D. Add Field to the Form (if needed)
- Navigate to the Incident form.
- Right‑click the header → choose Configure → Form Layout.
- Move your new field from Available to Selected.
- Click Save.
Step 7: Return to Salesforce and Complete the Mapping
- Navigate back to Salesforce and refresh the ADL Connect configuration page.
- In the Salesforce Record ID Field dropdown, select the newly created ServiceNow custom field.
- Verify that all other mapping details are correct:
- Salesforce Object
- ServiceNow Project
- ServiceNow Table
Step 8: Save the Project Mapping
- Click Save to finalize the configuration.
- The project mapping is now active and ready for use.
Result
Your project mapping is now successfully established. This configuration:
- Links a Salesforce object to a ServiceNow Table and
- Ensures every ServiceNow Incident created via ADL Connect maintains a reference to its originating Salesforce record
- Forms the foundation for:
- Field mappings
- Synchronization rules
- Issue creation and update workflows
Configuring Field Mappings
Field Mapping Configuration (Salesforce ↔ ServiceNow)
Once the project mapping has been established, the next step is to configure field-level mappings. Field mappings define how individual Salesforce fields correspond to ServiceNow fields and control the direction of data synchronization.
These mappings ensure that updates made in either system are synchronized correctly and in accordance with your business rules.
Follow the steps below to define field mappings for the selected project connection.
Step 1: Open the Field Mapping Section
- Navigate to the Project Connection created in the previous steps.
- Locate and click the Field Mapping action button that is located at the end of the row in the Data Table.
This opens the configuration panel used to define how data flows between Salesforce and ServiceNow.
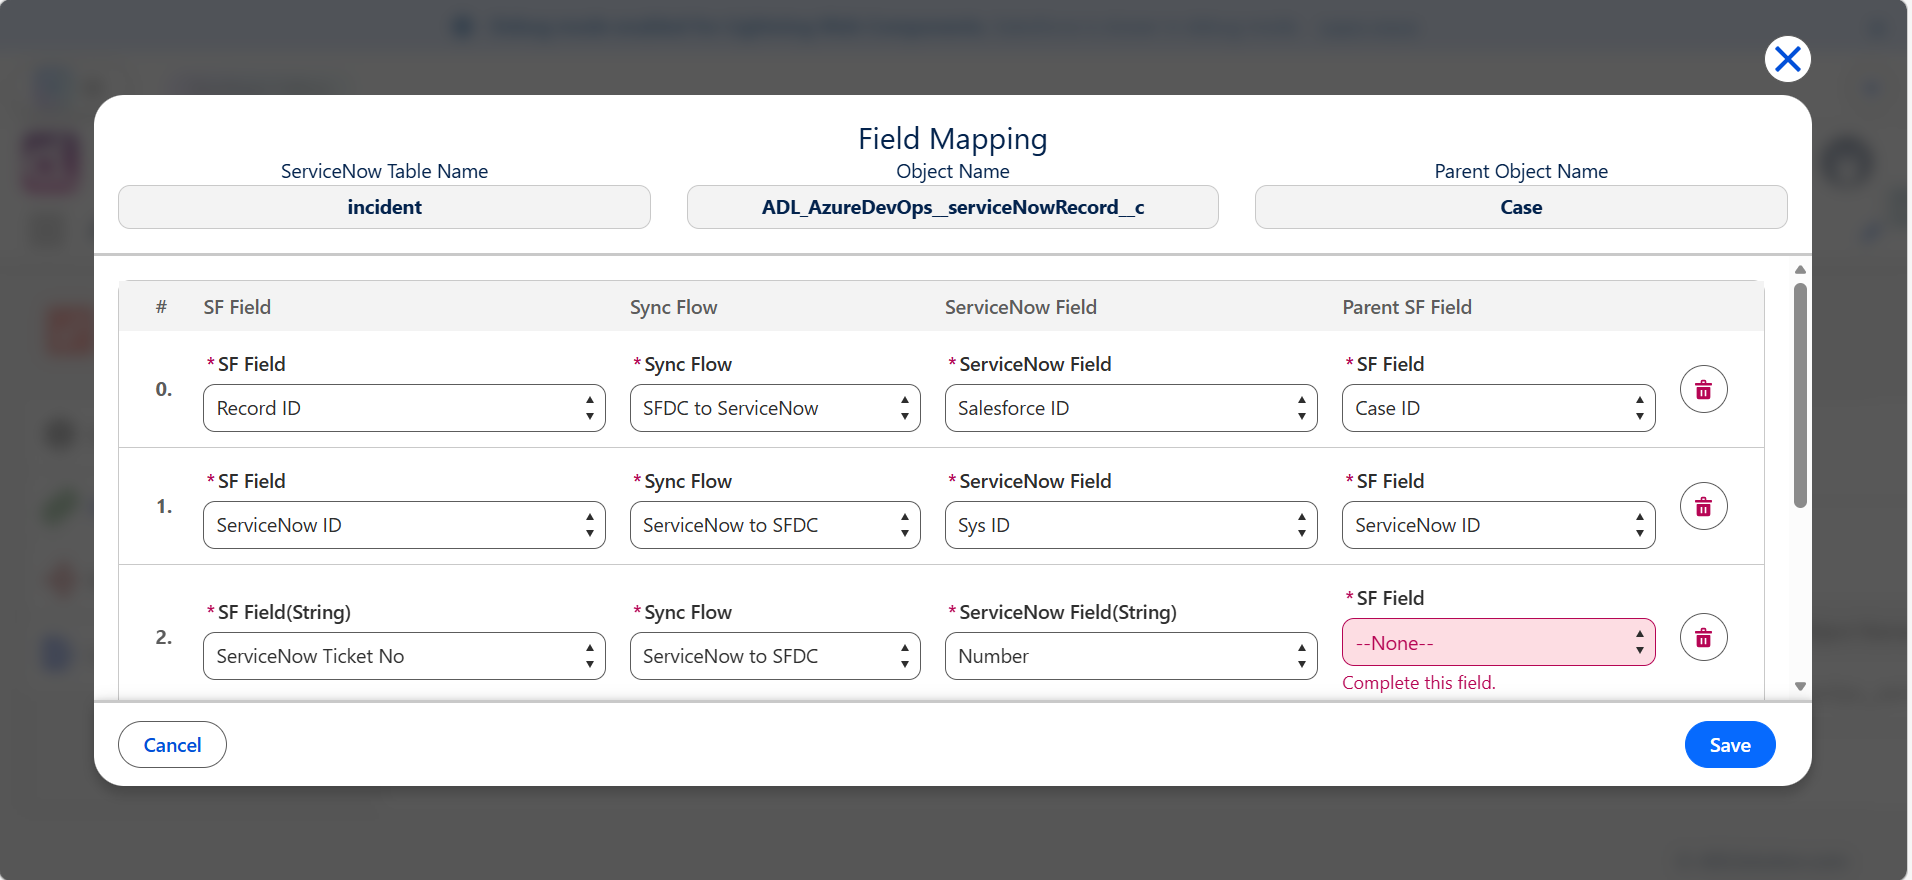
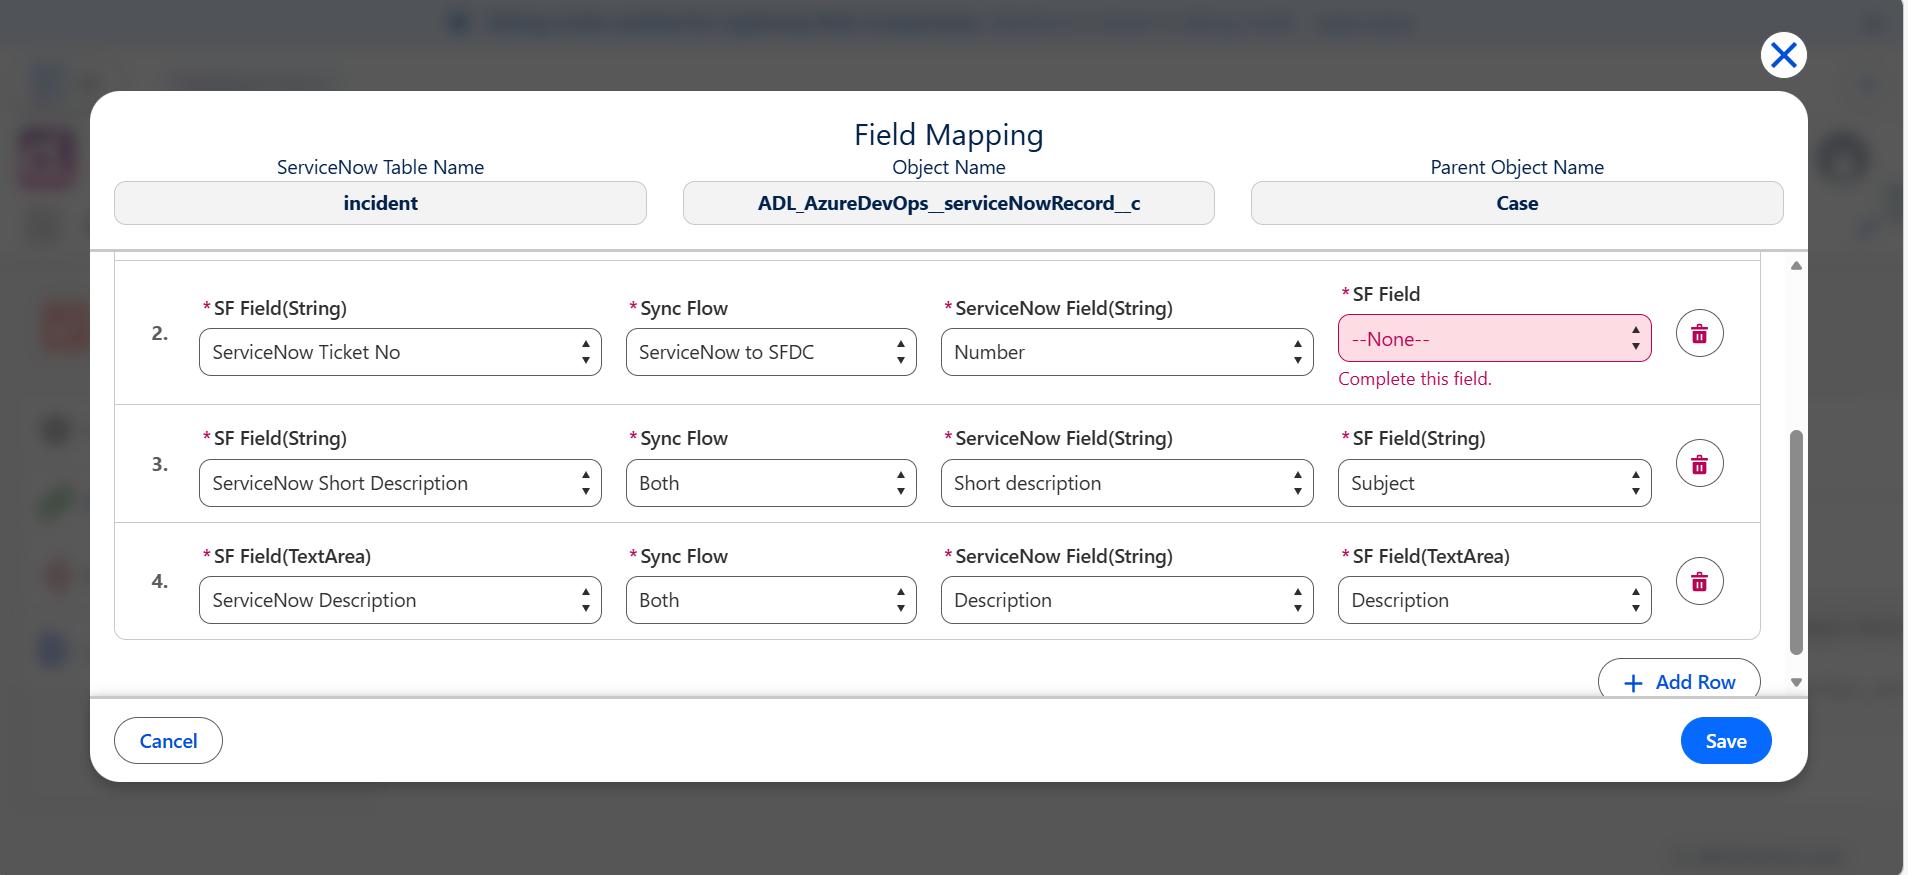
Step 2: Select the Salesforce Field
- In the Salesforce Field dropdown, select the field you want to synchronize.
- The system automatically displays all available fields from the Salesforce object associated with the project connection.
- Choose the appropriate standard or custom field based on your integration requirements.
Common examples include:
- Short Description
- Description
- ServiceNow Ticket No
- Any custom field created specifically for the integration
Field Mapping Configuration (Salesforce ↔ ServiceNow)
Once the project mapping has been established, the next step is to configure field-level mappings. Field mappings define how individual Salesforce fields correspond to ServiceNow fields and control the direction of data synchronization.
These mappings ensure that updates made in either system are synchronized correctly and in accordance with your business rules.
Follow the steps below to define field mappings for the selected project connection.
Step 1: Open the Field Mapping Section
- Navigate to the Project Connection created in the previous steps.
- Locate and click the Field Mapping action button that is located at the end of the row in the Data Table.
This opens the configuration panel used to define how data flows between Salesforce and ServiceNow.
Step 2: Select the Salesforce Field
- In the Salesforce Field dropdown, select the field you want to synchronize.
- The system automatically displays all available fields from the Salesforce object associated with the project connection.
- Choose the appropriate standard or custom field based on your integration requirements.
Common examples include:
- Short Description
- Description
- ServiceNow Ticket No
- Any custom field created specifically for the integration
Inbound Rules and Site Configuration
Inbound Rule Configuration (ServiceNow → Salesforce)
Inbound rules enable ServiceNow to send updates back into Salesforce. These updates may include field changes, status transitions, comments, and assignments. To enable inbound synchronization, an inbound rule must be configured in ADL Connect, along with a Salesforce Site that can receive webhook requests from ServiceNow.
Follow the steps below to complete the inbound configuration.
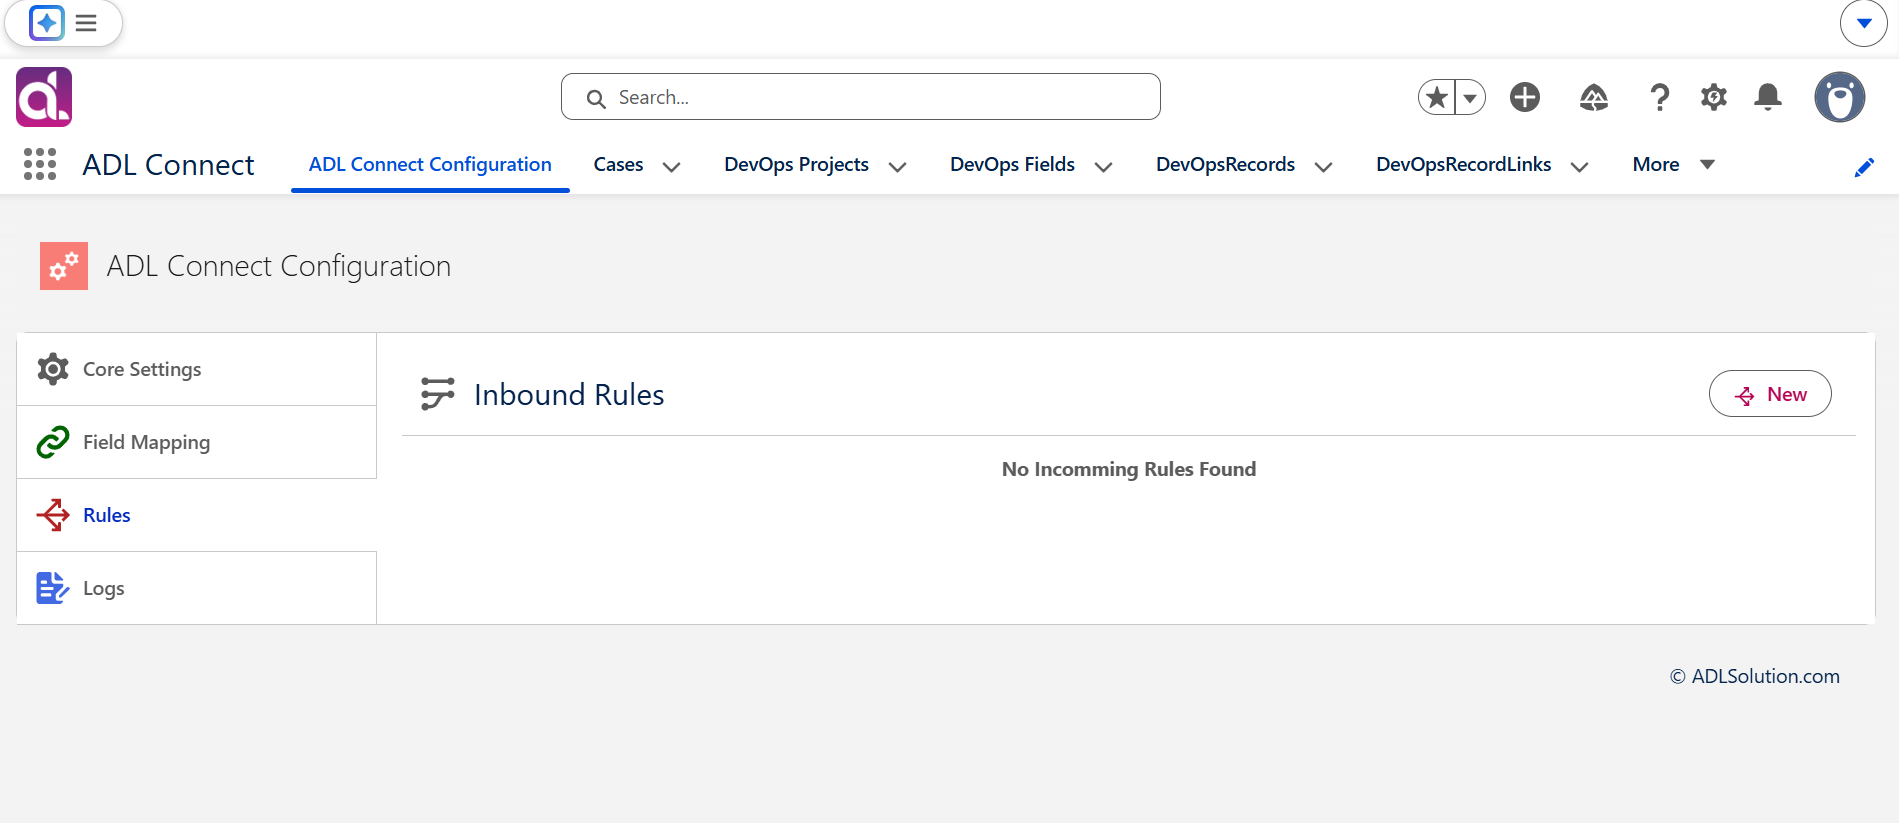
Step 1: Open the Inbound Rule Configuration
- Navigate to the Project Mapping created earlier.
- Locate the Inbound Rule section associated with the selected project mapping.
- Click New Inbound Rule.
This opens the configuration interface used to define how inbound Jira updates are processed in Salesforce.
Step 2: Select the Integration App
- In the Integration App dropdown, select the ServiceNow integration instance you are configuring.
- This ensures the inbound rule is associated with the correct ServiceNow environment and authentication context.
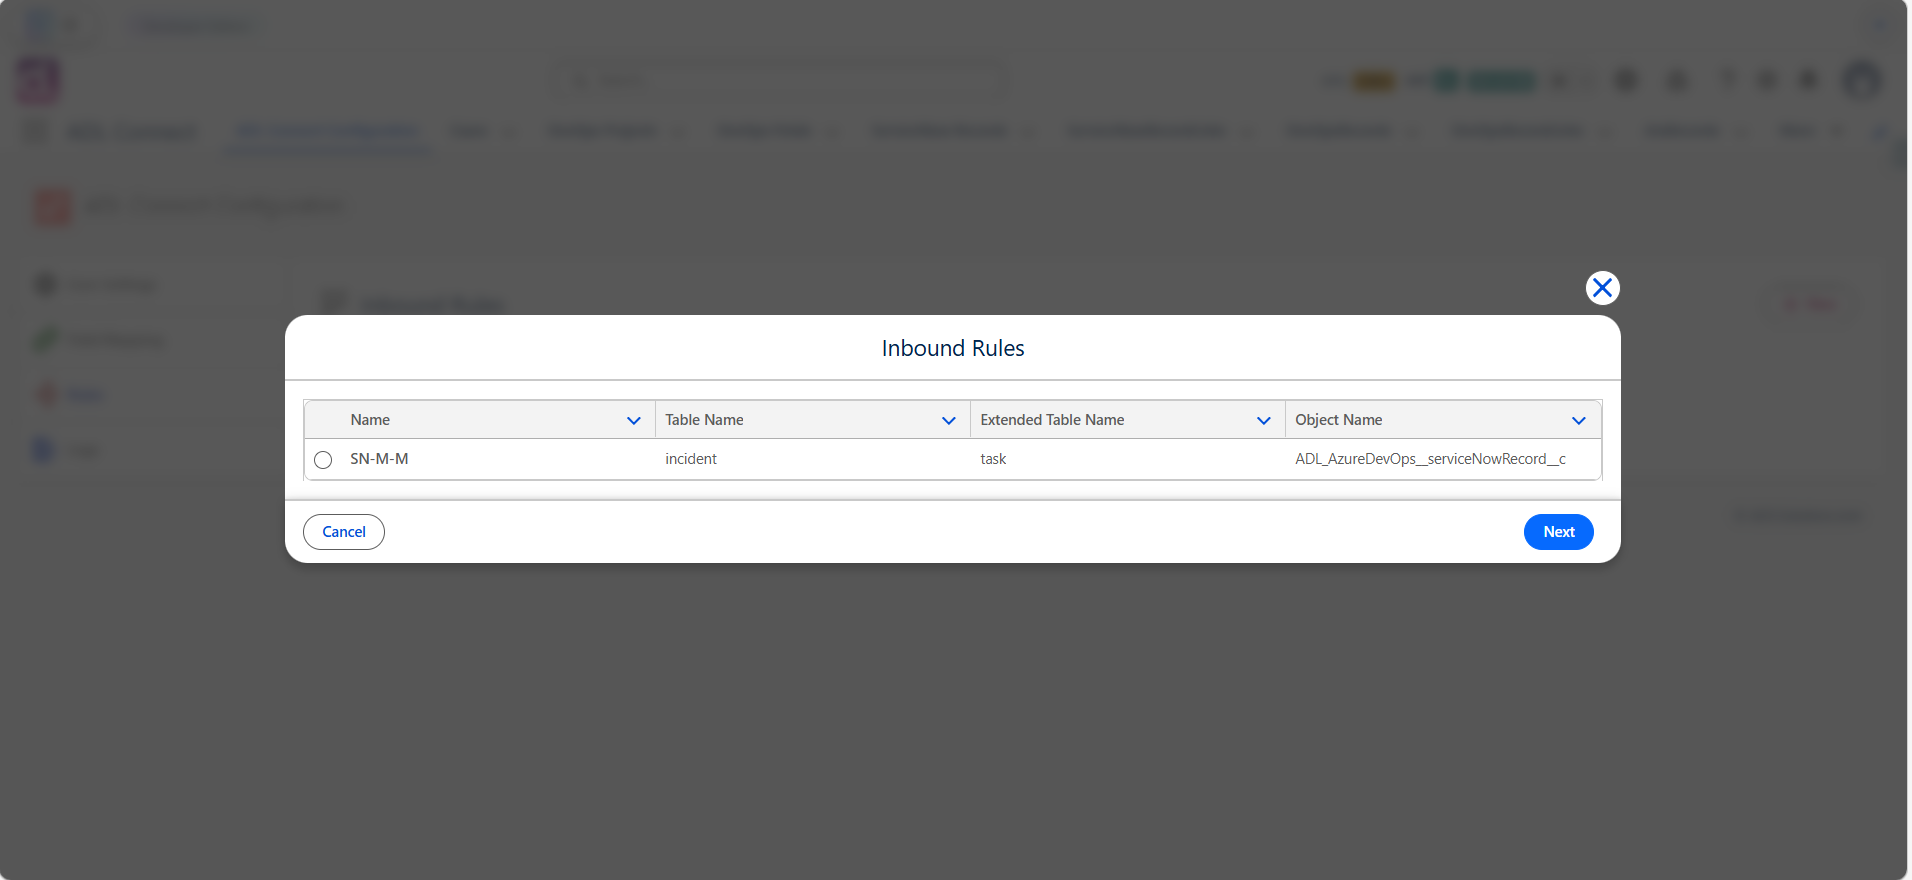
Step 3: Choose the Project Mapping
- In the Project Mapping field, select the mapping created previously.
- This links inbound updates to the correct Salesforce object and ServiceNow Table.
- Verify that the selected mapping matches the:
- Salesforce object
- ServiceNow Table
- for which inbound updates should apply.
Configuring the Salesforce Site for Inbound Access
To allow ServiceNow to call back into Salesforce, a Salesforce Site must be configured. This Site exposes a secure endpoint URL that Jira uses when sending webhook notifications.
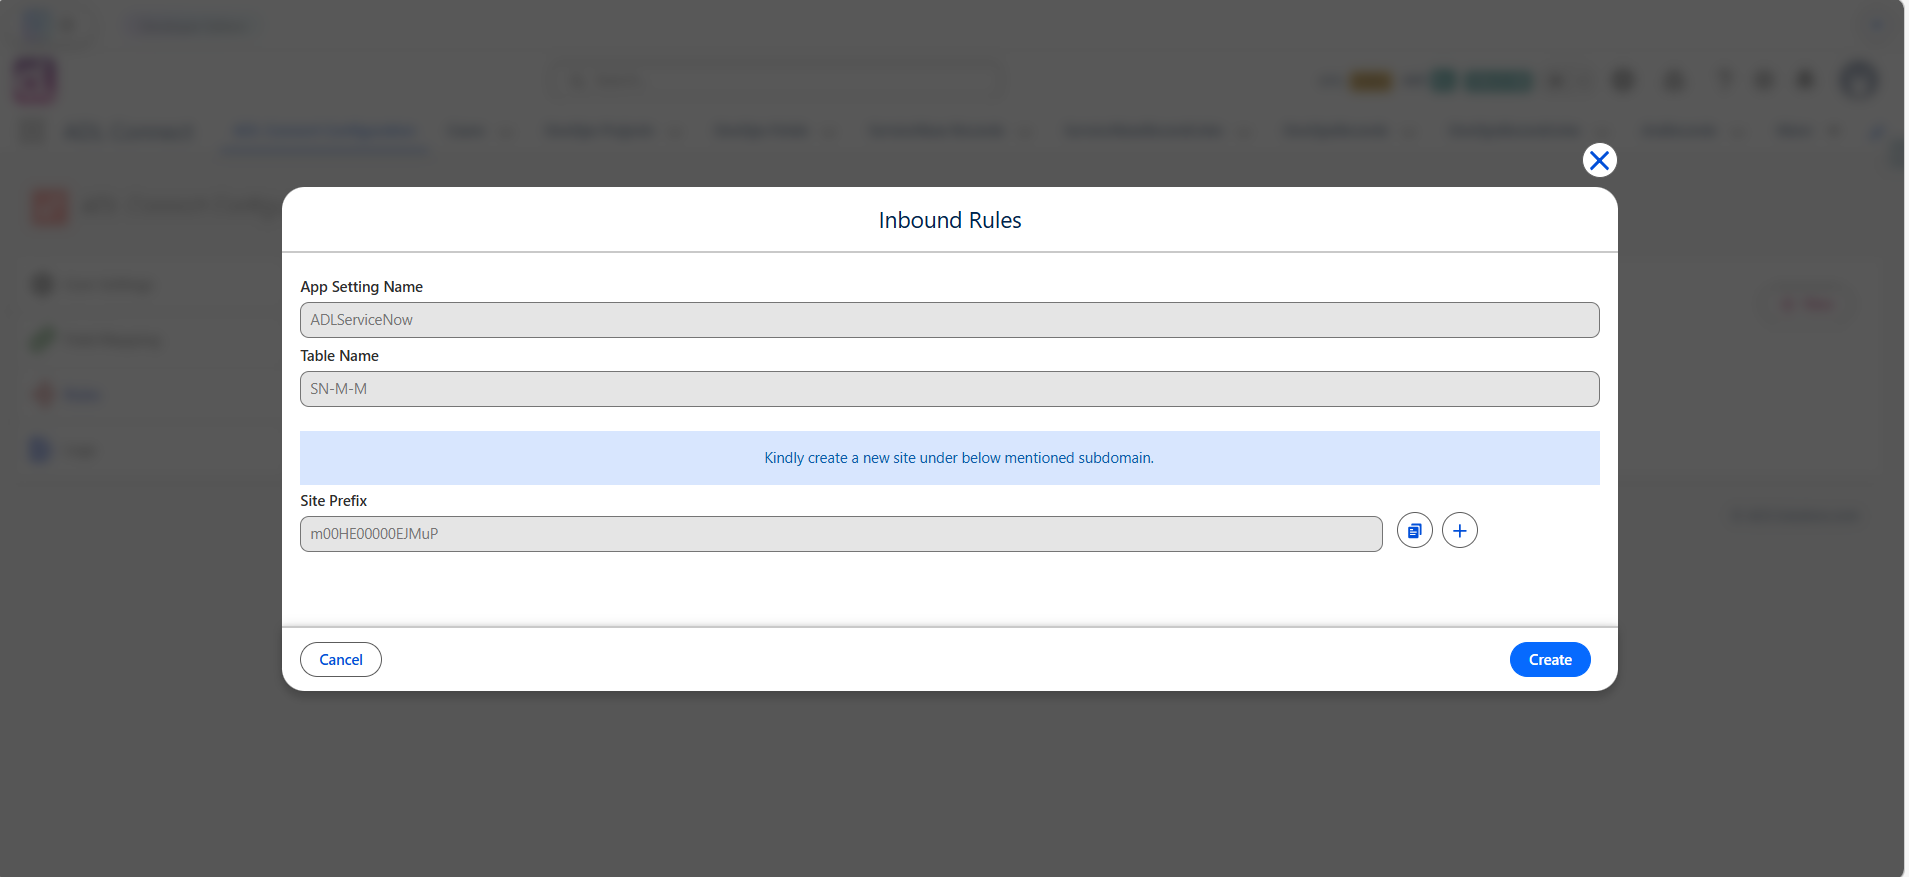
Step 4: Copy the Site Subdomain Prefix ID
- In the inbound rule configuration panel, locate the Site Subdomain Prefix ID displayed on the screen.
- Copy this prefix value.
- Click the Add button next to the Site configuration section.
You will be redirected to the Salesforce Sites setup page.
Step 5: Register a Salesforce Site Domain (If Not Already Enabled)
If Salesforce Sites have not been enabled previously:
- You will be prompted to register a Site Domain.
- Enter a unique domain name and save it.
- Once registered, Salesforce allows you to create new Sites under this domain.
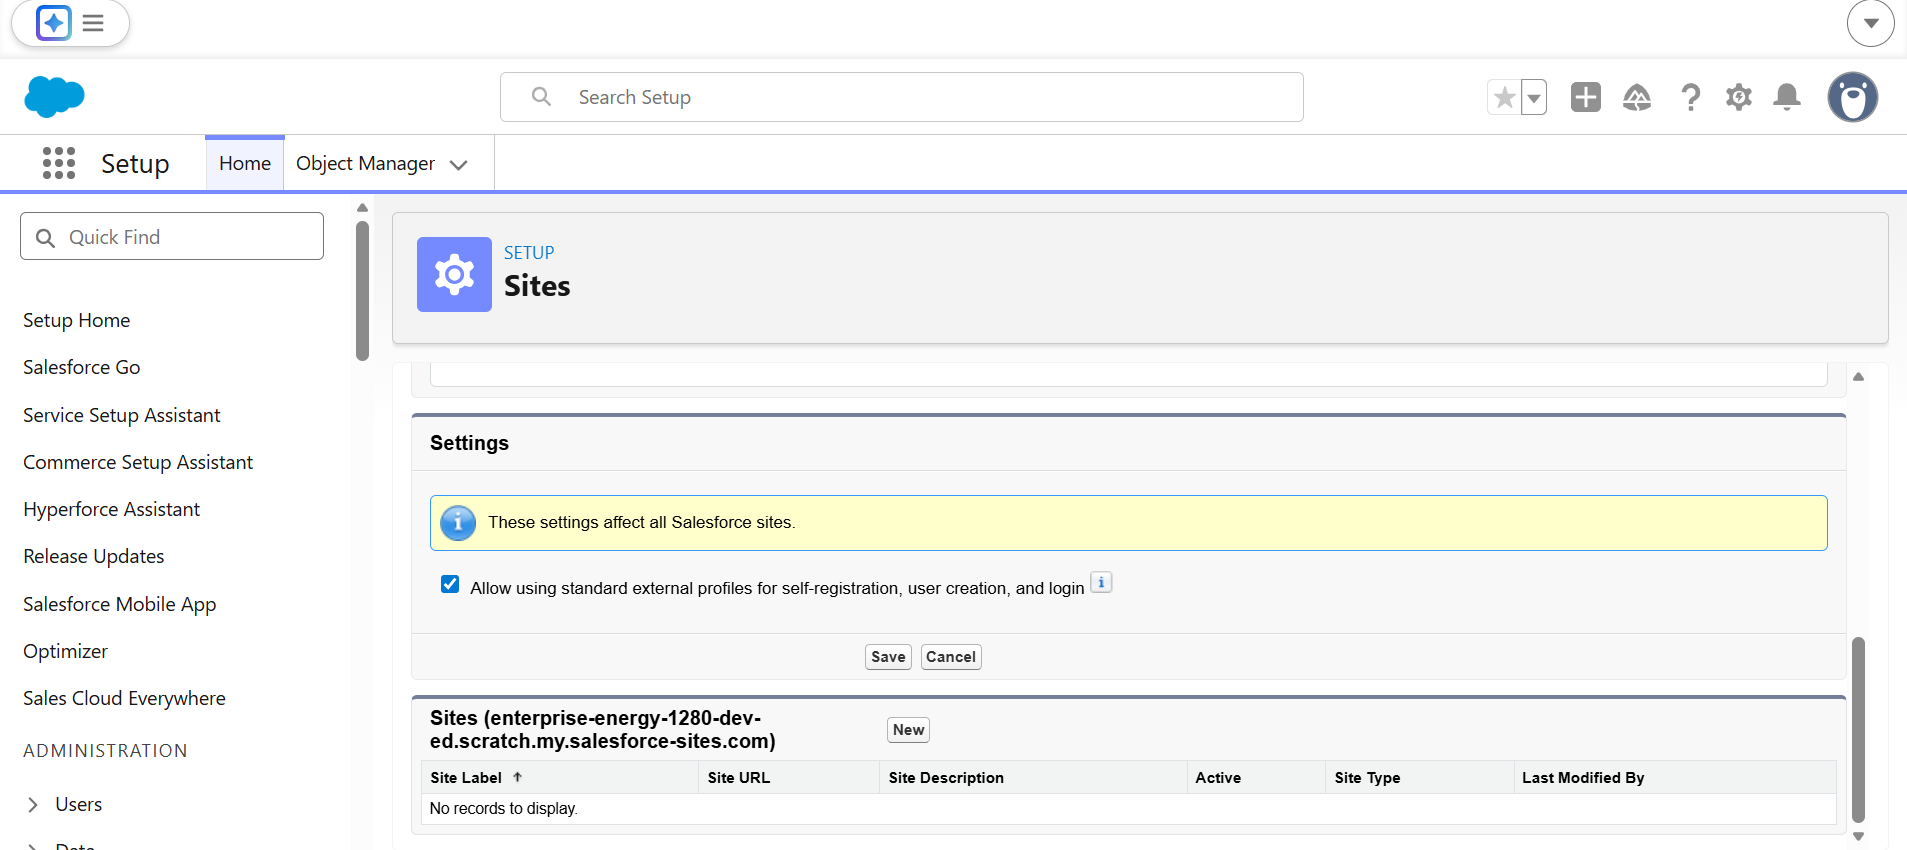
Step 6: Create a New Salesforce Site
- On the Sites setup page, click New.
- Enter a Site Label, such as:
- ADL Connect Inbound Site
- ServiceNow Sync Endpoint
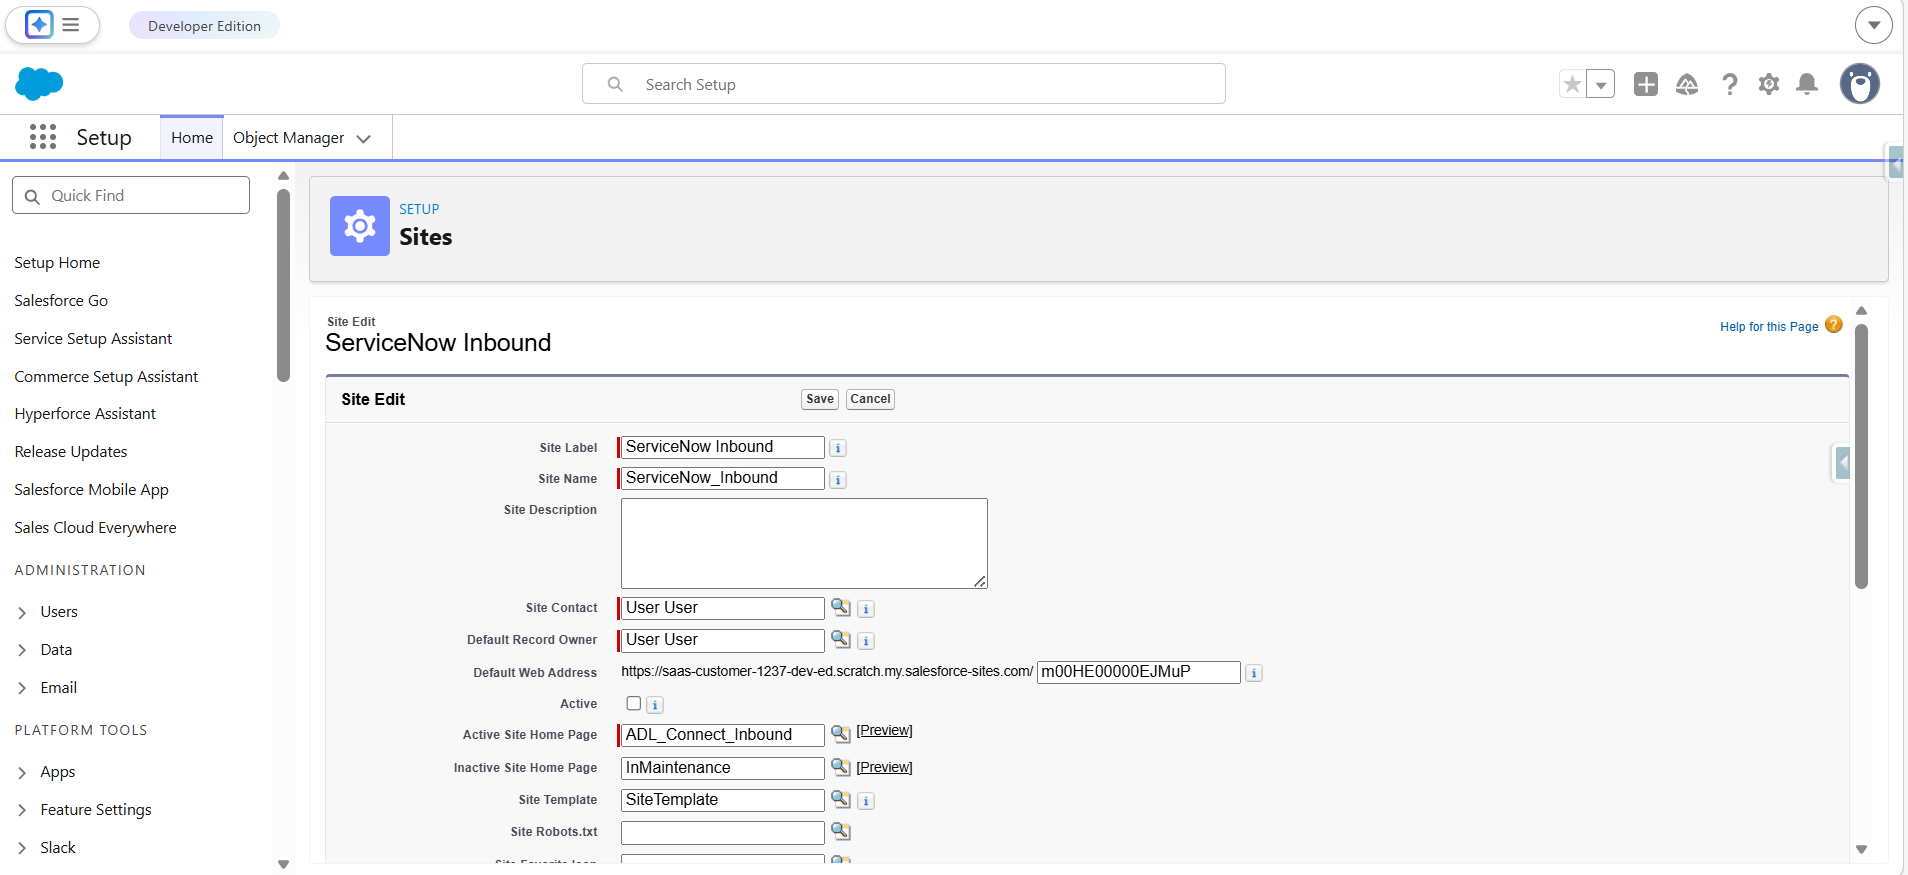
- In the Site Name / Subdomain Prefix field, paste the Site Subdomain Prefix ID copied earlier.
- This ensures the generated Site URL matches what ADL Connect expects.
- Complete the required Site configuration fields, including:
- Active status
- Site contact
- Default web address
- Click Save to create the Site.
Once saved, Salesforce generates a public-facing Site URL that ServiceNow will use for inbound updates.
Step 7: Return to ADL Connect and Save the Inbound Rule
- Return to ADL Connect in Salesforce.
- Ensure the newly created Salesforce Site is selected in the inbound rule configuration.
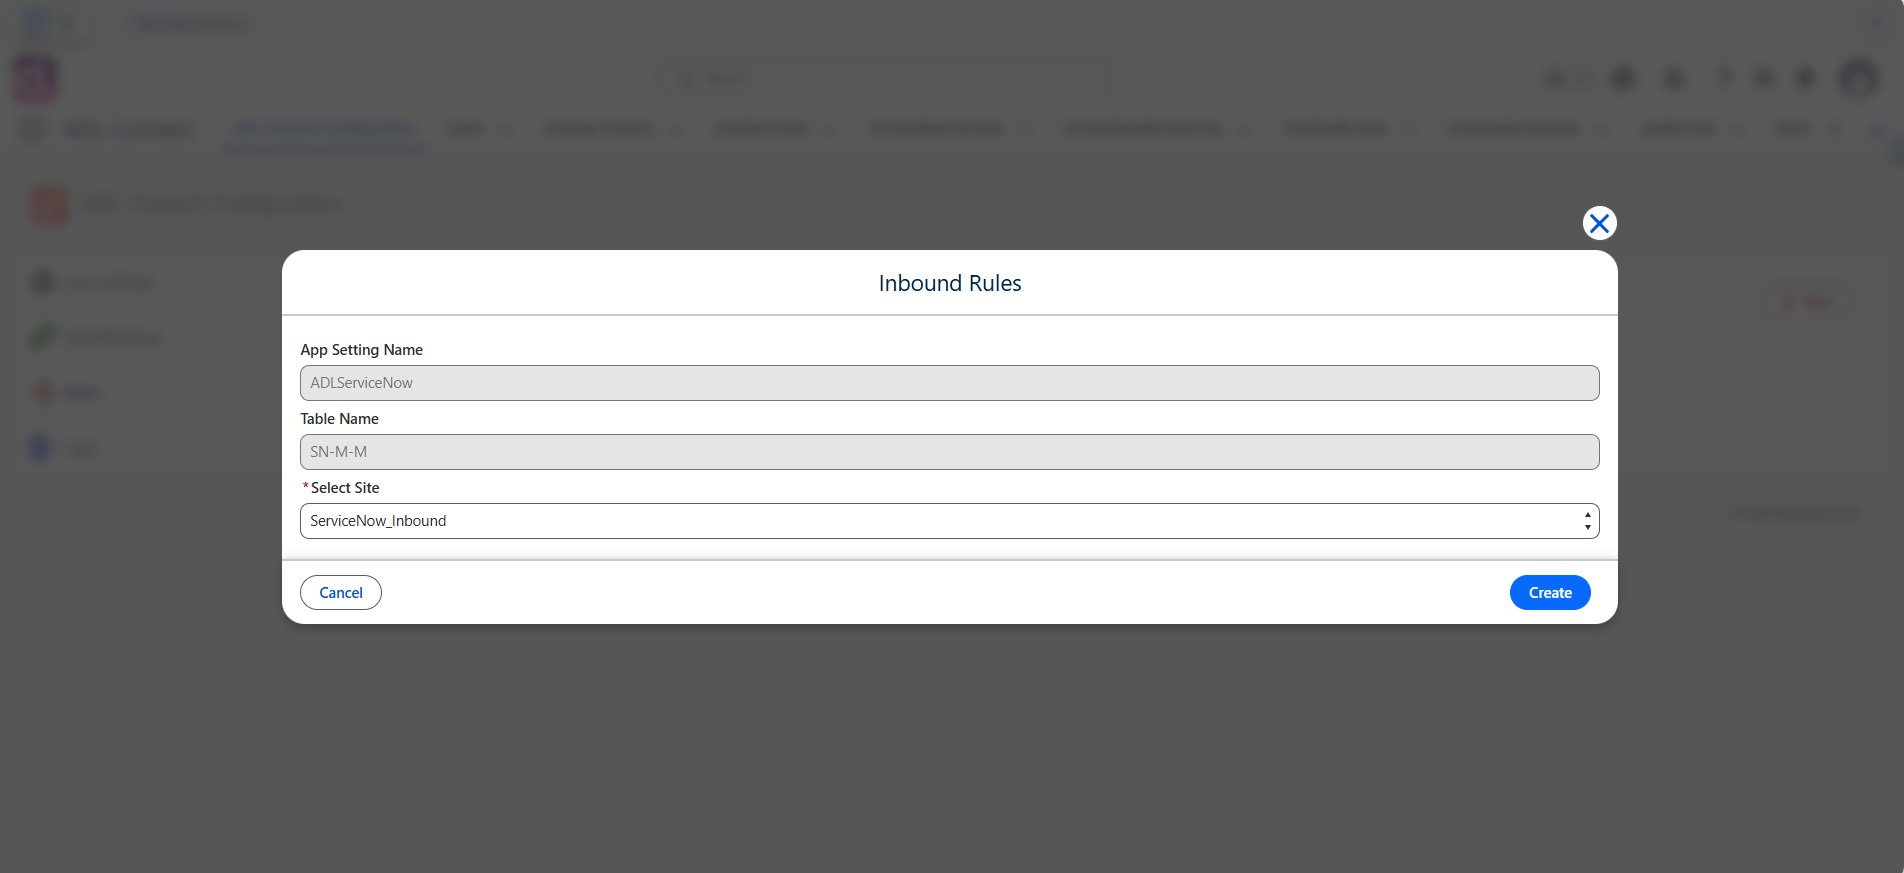
- Click Save to finalize the inbound rule.
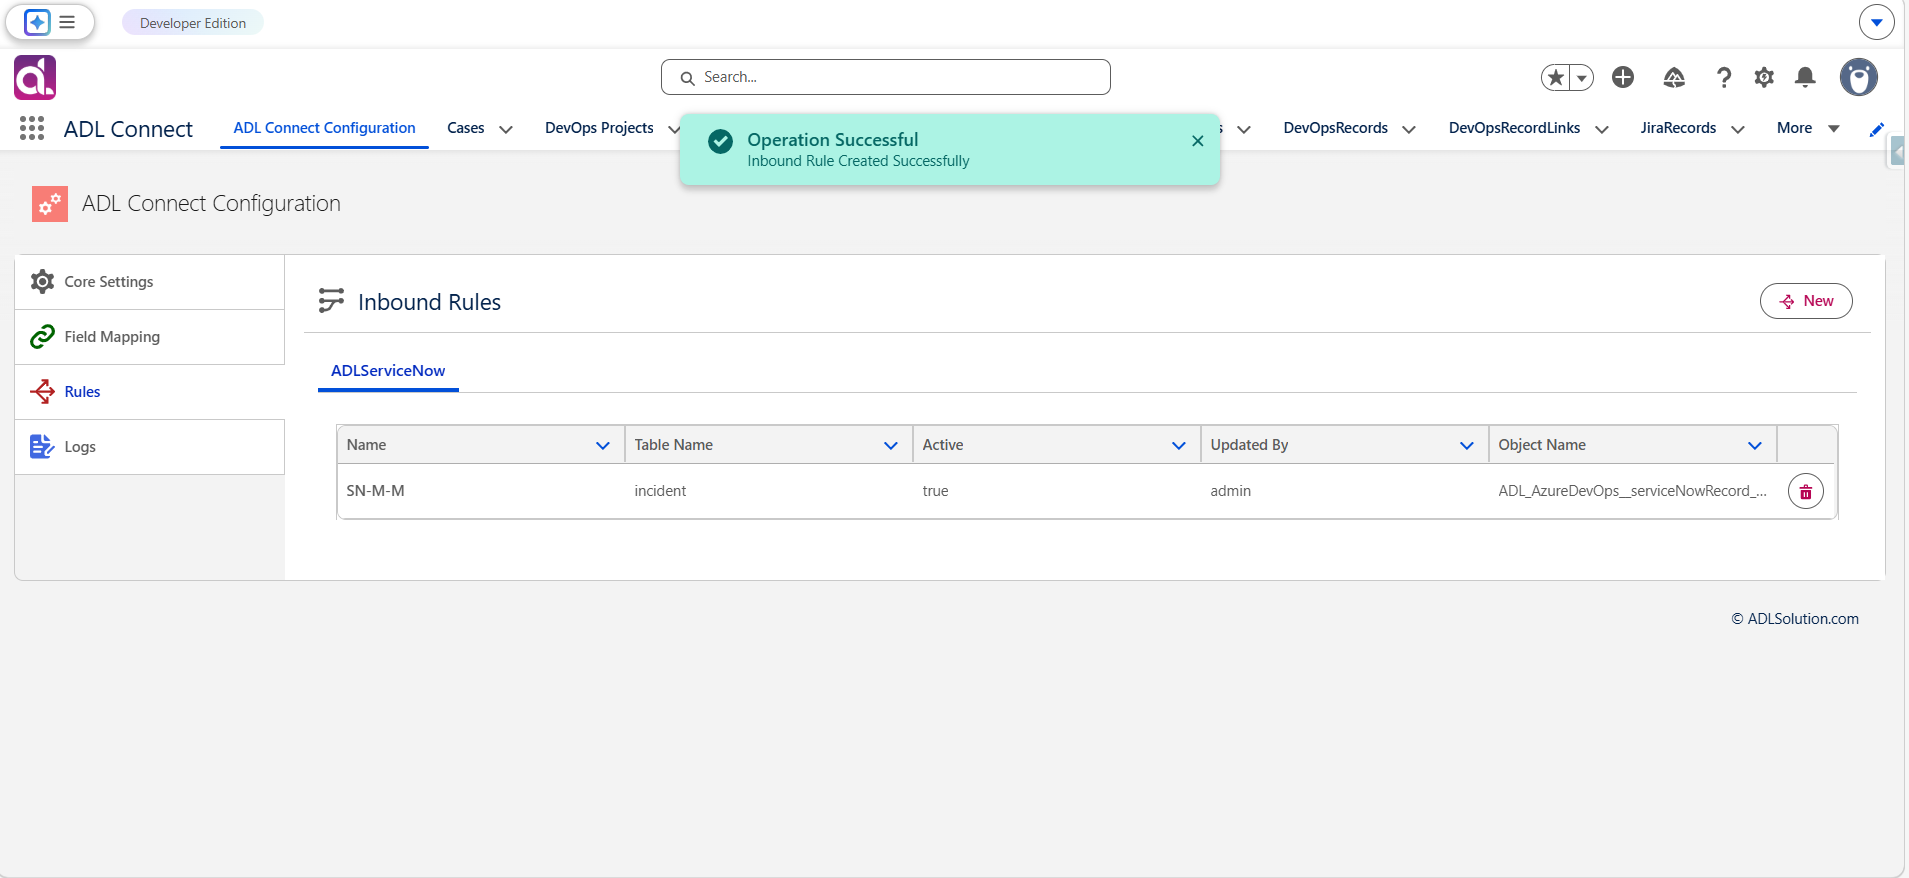
Inbound synchronization is now enabled for the selected project mapping.
Result
After completing these steps:
- ServiceNow can push field updates, status transitions, and assignments into Salesforce.
- The Salesforce Site acts as the secure endpoint for inbound webhook calls.
- ADL Connect is fully prepared to process real-time inbound updates for the configured project.
This completes the Inbound Rule configuration stage.
Inbound Rule Configuration (ServiceNow → Salesforce)
Inbound rules enable ServiceNow to send updates back into Salesforce. These updates may include field changes, status transitions, comments, and assignments. To enable inbound synchronization, an inbound rule must be configured in ADL Connect, along with a Salesforce Site that can receive webhook requests from ServiceNow.
Follow the steps below to complete the inbound configuration.
Step 1: Open the Inbound Rule Configuration
- Navigate to the Project Mapping created earlier.
- Locate the Inbound Rule section associated with the selected project mapping.
- Click New Inbound Rule.
This opens the configuration interface used to define how inbound Jira updates are processed in Salesforce.
Step 2: Select the Integration App
- In the Integration App dropdown, select the ServiceNow integration instance you are configuring.
- This ensures the inbound rule is associated with the correct ServiceNow environment and authentication context.
Step 3: Choose the Project Mapping
- In the Project Mapping field, select the mapping created previously.
- This links inbound updates to the correct Salesforce object and ServiceNow Table.
- Verify that the selected mapping matches the:
- Salesforce object
- ServiceNow Table
- for which inbound updates should apply.
Configuring the Salesforce Site for Inbound Access
To allow ServiceNow to call back into Salesforce, a Salesforce Site must be configured. This Site exposes a secure endpoint URL that Jira uses when sending webhook notifications.
Step 4: Copy the Site Subdomain Prefix ID
- In the inbound rule configuration panel, locate the Site Subdomain Prefix ID displayed on the screen.
- Copy this prefix value.
- Click the Add button next to the Site configuration section.
You will be redirected to the Salesforce Sites setup page.
Step 5: Register a Salesforce Site Domain (If Not Already Enabled)
If Salesforce Sites have not been enabled previously:
- You will be prompted to register a Site Domain.
- Enter a unique domain name and save it.
- Once registered, Salesforce allows you to create new Sites under this domain.
Step 6: Create a New Salesforce Site
- On the Sites setup page, click New.
- Enter a Site Label, such as:
- ADL Connect Inbound Site
- ServiceNow Sync Endpoint
- In the Site Name / Subdomain Prefix field, paste the Site Subdomain Prefix ID copied earlier.
- This ensures the generated Site URL matches what ADL Connect expects.
- Complete the required Site configuration fields, including:
- Active status
- Site contact
- Default web address
- Click Save to create the Site.
Once saved, Salesforce generates a public-facing Site URL that ServiceNow will use for inbound updates.
Step 7: Return to ADL Connect and Save the Inbound Rule
- Return to ADL Connect in Salesforce.
- Ensure the newly created Salesforce Site is selected in the inbound rule configuration.
- Click Save to finalize the inbound rule.
Inbound synchronization is now enabled for the selected project mapping.
Result
After completing these steps:
- ServiceNow can push field updates, status transitions, and assignments into Salesforce.
- The Salesforce Site acts as the secure endpoint for inbound webhook calls.
- ADL Connect is fully prepared to process real-time inbound updates for the configured project.
This completes the Inbound Rule configuration stage.
Configuring Case Page Layout
Enabling ServiceNow Incident Management on Salesforce Case Pages
To allow users to create, view, and manage ServiceNow incidents directly from Salesforce Cases, the required ADL Connect Lightning components must be added to the Case record page. This configuration enables seamless collaboration between Support and Engineering teams without leaving Salesforce.
The steps below explain both page configuration and end-to-end ServiceNow incident management from Salesforce.
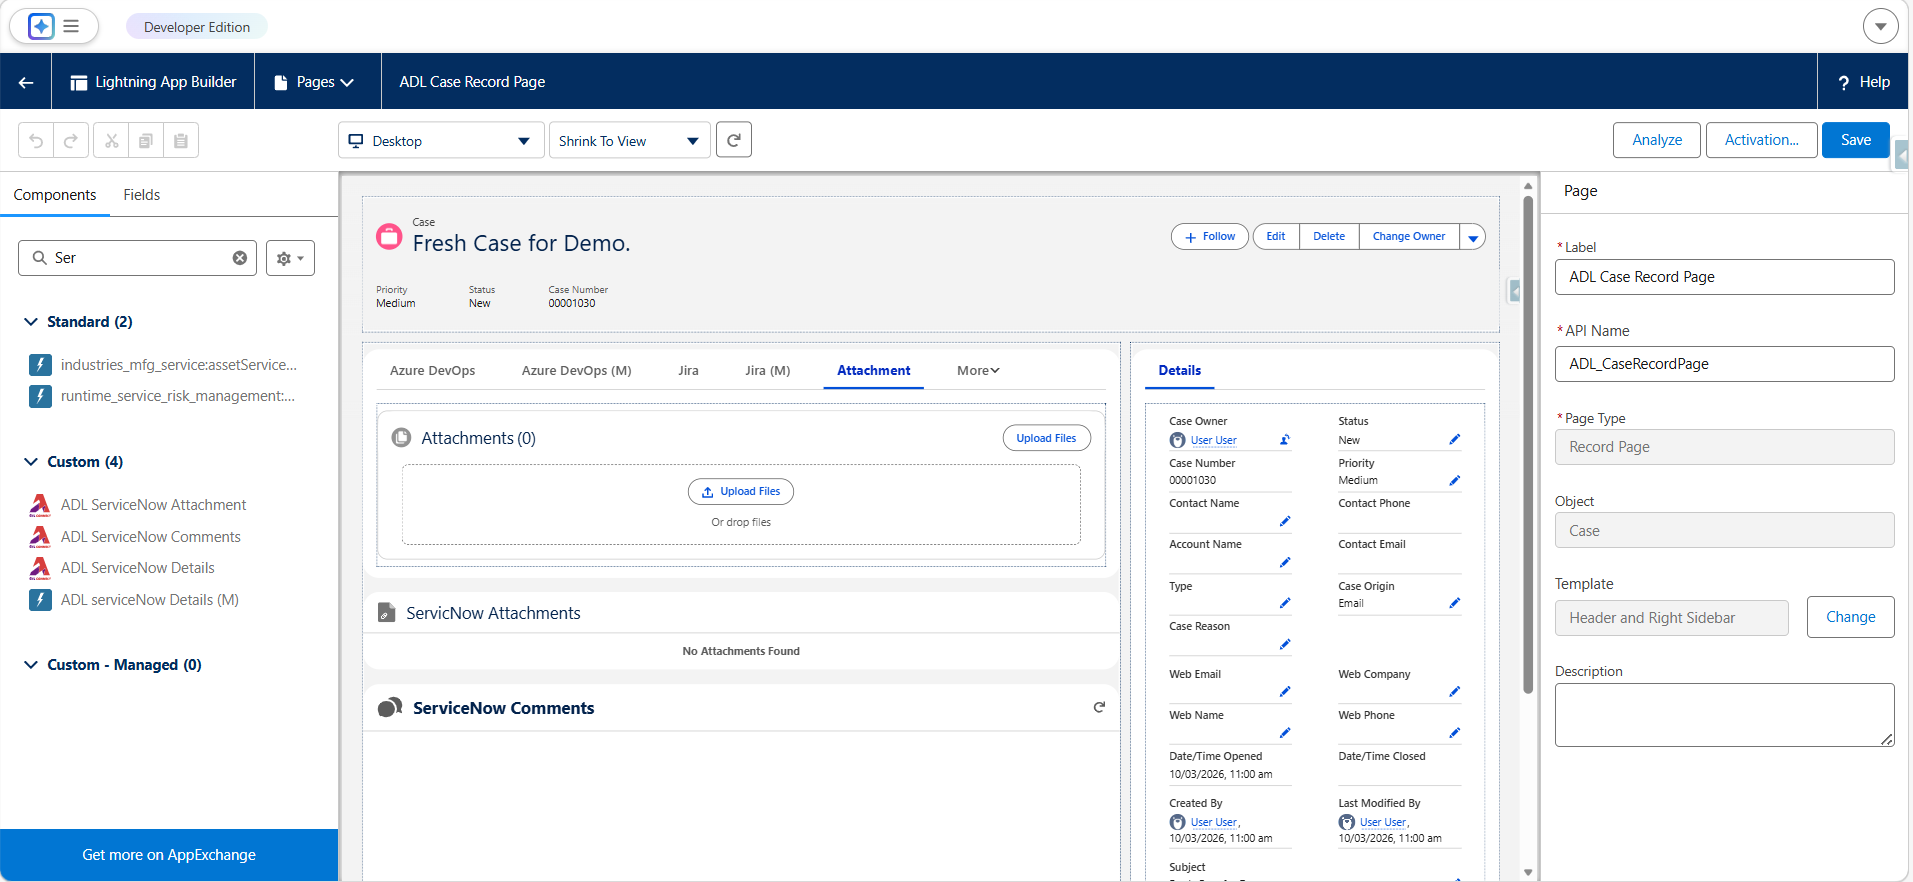
1. Open and Edit the Case Record Page
- Open any existing Case record in Salesforce.
- Click Edit Page to launch the Lightning App Builder.
- This opens the configurable layout where components can be added to extend Case functionality
2. Add the ADL ServiceNow Details Component
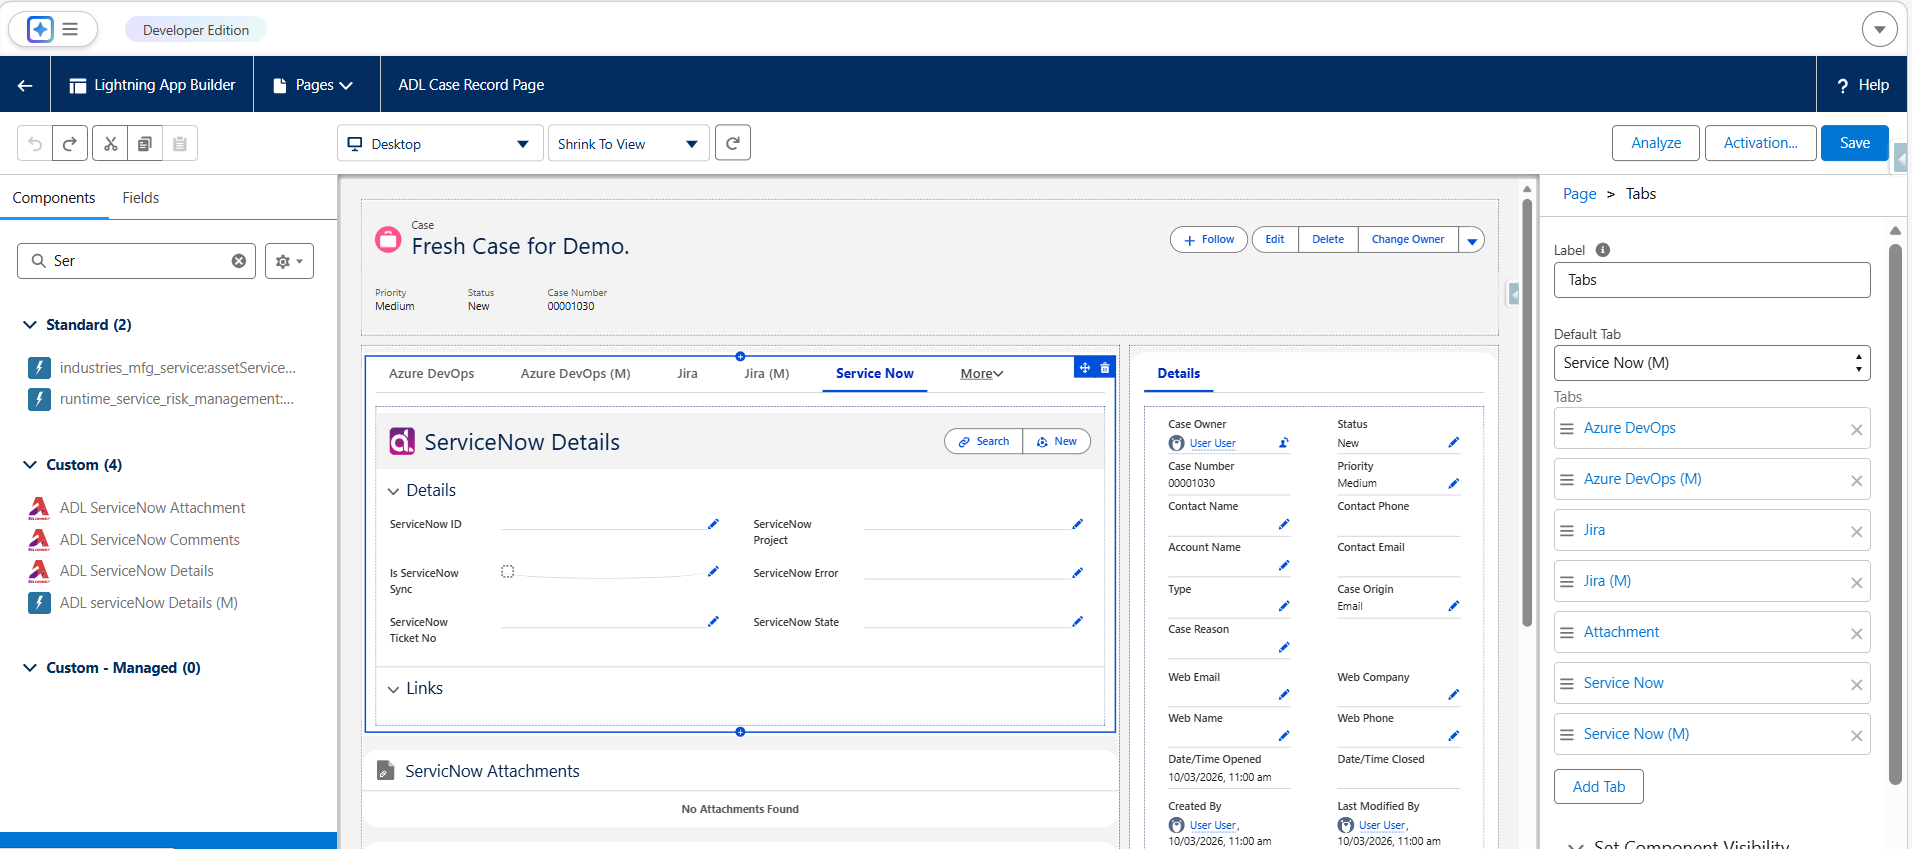
- In the Lightning App Builder component panel, scroll to Custom – Managed Components.
- Locate the ADL ServiceNow Details component.
- Drag and drop the component into the desired region of the Case page layout.
- This component displays ServiceNow incidents details and provides the interface to create new ServiceNow incident from Salesforce.
- Click Save and Activate the page for the required apps or profiles if prompted.
Once added, every Case record will support ServiceNow incident creation and tracking.
Enabling ServiceNow Incident Management on Salesforce Case Pages
To allow users to create, view, and manage ServiceNow incidents directly from Salesforce Cases, the required ADL Connect Lightning components must be added to the Case record page. This configuration enables seamless collaboration between Support and Engineering teams without leaving Salesforce.
The steps below explain both page configuration and end-to-end ServiceNow incident management from Salesforce.
1. Open and Edit the Case Record Page
- Open any existing Case record in Salesforce.
- Click Edit Page to launch the Lightning App Builder.
- This opens the configurable layout where components can be added to extend Case functionality
2. Add the ADL ServiceNow Details Component
- In the Lightning App Builder component panel, scroll to Custom – Managed Components.
- Locate the ADL ServiceNow Details component.
- Drag and drop the component into the desired region of the Case page layout.
- This component displays ServiceNow incidents details and provides the interface to create new ServiceNow incident from Salesforce.
- Click Save and Activate the page for the required apps or profiles if prompted.
Once added, every Case record will support ServiceNow incident creation and tracking.
Creating ServiceNow Incidents from Salesforce
Creating and Managing ServiceNow Incidents from Salesforce
ADL Connect enables Salesforce users to create and manage ServiceNow Incidents directly from Salesforce records, such as Cases. This capability improves collaboration between Support, Sales, and Development teams by allowing issue creation, assignment, and updates without leaving the Salesforce interface.
This article provides step-by-step guidance on creating ServiceNow Incidents from Salesforce and verifying bidirectional synchronization between Salesforce and ServiceNow.
Prerequisites
Before creating ServiceNow Incidents from Salesforce, ensure the following prerequisites are met:
- A Project Mapping is already configured between ServiceNow and Jira
- The ADL ServiceNow Details component has been added to the Salesforce record page
- Users have the required Salesforce permissions and ServiceNow project access
Creating ServiceNow Incidents from Salesforce
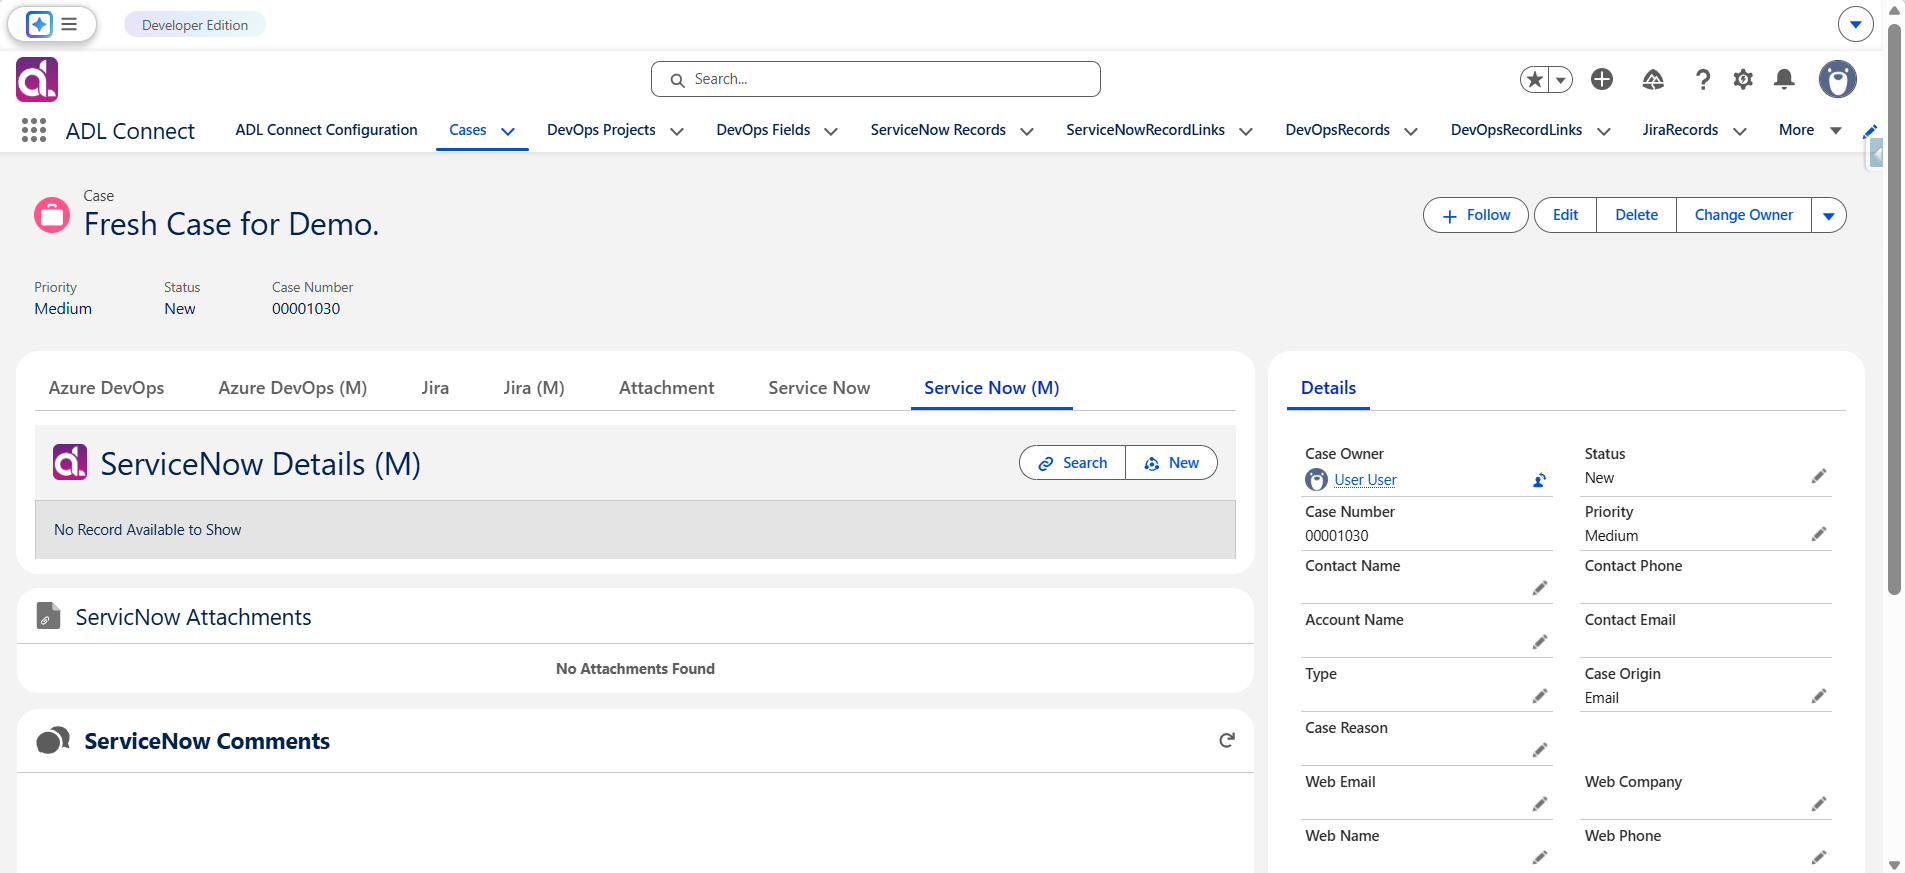
1. Access the ServiceNow Incidents Creation Interface
- Open the Salesforce record (typically a Case) from which you want to create a ServiceNow Incident.
- Locate the ADL ServiceNow Details component on the record page.
- Click New to begin creating a ServiceNow Incidents.
This opens the ServiceNow Incident creation panel embedded within Salesforce.
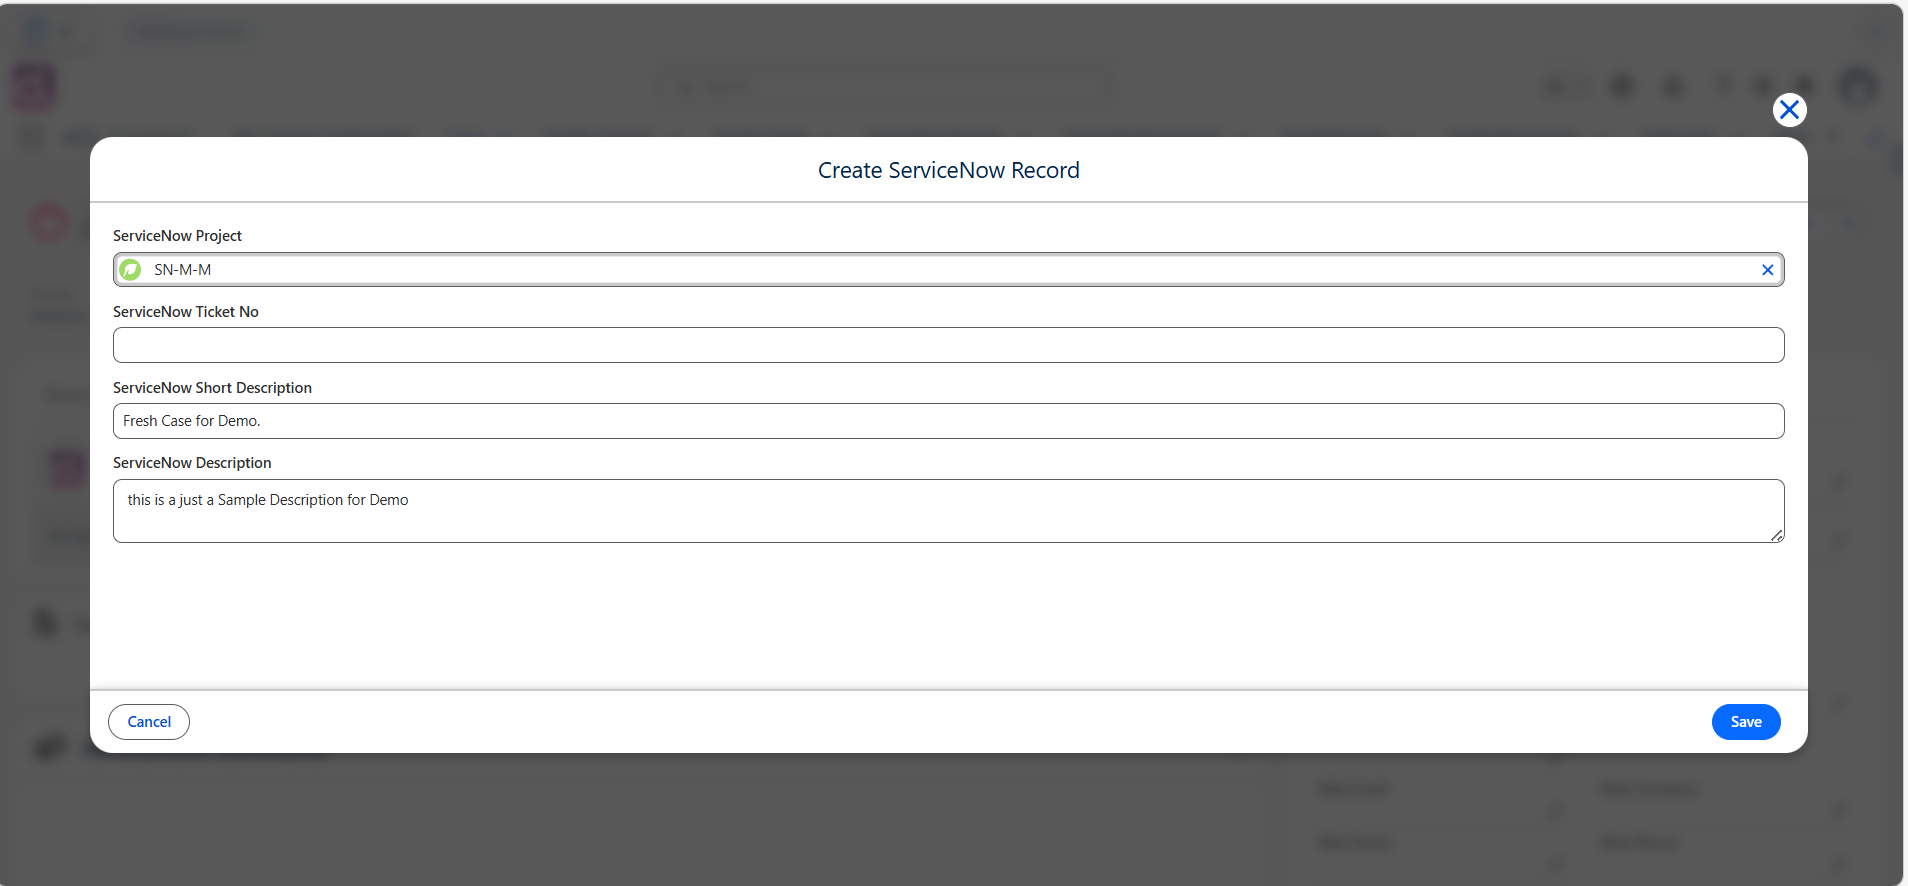
2. Select the Mapped ServiceNow Project
- In the Project selection field, start typing the name of the ServiceNow project.
- Select the project that was configured earlier in the Project Mapping setup.
ADL Connect automatically loads the corresponding:
- ServiceNow Incident types
- Field mappings
- Default values
This ensures the issue form aligns with the configured integration rules.
3. Review Pre-Populated Field Values
ADL Connect automatically populates several fields based on the configured field mappings. These may include:
- Salesforce field values mapped to ServiceNow fields
- Summary prefixes or templates
- Priority or classification values
- Custom integration fields
This reduces manual data entry and ensures consistent issue creation across the organization.
4. Assign the ServiceNow Incident
- Use the Assignee dropdown to select the ServiceNow user responsible for the incident.
- Assigning the issue during creation ensures the development team receives it immediately with clear ownership.
5. Save the ServiceNow Incidents
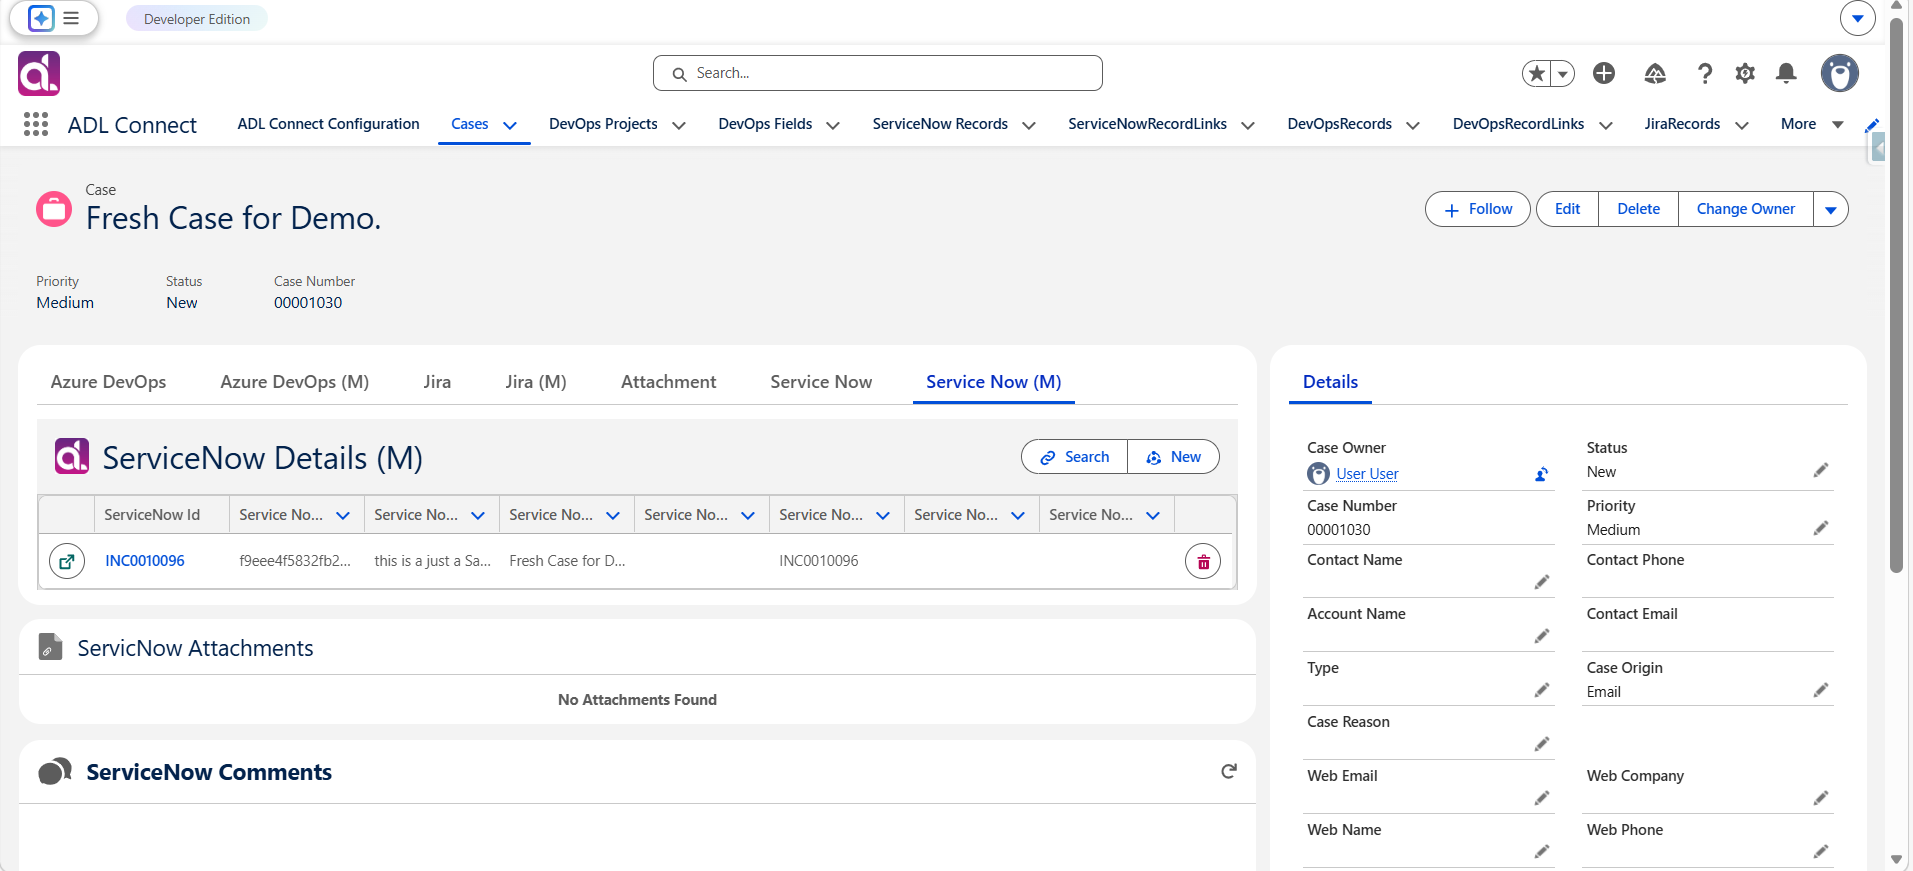
- After completing all required fields, click Save.
- ADL Connect creates the ServiceNow Incident in real time.
- The generated ServiceNow Incidents ID is displayed directly within Salesforce.
The ServiceNow Incident ID serves as the permanent reference for synchronization between Salesforce and ServiceNow.
Verifying the ServiceNow Incident
6. Open and Review the Created Incident
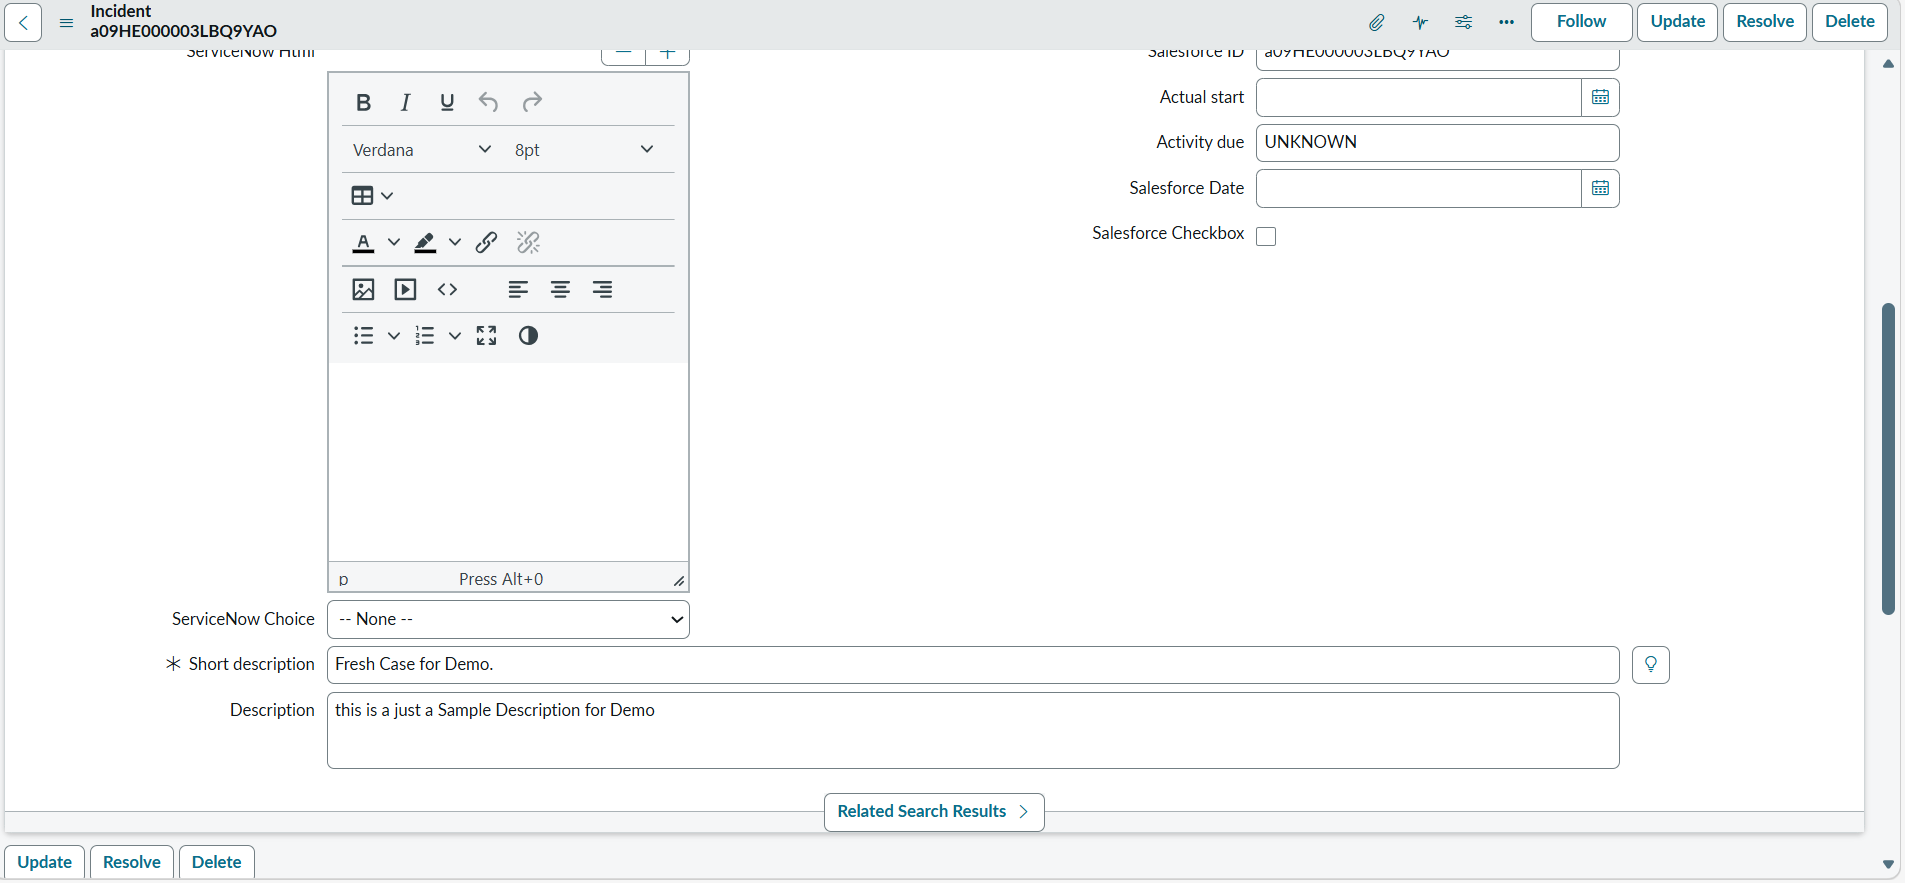
- Click the ServiceNow Sys ID displayed in Salesforce.
- The Jira issue opens in a new browser tab.
Verify that:
- The issue is assigned to the correct ServiceNow user
- The Salesforce Record ID appears in the custom ServiceNow field created for integration
- All mapped fields are populated correctly
This confirms that outbound synchronization from Salesforce to ServiceNow is functioning as expected.
Updating ServiceNow Incident from Salesforce
7. Modify ServiceNow Fields Directly in Salesforce
- In the ADL ServiceNow Details component, update fields such as:
- Short Description
- Description.
- Priority or other mapped fields
- Click Save to push the updates to ServiceNow.
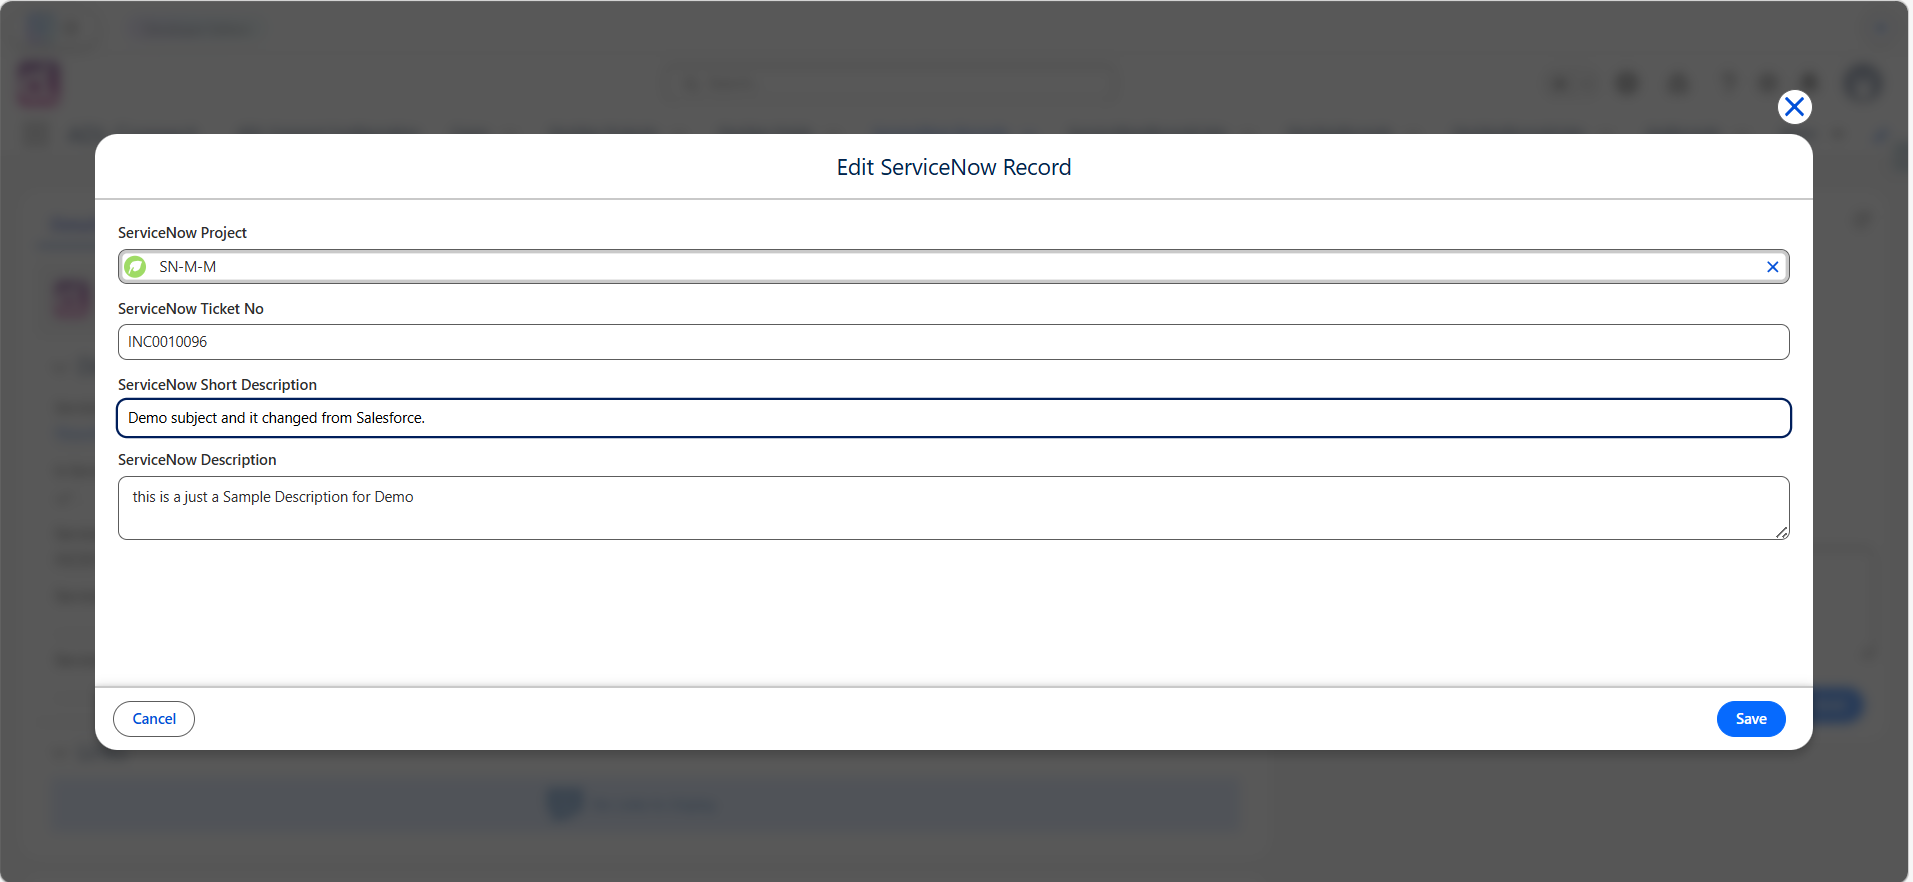
ADL Connect immediately sends these updates based on the configured field mappings and synchronization rules.
8. Validate Changes in ServiceNow
- Open the ServiceNow incident.
- Confirm that updates are reflected correctly.
This verifies that outbound updates from Salesforce are working as intended.
Receiving ServiceNow Updates in Salesforce
9. Confirm Inbound Synchronization Behaviour
- In ServiceNow, update the issue (for example, change the short Description or another mapped field).
- Return to Salesforce and refresh the record.
- Confirm that the updated values appear in the ADL ServiceNow Details component.
This validates that inbound synchronization from ServiceNow to Salesforce is enabled and functioning.
Summary
By using the ADL ServiceNow Details component, Salesforce users can:
- Create ServiceNow incidents directly from Salesforce Cases
- Assign incidents to ServiceNow team members at creation time
- Update incidents details bidirectionally
- Maintain real-time visibility into ServiceNow progress
- Eliminate duplicate data entry across platforms
This functionality significantly streamlines communication and execution between Salesforce teams and ServiceNow development teams, ensuring faster issue resolution and better cross-team alignment.
Creating and Managing ServiceNow Incidents from Salesforce
ADL Connect enables Salesforce users to create and manage ServiceNow Incidents directly from Salesforce records, such as Cases. This capability improves collaboration between Support, Sales, and Development teams by allowing issue creation, assignment, and updates without leaving the Salesforce interface.
This article provides step-by-step guidance on creating ServiceNow Incidents from Salesforce and verifying bidirectional synchronization between Salesforce and ServiceNow.
Prerequisites
Before creating ServiceNow Incidents from Salesforce, ensure the following prerequisites are met:
- A Project Mapping is already configured between ServiceNow and Jira
- The ADL ServiceNow Details component has been added to the Salesforce record page
- Users have the required Salesforce permissions and ServiceNow project access
Creating ServiceNow Incidents from Salesforce
1. Access the ServiceNow Incidents Creation Interface
- Open the Salesforce record (typically a Case) from which you want to create a ServiceNow Incident.
- Locate the ADL ServiceNow Details component on the record page.
- Click New to begin creating a ServiceNow Incidents.
This opens the ServiceNow Incident creation panel embedded within Salesforce.
2. Select the Mapped ServiceNow Project
- In the Project selection field, start typing the name of the ServiceNow project.
- Select the project that was configured earlier in the Project Mapping setup.
ADL Connect automatically loads the corresponding:
- ServiceNow Incident types
- Field mappings
- Default values
This ensures the issue form aligns with the configured integration rules.
3. Review Pre-Populated Field Values
ADL Connect automatically populates several fields based on the configured field mappings. These may include:
- Salesforce field values mapped to ServiceNow fields
- Summary prefixes or templates
- Priority or classification values
- Custom integration fields
This reduces manual data entry and ensures consistent issue creation across the organization.
4. Assign the ServiceNow Incident
- Use the Assignee dropdown to select the ServiceNow user responsible for the incident.
- Assigning the issue during creation ensures the development team receives it immediately with clear ownership.
5. Save the ServiceNow Incidents
- After completing all required fields, click Save.
- ADL Connect creates the ServiceNow Incident in real time.
- The generated ServiceNow Incidents ID is displayed directly within Salesforce.
The ServiceNow Incident ID serves as the permanent reference for synchronization between Salesforce and ServiceNow.
Verifying the ServiceNow Incident
6. Open and Review the Created Incident
- Click the ServiceNow Sys ID displayed in Salesforce.
- The Jira issue opens in a new browser tab.
Verify that:
- The issue is assigned to the correct ServiceNow user
- The Salesforce Record ID appears in the custom ServiceNow field created for integration
- All mapped fields are populated correctly
This confirms that outbound synchronization from Salesforce to ServiceNow is functioning as expected.
Updating ServiceNow Incident from Salesforce
7. Modify ServiceNow Fields Directly in Salesforce
- In the ADL ServiceNow Details component, update fields such as:
- Short Description
- Description.
- Priority or other mapped fields
- Click Save to push the updates to ServiceNow.
ADL Connect immediately sends these updates based on the configured field mappings and synchronization rules.
8. Validate Changes in ServiceNow
- Open the ServiceNow incident.
- Confirm that updates are reflected correctly.
This verifies that outbound updates from Salesforce are working as intended.
Receiving ServiceNow Updates in Salesforce
9. Confirm Inbound Synchronization Behaviour
- In ServiceNow, update the issue (for example, change the short Description or another mapped field).
- Return to Salesforce and refresh the record.
- Confirm that the updated values appear in the ADL ServiceNow Details component.
This validates that inbound synchronization from ServiceNow to Salesforce is enabled and functioning.
Summary
By using the ADL ServiceNow Details component, Salesforce users can:
- Create ServiceNow incidents directly from Salesforce Cases
- Assign incidents to ServiceNow team members at creation time
- Update incidents details bidirectionally
- Maintain real-time visibility into ServiceNow progress
- Eliminate duplicate data entry across platforms
This functionality significantly streamlines communication and execution between Salesforce teams and ServiceNow development teams, ensuring faster issue resolution and better cross-team alignment.
Creating ServiceNow Comments In Salesforce
Configuring the Case Page Layout for ServiceNow Comments
Before working with Jira comments, the ADL ServiceNow Comments component must be added to the Salesforce record page.
1. Add the ADL ServiceNow Comments Component to the Page
- Open any Salesforce record (typically a Case).
- Click Edit Page to open the Lightning App Builder.
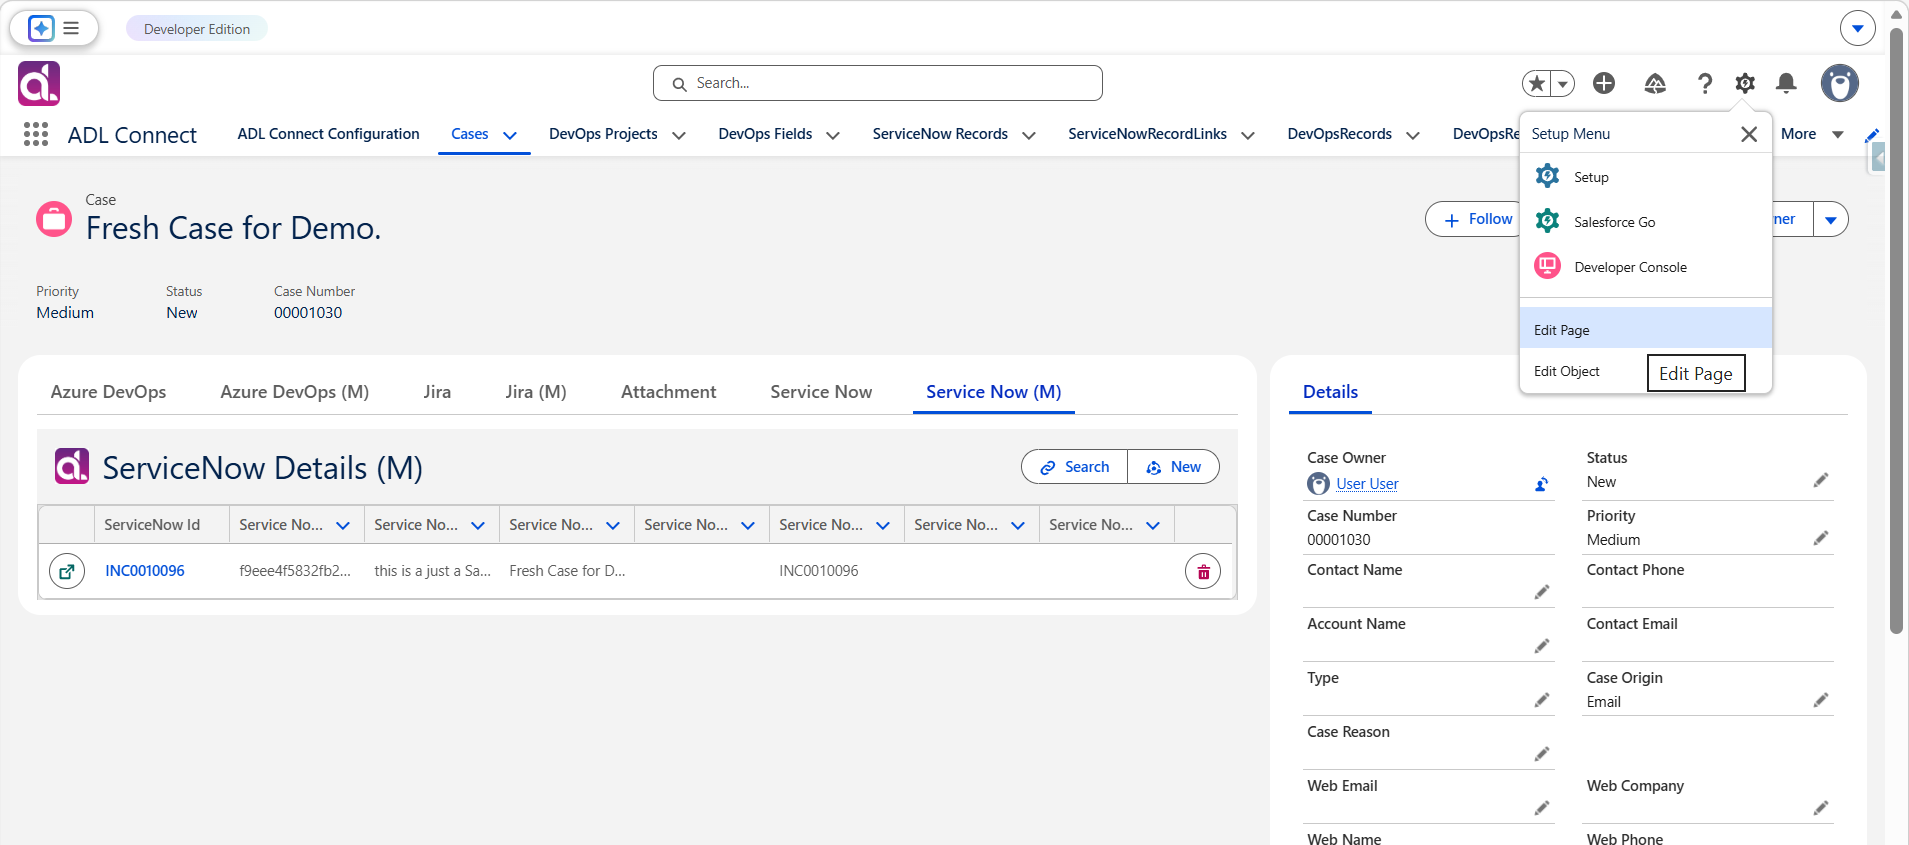
- Scroll to Custom – Managed Components.
- Locate the ADL ServieNow Comments component.
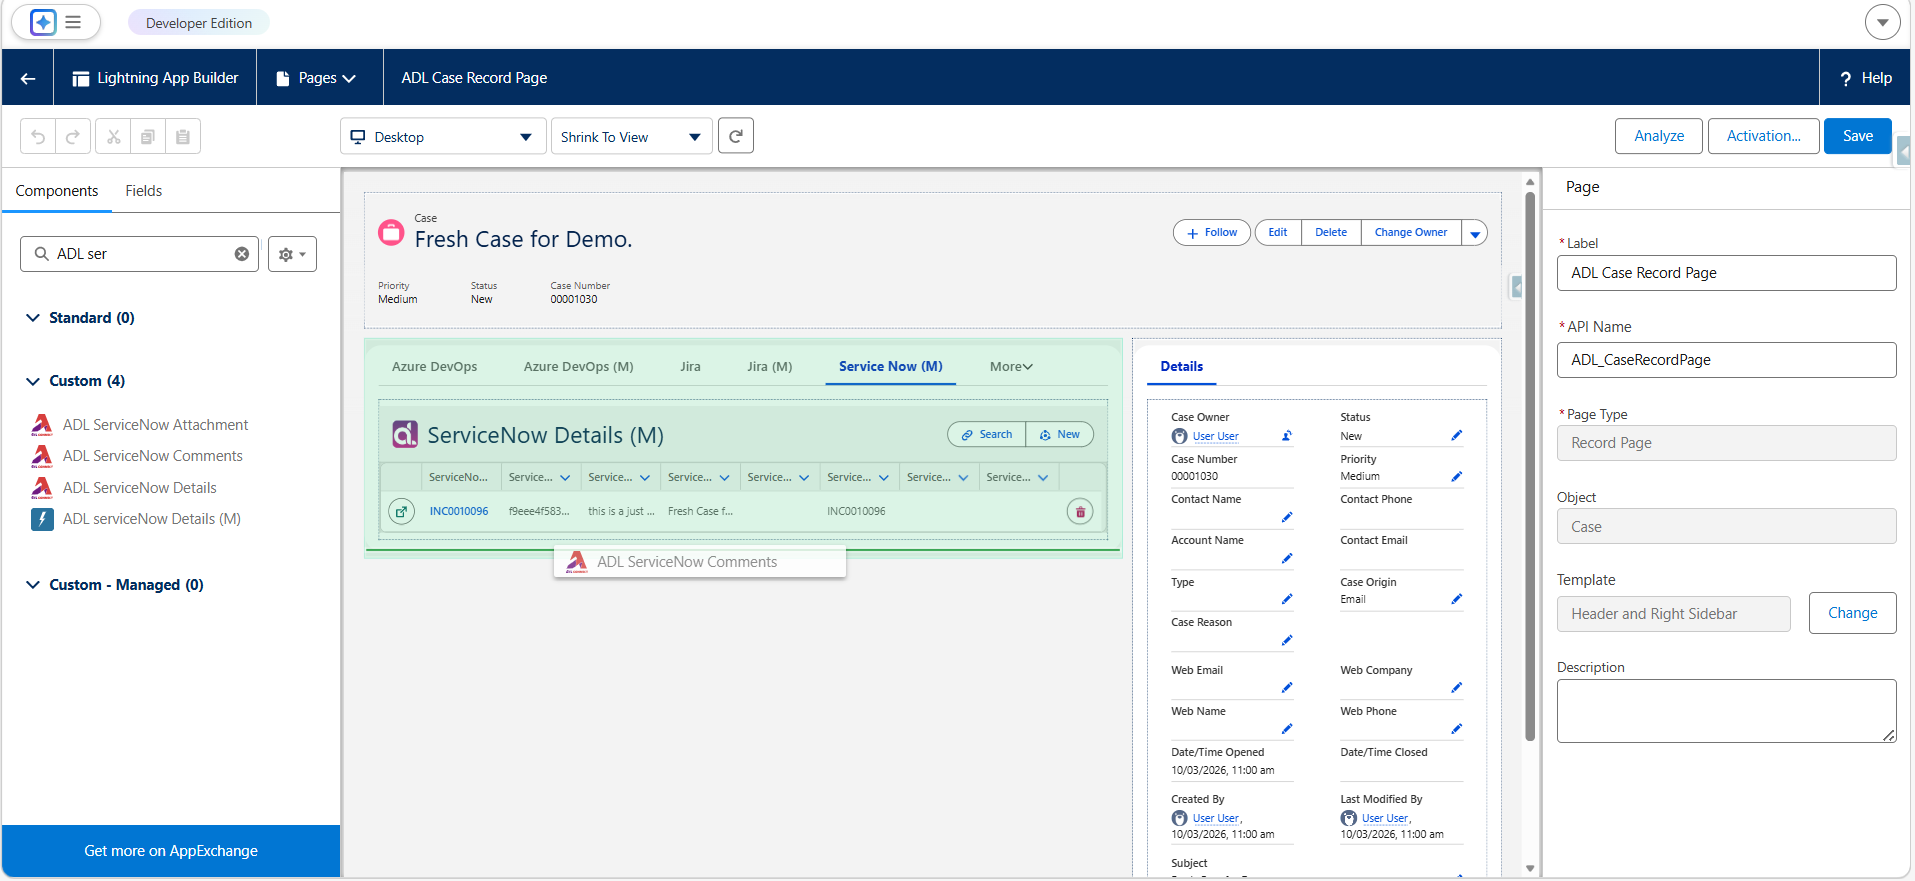
- Drag and drop the component into the desired location on the page layout.
- Click Save and Activate the page for the required apps or profiles.
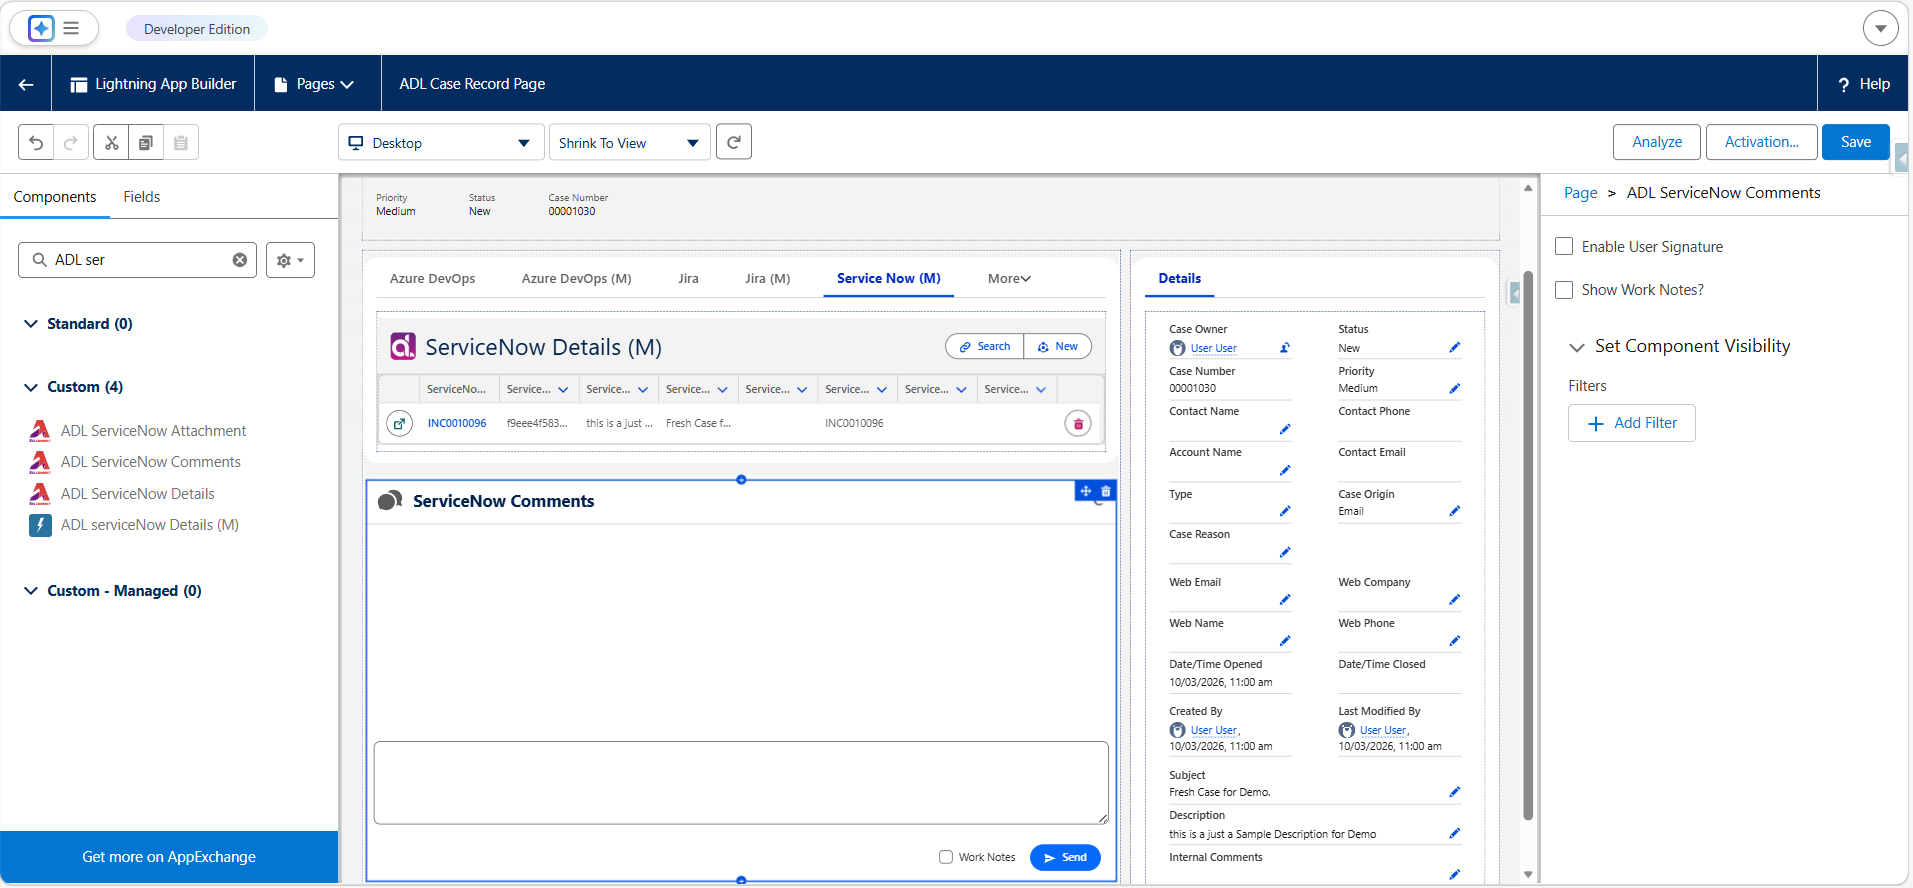
The record page is now configured to display and manage ServiceNow comments.
Adding and Editing ServiceNow Comments from Salesforce
2. Post a Comment to a ServiceNow Incident from Salesforce
- Navigate to the Salesforce record where the ADL ServiceNow Comments component is available.
- Enter your message in the comment input area.
- Click Send to post the comment to ServiceNow.
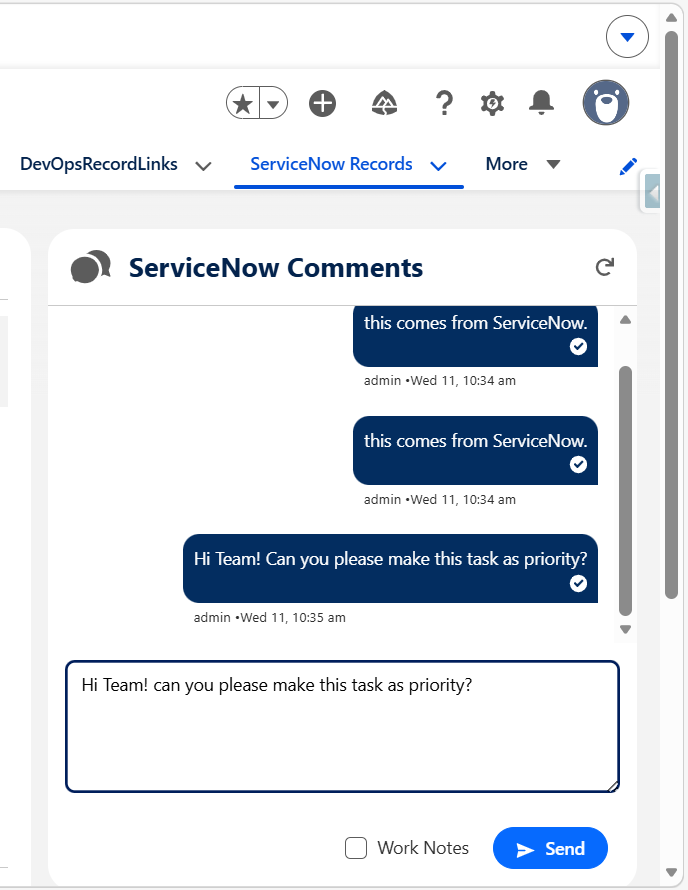
Once submitted:
- The comment is added to the linked ServieNow incident.
- The comment becomes immediately visible to ServieNow users.
3. Edit Existing Comments (If Required)
- Locate the comment you want to update within the Salesforce component.
- Click the Edit option.
- Modify the comment content and save the changes.
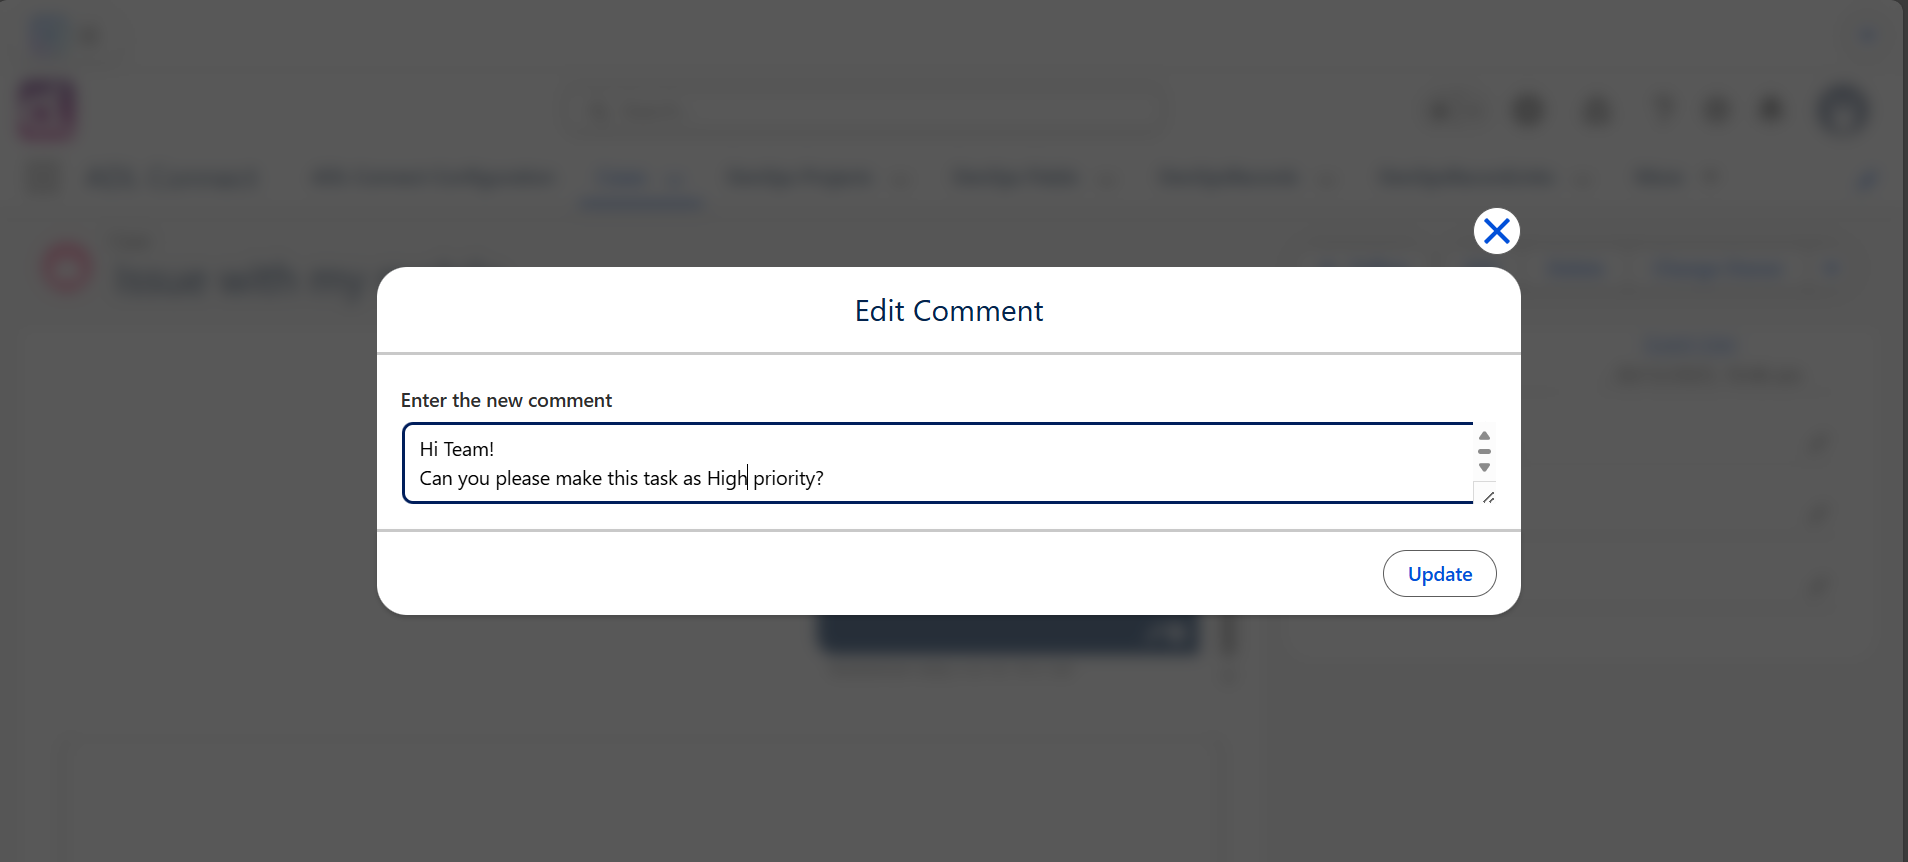
The updated comment is synchronized back to ServiceNow , ensuring both systems reflect the latest version.
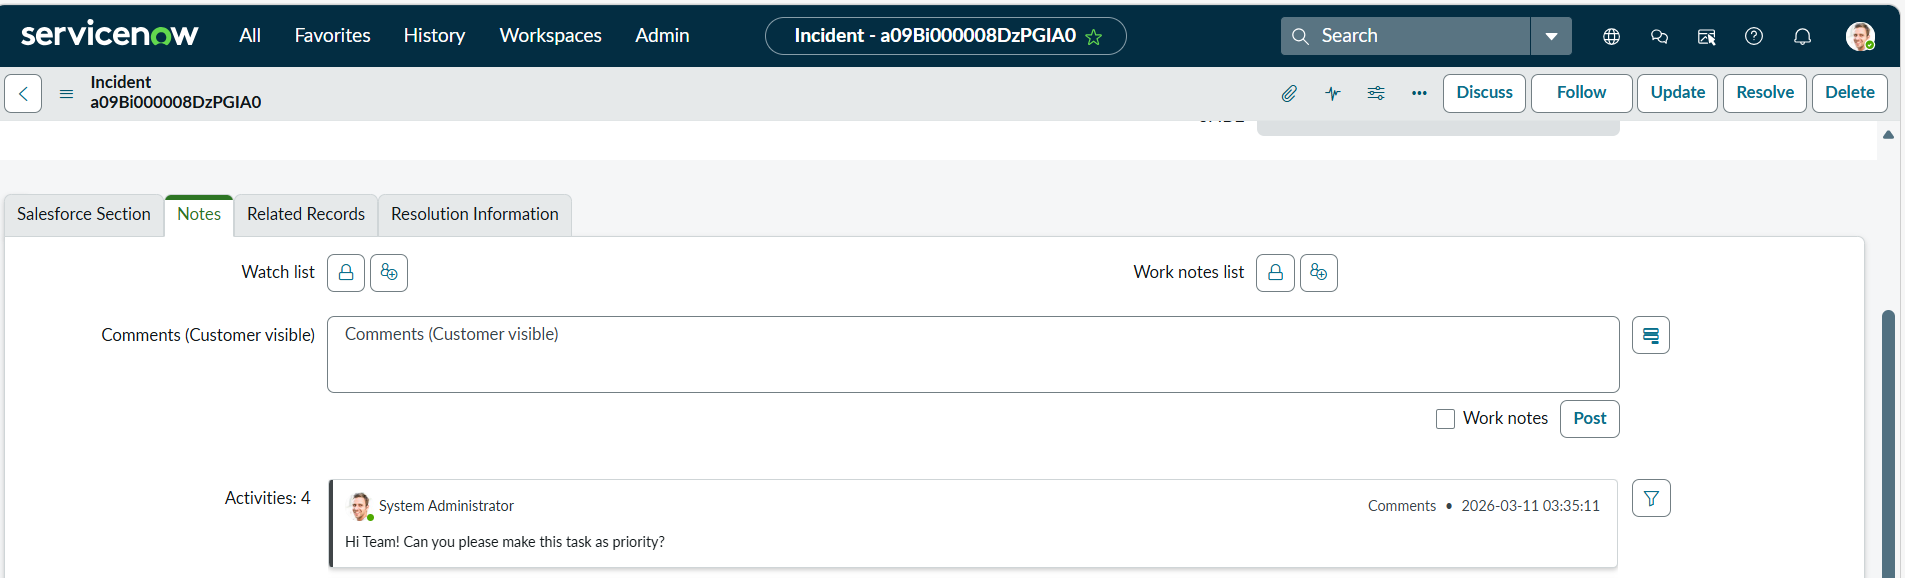
Verifying Comment Synchronization in ServiceNow
4. Confirm Updates in ServiceNow
- Open the corresponding ServiceNow incident.
- Navigate to the Comments section.
- Verify that the newly added or edited comment from Salesforce is visible.
This confirms that Salesforce → ServiceNow comment synchronization is working correctly.
Receiving Comments from ServiceNow into Salesforce
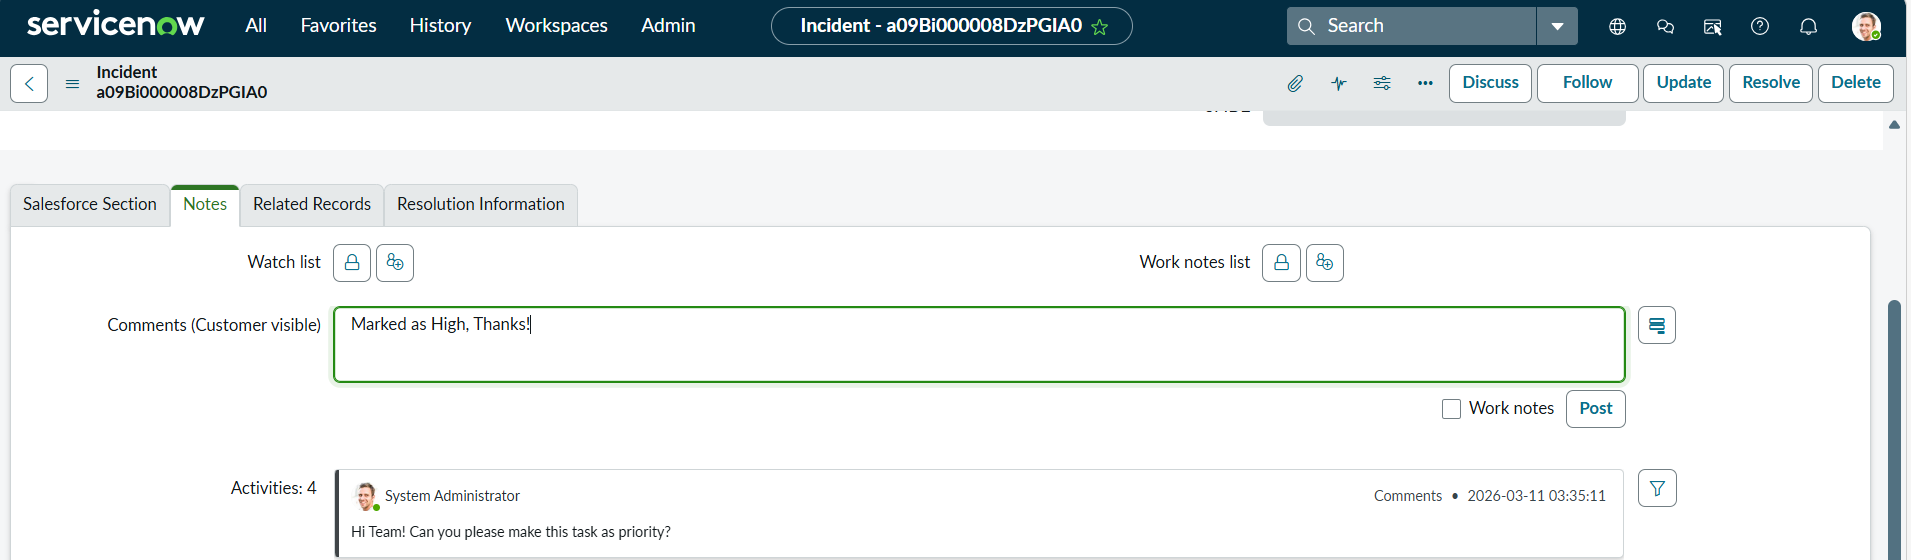
5. Add a Comment in ServiceNow
- Open the ServiceNow incident linked to the Salesforce record.
- Add a new comment in the ServiceNow comments section.
- Save the comment.
6. Refresh Salesforce to View ServiceNow Comments
- Return to the Salesforce record.
- Refresh the page.
- Confirm that the new comment from Jira appears in the ADL ServiceNow Comments component.
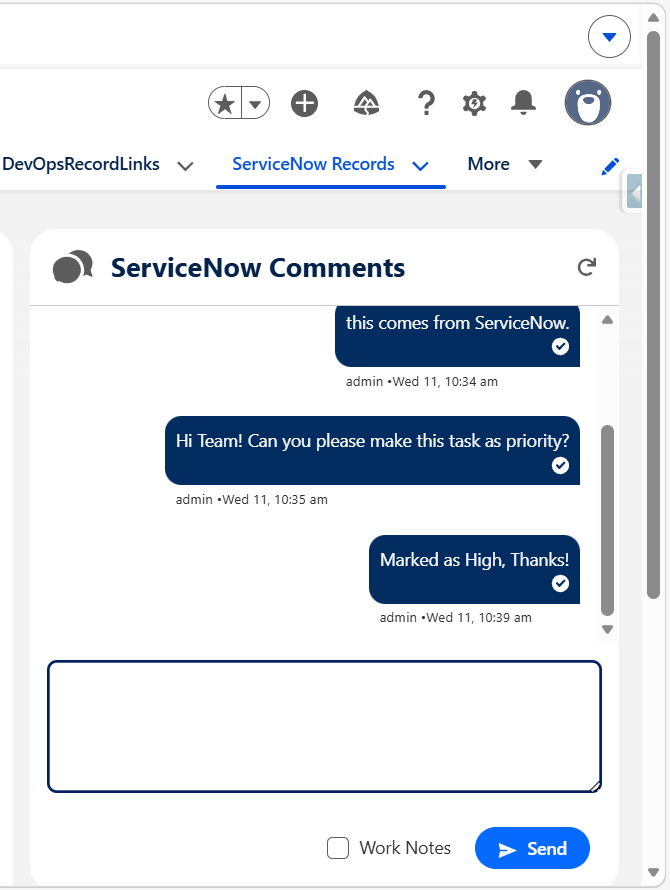
This validates ServiceNow → Salesforce inbound comment synchronization.
Summary
With the ADL ServiceNow Comments component, teams can:
- Read ServiceNow comments directly from Salesforce
- Post and edit comments without switching applications
- Maintain synchronized conversations across Salesforce and ServiceNow
- Improve collaboration between customer-facing and development teams
This capability ensures transparent, real-time communication while keeping Salesforce as the central workspace.
Configuring the Case Page Layout for ServiceNow Comments
Before working with Jira comments, the ADL ServiceNow Comments component must be added to the Salesforce record page.
1. Add the ADL ServiceNow Comments Component to the Page
- Open any Salesforce record (typically a Case).
- Click Edit Page to open the Lightning App Builder.
- Scroll to Custom – Managed Components.
- Locate the ADL ServieNow Comments component.
- Drag and drop the component into the desired location on the page layout.
- Click Save and Activate the page for the required apps or profiles.
The record page is now configured to display and manage ServiceNow comments.
Adding and Editing ServiceNow Comments from Salesforce
2. Post a Comment to a ServiceNow Incident from Salesforce
- Navigate to the Salesforce record where the ADL ServiceNow Comments component is available.
- Enter your message in the comment input area.
- Click Send to post the comment to ServiceNow.
Once submitted:
- The comment is added to the linked ServieNow incident.
- The comment becomes immediately visible to ServieNow users.
3. Edit Existing Comments (If Required)
- Locate the comment you want to update within the Salesforce component.
- Click the Edit option.
- Modify the comment content and save the changes.
The updated comment is synchronized back to ServiceNow , ensuring both systems reflect the latest version.
Verifying Comment Synchronization in ServiceNow
4. Confirm Updates in ServiceNow
- Open the corresponding ServiceNow incident.
- Navigate to the Comments section.
- Verify that the newly added or edited comment from Salesforce is visible.
This confirms that Salesforce → ServiceNow comment synchronization is working correctly.
Receiving Comments from ServiceNow into Salesforce
5. Add a Comment in ServiceNow
- Open the ServiceNow incident linked to the Salesforce record.
- Add a new comment in the ServiceNow comments section.
- Save the comment.
6. Refresh Salesforce to View ServiceNow Comments
- Return to the Salesforce record.
- Refresh the page.
- Confirm that the new comment from Jira appears in the ADL ServiceNow Comments component.
This validates ServiceNow → Salesforce inbound comment synchronization.
Summary
With the ADL ServiceNow Comments component, teams can:
- Read ServiceNow comments directly from Salesforce
- Post and edit comments without switching applications
- Maintain synchronized conversations across Salesforce and ServiceNow
- Improve collaboration between customer-facing and development teams
This capability ensures transparent, real-time communication while keeping Salesforce as the central workspace.
Creating ServiceNow Attachments In Salesforce
Managing ServiceNow Attachments from Salesforce
ADL Connect enables Salesforce users to view, preview, and upload ServiceNow attachments directly from Salesforce records. This functionality gives customer-facing teams full visibility into ServiceNow incident context and allows them to contribute files without switching systems.
Attachments uploaded from Salesforce synchronize instantly to ServiceNow, and existing ServiceNow attachments are displayed within the Salesforce interface.
Configuring the Salesforce Page Layout for ServiceNow Attachments
Before viewing or uploading attachments, the ADL ServiceNow Attachments component must be added to the Salesforce record page.
1. Add the ADL ServiceNow Attachments Component
- Open the Salesforce record linked to the ServiceNow incident(for example, a Case).
- Click Edit Page to open the Lightning App Builder.
- Scroll to Custom – Managed Components.
- Locate the ADL ServiceNow Attachments component.
- Drag and drop the component into the desired area of the page layout.
- Click Save and Activate the page.
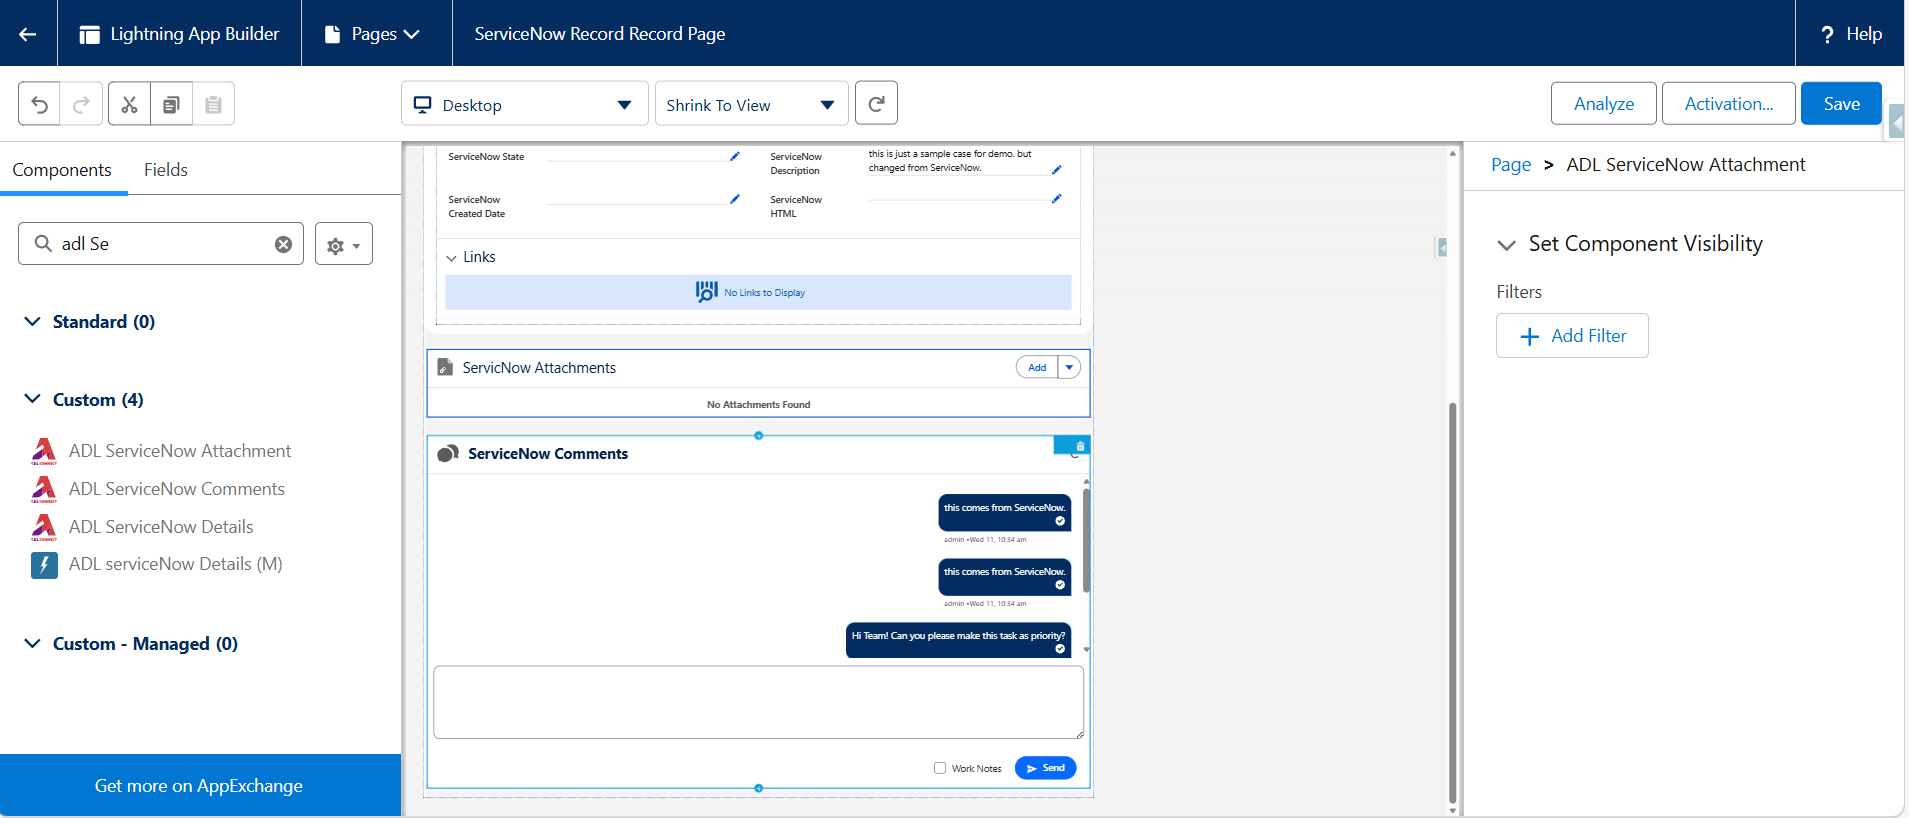
Once added, the component displays all attachments associated with the linked ServiceNow incident.
Viewing ServiceNow Attachments in Salesforce
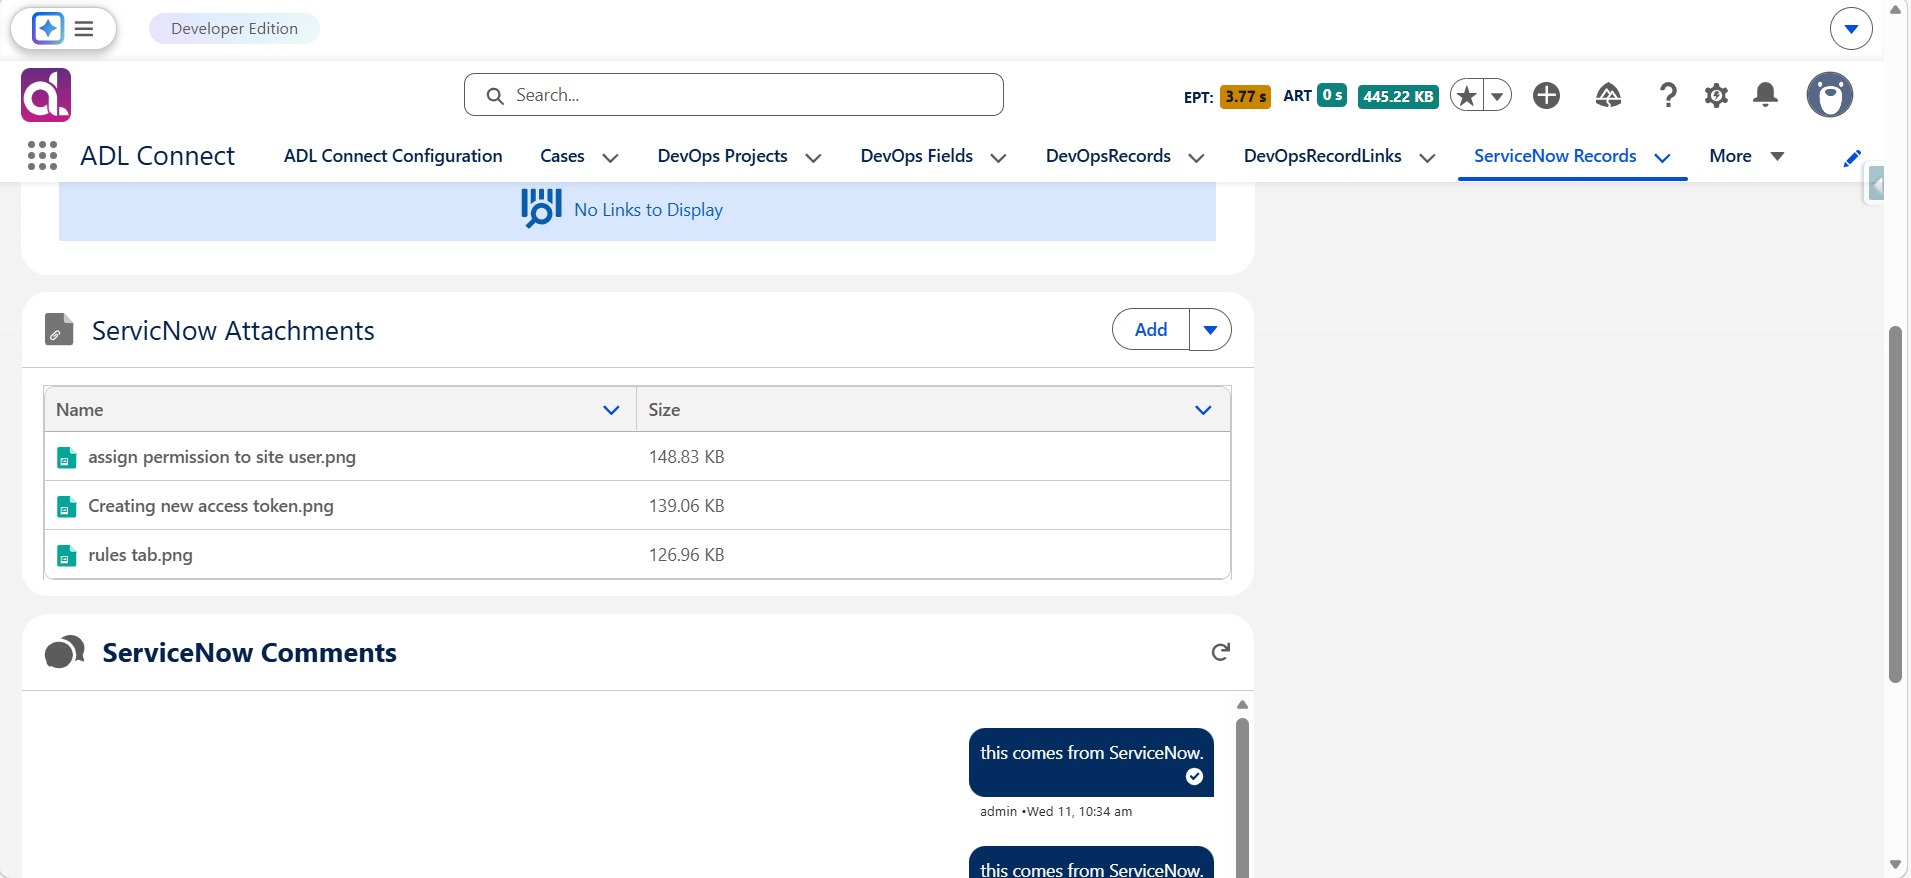
2. View or Preview Existing ServiceNow Attachments
- Navigate to the updated Salesforce record.
- In the ADL ServiceNow Attachments component, review the list of attachments retrieved from ServiceNow.
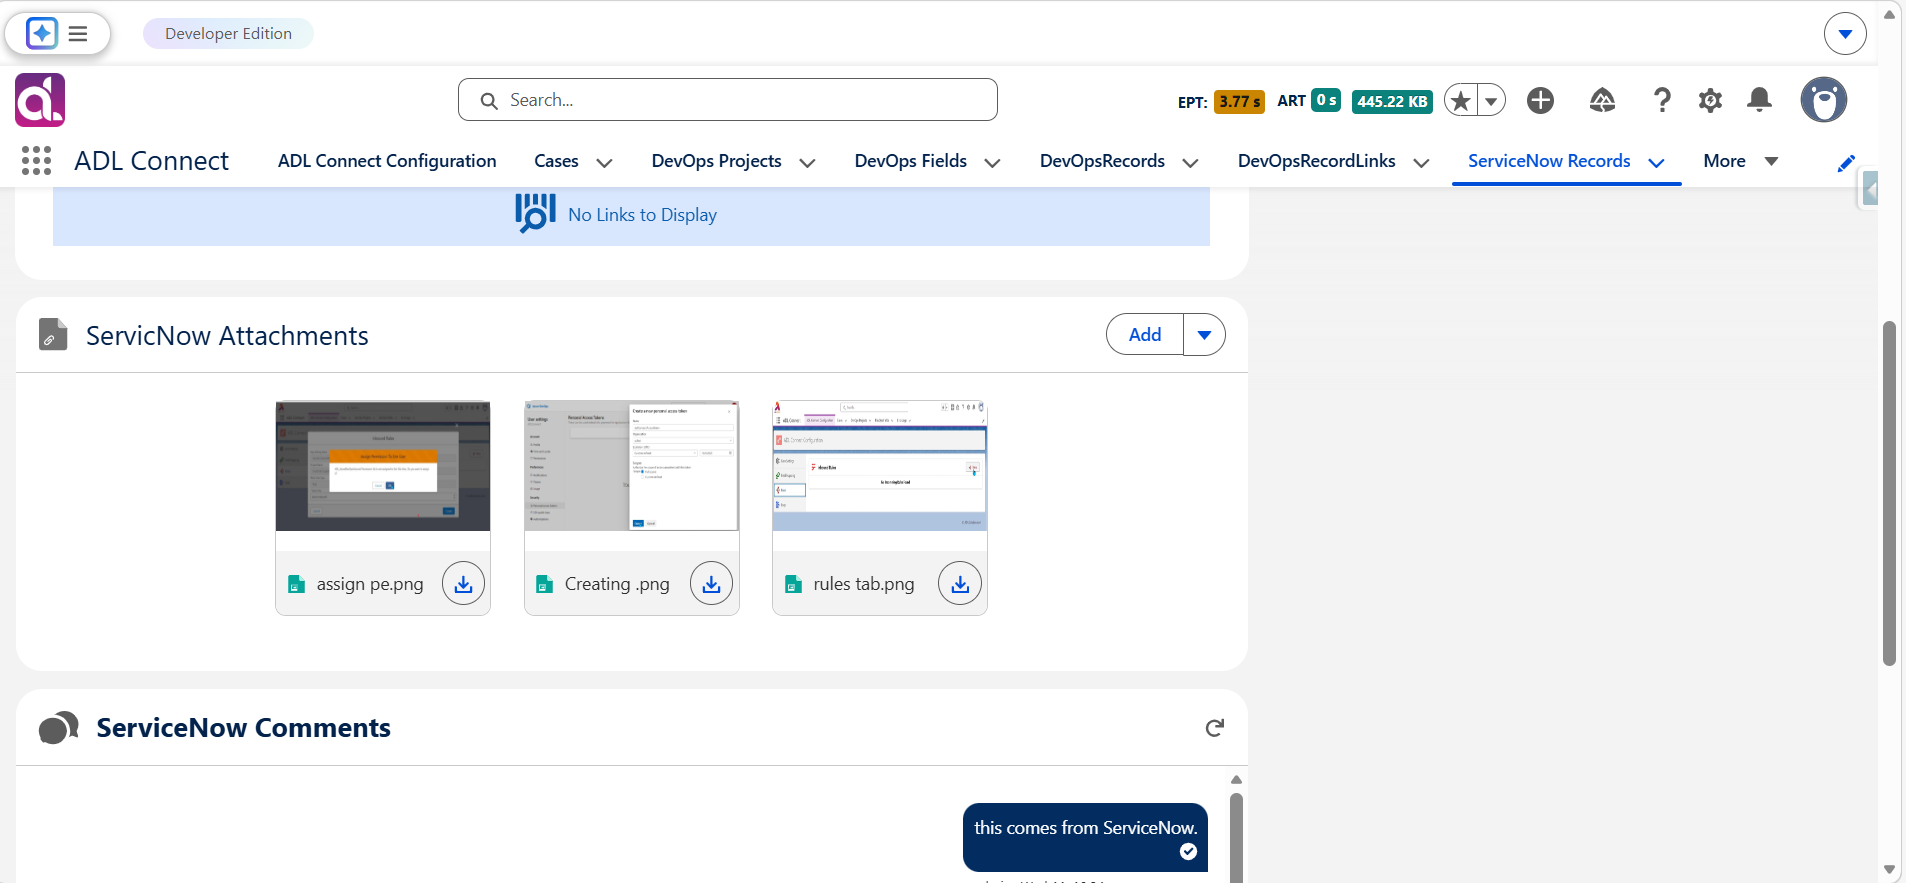
- Optionally switch the display format to Tile View.
- Tile View allows image previews without downloading files.
- Click any attachment to preview it or download it directly from Salesforce.
Tile View is especially useful for image-heavy files such as screenshots, diagrams, and UX mock-up's.
Uploading Attachments to ServiceNow from Salesforce
3. Upload New Attachments from Salesforce
- In the ADL ServiceNow Attachments component, click Add or Upload Attachments.
- Select one or more files from your device.
- Confirm the upload.
The selected files are immediately uploaded to ServiceNow and associated with the Incident.
4. Verify the Upload in ServiceNow
- Open the corresponding ServiceNow incident.
- Click the Attachments section that looks like a paper clip and located to the right side of the gray navigation bar.
- Confirm that the files uploaded from Salesforce are visible and accessible.
This verifies that Salesforce → ServiceNow attachment synchronization is functioning correctly.
Summary
By using the ADL ServiceNow Attachments component, Salesforce users can:
- View all ServiceNow attachments directly within Salesforce
- Preview images using Tile View without downloading
- Upload new files from Salesforce into ServiceNow
- Maintain complete context for customer cases and development tasks
This capability significantly reduces context switching and improves collaboration between Support and Engineering teams by keeping Salesforce as the central workspace.
Managing ServiceNow Attachments from Salesforce
ADL Connect enables Salesforce users to view, preview, and upload ServiceNow attachments directly from Salesforce records. This functionality gives customer-facing teams full visibility into ServiceNow incident context and allows them to contribute files without switching systems.
Attachments uploaded from Salesforce synchronize instantly to ServiceNow, and existing ServiceNow attachments are displayed within the Salesforce interface.
Configuring the Salesforce Page Layout for ServiceNow Attachments
Before viewing or uploading attachments, the ADL ServiceNow Attachments component must be added to the Salesforce record page.
1. Add the ADL ServiceNow Attachments Component
- Open the Salesforce record linked to the ServiceNow incident(for example, a Case).
- Click Edit Page to open the Lightning App Builder.
- Scroll to Custom – Managed Components.
- Locate the ADL ServiceNow Attachments component.
- Drag and drop the component into the desired area of the page layout.
- Click Save and Activate the page.
Once added, the component displays all attachments associated with the linked ServiceNow incident.
Viewing ServiceNow Attachments in Salesforce
2. View or Preview Existing ServiceNow Attachments
- Navigate to the updated Salesforce record.
- In the ADL ServiceNow Attachments component, review the list of attachments retrieved from ServiceNow.
- Optionally switch the display format to Tile View.
- Tile View allows image previews without downloading files.
- Click any attachment to preview it or download it directly from Salesforce.
Tile View is especially useful for image-heavy files such as screenshots, diagrams, and UX mock-up's.
Uploading Attachments to ServiceNow from Salesforce
3. Upload New Attachments from Salesforce
- In the ADL ServiceNow Attachments component, click Add or Upload Attachments.
- Select one or more files from your device.
- Confirm the upload.
The selected files are immediately uploaded to ServiceNow and associated with the Incident.
4. Verify the Upload in ServiceNow
- Open the corresponding ServiceNow incident.
- Click the Attachments section that looks like a paper clip and located to the right side of the gray navigation bar.
- Confirm that the files uploaded from Salesforce are visible and accessible.
This verifies that Salesforce → ServiceNow attachment synchronization is functioning correctly.
Summary
By using the ADL ServiceNow Attachments component, Salesforce users can:
- View all ServiceNow attachments directly within Salesforce
- Preview images using Tile View without downloading
- Upload new files from Salesforce into ServiceNow
- Maintain complete context for customer cases and development tasks
This capability significantly reduces context switching and improves collaboration between Support and Engineering teams by keeping Salesforce as the central workspace.
Frequently Asked Questions (FAQ)
General Overview
Q1: What is ADL Connect and what problem does it solve?
A:
ADL Connect is a bidirectional integration tool that synchronizes Salesforce records with ServiceNow issues. It eliminates duplicate data entry, improves collaboration between support and development teams, and provides real-time visibility into issue progress—without requiring users to switch systems.
Q2: Which ServiceNow versions does ADL Connect support?
A:
ADL Connect supports the following ServiceNow versions:
- Xanadu
- Zurich
- Yokohama
Q3: Can I try ADL Connect before purchasing a license?
A:
Yes. ADL Connect offers a free 30-day trial via the Salesforce AppExchange, allowing you to evaluate all features before purchasing.
Setup & Configuration
Q4: Do I need admin permissions to configure ADL Connect?
A:
Yes.
- Salesforce: System Administrator permissions are required to install the package, configure Lightning pages, set up Salesforce Sites, and manage field-level security.
- ServiceNow: Administrator permissions are required to create custom fields and generate API tokens.
Q5: Why do I need to create a custom ServiceNow field for Salesforce record IDs?
A:
ADL Connect requires a custom String field in ServiceNow to store the Salesforce record ID. This enables the connector to:
- Link ServiceNow incidents back to Salesforce records
- Maintain reliable bidirectional synchronization
- Prevent duplicate or broken issue relationships
Without this field, linking and synchronization will not function correctly.
Q6: How do I authenticate Salesforce and ServiceNow?
A:
Authentication is performed using:
- ServiceNow username
- ServiceNow Password
The Username and Password were generated when the ServiceNow Instance Created.
Q7: What Salesforce objects can be synced with ServiceNow incidents?
A:
ADL Connect supports:
- Standard objects (e.g., Case, Opportunity, Account)
- Custom objects created in your Salesforce org
Any compatible Salesforce field can be mapped to a ServiceNow field, provided the data types are supported.
Q8: What is a Project Mapping and why is it required?
A:
A Project Mapping defines:
- Which Salesforce object maps to which Jira project
- Which ServiceNow incident type is created
- Which ServiceNow custom field stores the Salesforce record ID
It is the foundation for field mappings and synchronization logic.
Synchronization Behavior
Q9: What sync directions are supported?
A:
ADL Connect supports:
- Salesforce → ServiceNow (Outbound)
- ServiceNow → Salesforce (Inbound)
- Bidirectional synchronization
Sync direction is configurable at the field level.
Q10: How often does data synchronization occur?
A:
Synchronization is near real-time:
- Outbound sync occurs immediately when records are saved in Salesforce
- Inbound sync occurs when ServiceNow sends webhook events to Salesforce via the configured Salesforce Site
Q11: Can I choose which fields sync between Salesforce and ServiceNow?
A:
Yes. Field-level mapping allows you to control:
- Which Salesforce field maps to which ServiceNow field
- The sync direction
- Whether the field is required, optional, or read-only
Q12: Are comments and attachments synchronized?
A:
Yes.
- Comments synchronize bidirectionally (Salesforce ↔ ServiceNow )
- Attachments can be viewed, uploaded, and downloaded directly from Salesforce
Q13: How does ADL Connect prevent accidental data overwrites?
A:
Each field mapping specifies a sync direction. This allows you to define which system is the source of truth for each field, preventing unintended overwrites.
Usage Questions
Q14: Can Salesforce users create ServiceNow incidents without ServiceNow licenses?
A:
Yes. Salesforce users do not require ServiceNow licenses to create or update ServiceNow incidents through ADL Connect. ServiceNow licensing affects visibility and permissions within ServiceNow only.
Q15: Can I edit ServiceNow incident directly from Salesforce?
A:
Yes. Using the ADL ServiceNow Details component, users can update:
- Status
- Descritption
- Assignee
- Any mapped fields
All updates synchronize to ServiceNow in real time.
Troubleshooting
Q16: I can’t see some Salesforce fields in the ServiceNow Details component. What should I check?
A:
Verify that:
- The field is added to the page layout
- The field is included on the Lightning Record Page
- Field-Level Security allows visibility
- The field is included in Project Mapping and Field Mapping
Q19: Inbound synchronization is not working. What should I check first?
A:
Verify the following:
- Salesforce Site domain is registered
- Correct Subdomain Prefix ID is used
- Guest User Profile permissions are configured correctly
- ServiceNow webhook points to the correct Site endpoint
- Inbound Rule is saved and mapped to the correct project
Q20: Why are ServiceNow comments not appearing in Salesforce?
A:
Common causes include:
- ServiceNow webhook not configured
- Missing inbound permissions
- ADL ServiceNow Comments component not added to the page
- Incorrect project or field mapping
Q21: Why does the ServiceNow Issue ID not appear after issue creation?
A:
Check whether:
- API token authentication is valid
- Project Mapping is correctly configured
- The Salesforce record is saved before issue creation
- The ServiceNow custom field for Salesforce ID exists and is mapped
Q22: Attachments are not appearing in Salesforce. What should I do?
A:
Ensure that:
- ADL ServiceNow Attachments component is added to the page
- Salesforce Site Guest User has read access to attachment fields
- ServiceNow permissions allow attachment access via API
Security & Access
Q23: How secure is Salesforce–ServiceNow authentication?
A:
Authentication uses Password and HTTPS endpoints. No ServiceNow passwords are stored in Salesforce. Passwords can be changed at any time from ServiceNow.
Q24: Does the Salesforce Site Guest User pose a security risk?
A:
No, when configured correctly. Ensure that:
- Only required permissions are granted
- Object and field access is minimized
- Sharing rules restrict sensitive records
ADL Connect only accesses fields required for inbound synchronization.
Q25: Can I restrict who can create ServiceNow incident from Salesforce?
A:
Yes. Access can be controlled using:
- Profiles
- Permission sets
- Lightning page visibility rules
Licensing & Maintenance
Q26: Do all Salesforce users require a license to use ADL Connect?
A:
Only users who interact with ADL Connect components require licenses. Administrators configuring the integration also require licenses.
Q27: What happens if my license expires?
A:
Synchronization and issue creation are disabled until the license is renewed. Existing configurations and integrated data are preserved.
Q28: How often are updates released?
A:
Updates are delivered periodically through the Salesforce AppExchange. Administrators are notified when new versions are available.
General Overview
Q1: What is ADL Connect and what problem does it solve?
A:
ADL Connect is a bidirectional integration tool that synchronizes Salesforce records with ServiceNow issues. It eliminates duplicate data entry, improves collaboration between support and development teams, and provides real-time visibility into issue progress—without requiring users to switch systems.
Q2: Which ServiceNow versions does ADL Connect support?
A:
ADL Connect supports the following ServiceNow versions:
- Xanadu
- Zurich
- Yokohama
Q3: Can I try ADL Connect before purchasing a license?
A:
Yes. ADL Connect offers a free 30-day trial via the Salesforce AppExchange, allowing you to evaluate all features before purchasing.
Setup & Configuration
Q4: Do I need admin permissions to configure ADL Connect?
A:
Yes.
- Salesforce: System Administrator permissions are required to install the package, configure Lightning pages, set up Salesforce Sites, and manage field-level security.
- ServiceNow: Administrator permissions are required to create custom fields and generate API tokens.
Q5: Why do I need to create a custom ServiceNow field for Salesforce record IDs?
A:
ADL Connect requires a custom String field in ServiceNow to store the Salesforce record ID. This enables the connector to:
- Link ServiceNow incidents back to Salesforce records
- Maintain reliable bidirectional synchronization
- Prevent duplicate or broken issue relationships
Without this field, linking and synchronization will not function correctly.
Q6: How do I authenticate Salesforce and ServiceNow?
A:
Authentication is performed using:
- ServiceNow username
- ServiceNow Password
The Username and Password were generated when the ServiceNow Instance Created.
Q7: What Salesforce objects can be synced with ServiceNow incidents?
A:
ADL Connect supports:
- Standard objects (e.g., Case, Opportunity, Account)
- Custom objects created in your Salesforce org
Any compatible Salesforce field can be mapped to a ServiceNow field, provided the data types are supported.
Q8: What is a Project Mapping and why is it required?
A:
A Project Mapping defines:
- Which Salesforce object maps to which Jira project
- Which ServiceNow incident type is created
- Which ServiceNow custom field stores the Salesforce record ID
It is the foundation for field mappings and synchronization logic.
Synchronization Behavior
Q9: What sync directions are supported?
A:
ADL Connect supports:
- Salesforce → ServiceNow (Outbound)
- ServiceNow → Salesforce (Inbound)
- Bidirectional synchronization
Sync direction is configurable at the field level.
Q10: How often does data synchronization occur?
A:
Synchronization is near real-time:
- Outbound sync occurs immediately when records are saved in Salesforce
- Inbound sync occurs when ServiceNow sends webhook events to Salesforce via the configured Salesforce Site
Q11: Can I choose which fields sync between Salesforce and ServiceNow?
A:
Yes. Field-level mapping allows you to control:
- Which Salesforce field maps to which ServiceNow field
- The sync direction
- Whether the field is required, optional, or read-only
Q12: Are comments and attachments synchronized?
A:
Yes.
- Comments synchronize bidirectionally (Salesforce ↔ ServiceNow )
- Attachments can be viewed, uploaded, and downloaded directly from Salesforce
Q13: How does ADL Connect prevent accidental data overwrites?
A:
Each field mapping specifies a sync direction. This allows you to define which system is the source of truth for each field, preventing unintended overwrites.
Usage Questions
Q14: Can Salesforce users create ServiceNow incidents without ServiceNow licenses?
A:
Yes. Salesforce users do not require ServiceNow licenses to create or update ServiceNow incidents through ADL Connect. ServiceNow licensing affects visibility and permissions within ServiceNow only.
Q15: Can I edit ServiceNow incident directly from Salesforce?
A:
Yes. Using the ADL ServiceNow Details component, users can update:
- Status
- Descritption
- Assignee
- Any mapped fields
All updates synchronize to ServiceNow in real time.
Troubleshooting
Q16: I can’t see some Salesforce fields in the ServiceNow Details component. What should I check?
A:
Verify that:
- The field is added to the page layout
- The field is included on the Lightning Record Page
- Field-Level Security allows visibility
- The field is included in Project Mapping and Field Mapping
Q19: Inbound synchronization is not working. What should I check first?
A:
Verify the following:
- Salesforce Site domain is registered
- Correct Subdomain Prefix ID is used
- Guest User Profile permissions are configured correctly
- ServiceNow webhook points to the correct Site endpoint
- Inbound Rule is saved and mapped to the correct project
Q20: Why are ServiceNow comments not appearing in Salesforce?
A:
Common causes include:
- ServiceNow webhook not configured
- Missing inbound permissions
- ADL ServiceNow Comments component not added to the page
- Incorrect project or field mapping
Q21: Why does the ServiceNow Issue ID not appear after issue creation?
A:
Check whether:
- API token authentication is valid
- Project Mapping is correctly configured
- The Salesforce record is saved before issue creation
- The ServiceNow custom field for Salesforce ID exists and is mapped
Q22: Attachments are not appearing in Salesforce. What should I do?
A:
Ensure that:
- ADL ServiceNow Attachments component is added to the page
- Salesforce Site Guest User has read access to attachment fields
- ServiceNow permissions allow attachment access via API
Security & Access
Q23: How secure is Salesforce–ServiceNow authentication?
A:
Authentication uses Password and HTTPS endpoints. No ServiceNow passwords are stored in Salesforce. Passwords can be changed at any time from ServiceNow.
Q24: Does the Salesforce Site Guest User pose a security risk?
A:
No, when configured correctly. Ensure that:
- Only required permissions are granted
- Object and field access is minimized
- Sharing rules restrict sensitive records
ADL Connect only accesses fields required for inbound synchronization.
Q25: Can I restrict who can create ServiceNow incident from Salesforce?
A:
Yes. Access can be controlled using:
- Profiles
- Permission sets
- Lightning page visibility rules
Licensing & Maintenance
Q26: Do all Salesforce users require a license to use ADL Connect?
A:
Only users who interact with ADL Connect components require licenses. Administrators configuring the integration also require licenses.
Q27: What happens if my license expires?
A:
Synchronization and issue creation are disabled until the license is renewed. Existing configurations and integrated data are preserved.
Q28: How often are updates released?
A:
Updates are delivered periodically through the Salesforce AppExchange. Administrators are notified when new versions are available.